
We noticed you are blocking ads. DO THE TON only works with community supporters. Most are active members of the site with small businesses. Please consider disabling your ad blocking tool and checking out the businesses that help keep our site up and free.
You are using an out of date browser. It may not display this or other websites correctly.
You should upgrade or use an alternative browser.
You should upgrade or use an alternative browser.
Ton up SR250: 100mph, 100kg, 30hp
- Thread starter JadusMotorcycleParts
- Start date
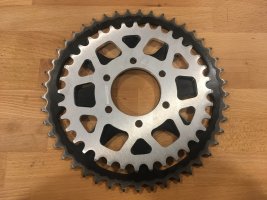
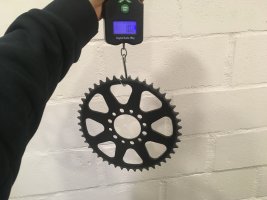
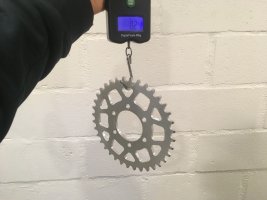
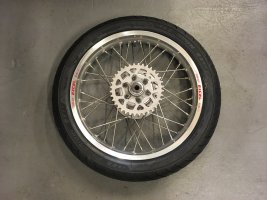
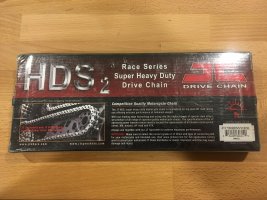
Can highly recommend SuperSprox! What a sweet service! Will def use this in the future. The sprocket came in even lighter than expected - at 240g-ish. Decent weight savings here, especially unsprung mass. Now got the rear wheel assembled and ready to go in the frame. I tracked down a decent lightweight, low friction but strong chain as well - after reading a lot about different types. I like the all silver look  too
too
tooAttachments

Last edited:
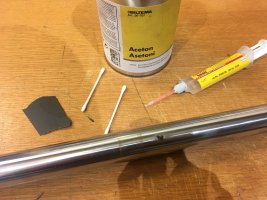
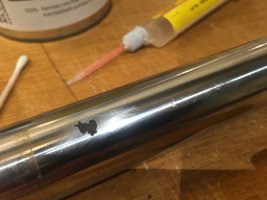
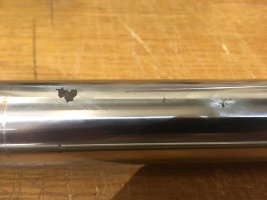
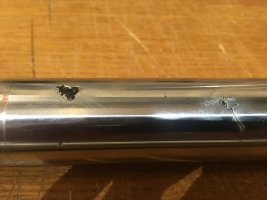
I was lucky that I had two decent fork stanchions for this bike - many old SR250 forks get terrible corrosion. There were no issues in the 'working' area of these, however there were a few small rust spots that I wanted to address. I had seen this fix method somewhere online and decided to give it a go myself.
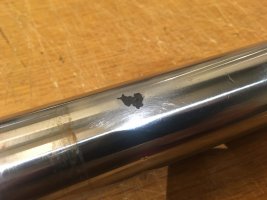
So I sanded back the spots with 400 grit sandpaper, cleaned it with acetone, then filled with a really strong gap filling 2 part epoxy. Then waited for it to harden and sanded it back carefully. It looks like it has worked but I am not certain how long it is going to stay put! Perhaps there is another type of two part epoxy that would have been better suited to this. Oh well, this area of the forks will be covered anyway by the custom headlight brackets - as well as being sealed and water proofed (held in place with orings).
So I sanded back the spots with 400 grit sandpaper, cleaned it with acetone, then filled with a really strong gap filling 2 part epoxy. Then waited for it to harden and sanded it back carefully. It looks like it has worked but I am not certain how long it is going to stay put! Perhaps there is another type of two part epoxy that would have been better suited to this. Oh well, this area of the forks will be covered anyway by the custom headlight brackets - as well as being sealed and water proofed (held in place with orings).
Attachments
That's what I figured! Let's see how it holds up.I've never seen that approach tried before. What the heck, looks like it's worth a try, why not? Good luck w/ it.
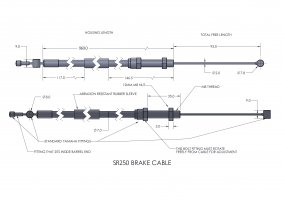
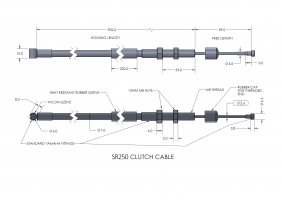
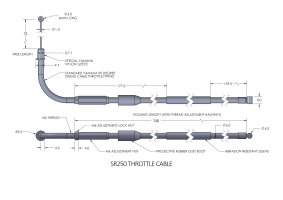
I measured up the lengths required for the new custom cables I will be ordering - to suit both the lower clip on position and the new brake set up. I have created some drawings for these cables to be able to send to Venhill who make them: https://www.venhill.co.uk/
I have attached the drawings here for others to use (PDFs and JPEGs). Just make sure to measure your own lengths and modify the drawing to reflect that - it is just the 'HOUSING LENGTH' dimension that will need to be change, all other dimensions work with the stock carb, brakes and clutch.
I have attached the drawings here for others to use (PDFs and JPEGs). Just make sure to measure your own lengths and modify the drawing to reflect that - it is just the 'HOUSING LENGTH' dimension that will need to be change, all other dimensions work with the stock carb, brakes and clutch.
Attachments
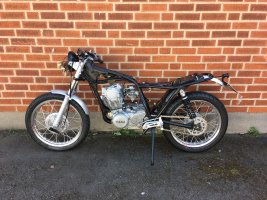
I wasn't satisfied with the slow pace of the project and felt pressure to get it done for the coming riding season... that is already upon us! So I took a few days off work in March to be able to leapfrog a few steps and get back on track. Now I have a rolling chassis and have started working on some of the other details - guards, linkages, electronics etc. I will share a few of those updates in subsequent posts.
This part of the project is really fun - so much planning and thought has gone in to each part, it is nice to finally see it all coming together
This part of the project is really fun - so much planning and thought has gone in to each part, it is nice to finally see it all coming together
Attachments
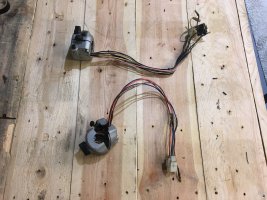
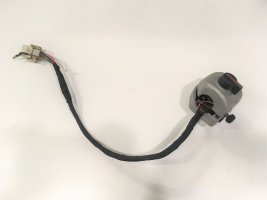
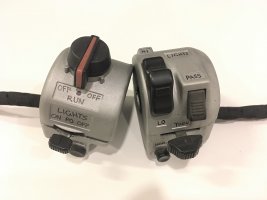
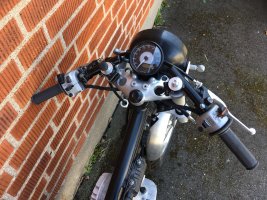
An update on some of the electrics... By removing the electric starter I could also remove the starter relay and safety relay (cuts power to the starter relay in the case that the bike is in gear or clutch not pulled in) and the associated wiring that goes with those components. It will be nice to have a little simpler wiring harness. I was also able to fix the starter button in position and label it 'NOPE' on the bead blasted stock switch blocks I really like these small hand-made touches here and there - so the bike does not look too 'machine'.
I have also shortened the switch block cables (too much wiring in the headlight otherwise) and the speedo cables.
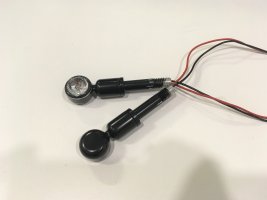
I am glad I ordered two sets of the custom headlight bolts for the mini blinkers because the second set will get used in the rear - picture of that coming soon!
I really like these small hand-made touches here and there - so the bike does not look too 'machine'. I have also shortened the switch block cables (too much wiring in the headlight otherwise) and the speedo cables.
I am glad I ordered two sets of the custom headlight bolts for the mini blinkers because the second set will get used in the rear - picture of that coming soon!
Attachments
-
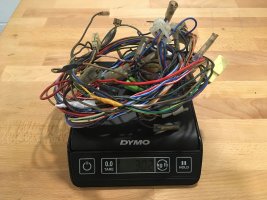 SR250_WireHarnessStock.JPG380.6 KB · Views: 225
 -
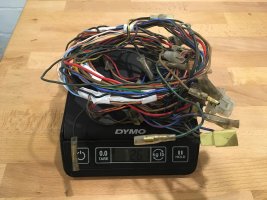 SR250_WireHarnessSimplified.JPG372.3 KB · Views: 216
 -
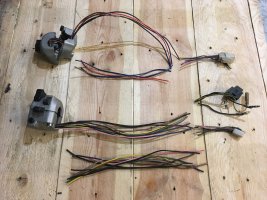 SR250_BlastedSwitches.JPG486.4 KB · Views: 210
 -
 SR250_ShortenedSwitchCables.JPG464 KB · Views: 210
 -
 SR250_BlastedControls.JPG153.8 KB · Views: 251
 -
 SR250_ControlButtons.JPG214.6 KB · Views: 217
 -
 SR250_HeadlightBolts.JPG445.9 KB · Views: 227
 -
 SR250_MiniBlinkers.JPG184.7 KB · Views: 237
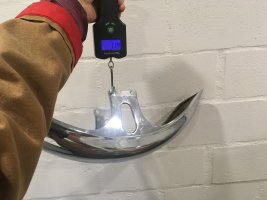
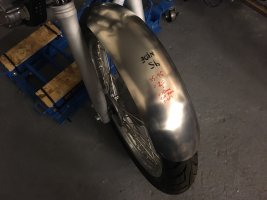
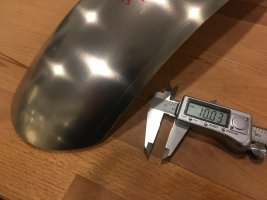
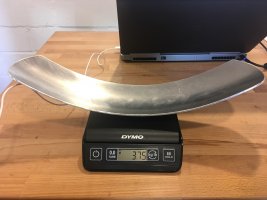
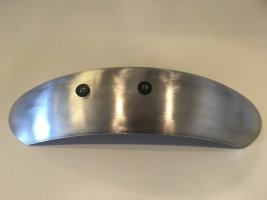
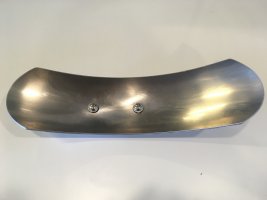
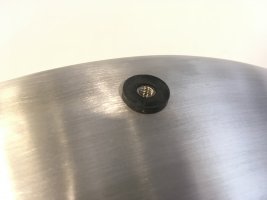
A few more parts taking shape. A trimmed guard - much lighter than stock Grommeted holes in the guards for mounting - vibration damping. And a trimmed and modified speedo bracket - for the new unit.
Grommeted holes in the guards for mounting - vibration damping. And a trimmed and modified speedo bracket - for the new unit.Attachments
-
 SR250_StockFrontGuard.JPG349.1 KB · Views: 218
 -
 SR250_JadusGuard.JPG271.2 KB · Views: 216
 -
 SR250_TrimmingJadusGuard.JPG332.4 KB · Views: 214
 -
 SR250_AlloyGuard.JPG322.1 KB · Views: 205
 -
 SR250_TrimmedJadusGuard1.JPG281.2 KB · Views: 204
 -
 SR250_AlloyRearGuard.JPG162.1 KB · Views: 212
 -
 SR250_AluminiumRearGuard.JPG165.8 KB · Views: 189
 -
 GuardMountRubbers.JPG157.7 KB · Views: 187
 -
 SR250_Speedobracketmod.JPG161.6 KB · Views: 183
 -
 SR250_Speedobracketmod1.JPG188.2 KB · Views: 187
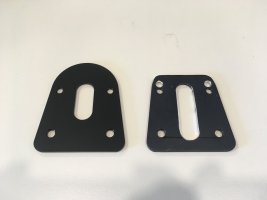
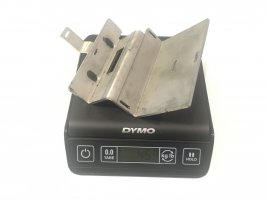
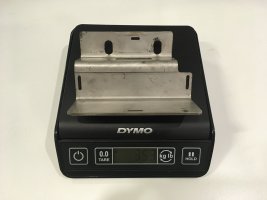
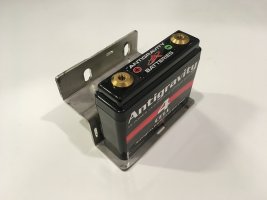
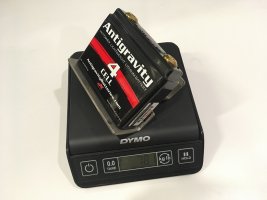
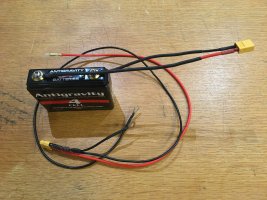
And some more parts taking shape... A trimmed battery tray - I designed the tray so that it could be used with both an 8 cell and 4 cell lithium battery but I had never actually tried it with the 4 cell - always wanting the extra juice for the starter. But now with kickstart only I could try it and it works great. I could also remove the tab for the starter relay - not needing that any more either. I also decided to use some XT60 connectors for the battery - so I can easily disconnect it in case of any parasitic drains that are difficult to find (lithium batteries, as you know, die if drained below a certain voltage - ask anyone how they know hehe). And also to be able to easily connect a charger while the battery is still in place - wiring up an adaptor with a plug to the charger. Together with this I made a small power harness that connects back into the main wire harness. This one has two grounds to be sure - one running to an engine cover bolt, the other running up to the main frame ground by the ignition coil.
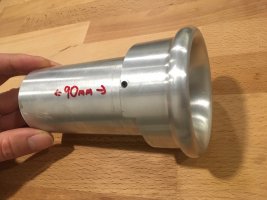
And finally, I will be using an old bellmouth prototype on this bikes intake - the one that I had made to fit different length tubes to be able to dyno test the length of our performance intake kit. However, with the hopes of having power at peak rpm instead of a nice torque spread in the middle, this intake will be shorter - so I calculated where the 3rd harmonic would be at peak power/rpm and will trim it to that - at 90mm. It seemed a shame not to have this cool piece of machining in use, so now it will get a deserving installment.
I am chipping away at the wire harness and will give a decent update with some full shot photos soon!
Attachments
-
 SR250_JadusBatteryTray.JPG133.6 KB · Views: 173
 -
 SR250_TrimmedJadusBatteryTray.JPG228.7 KB · Views: 163
 -
 SR250_LightWeightBattery.JPG181.7 KB · Views: 165
 -
 SR250_4CellBatteryTray.JPG232.3 KB · Views: 161
 -
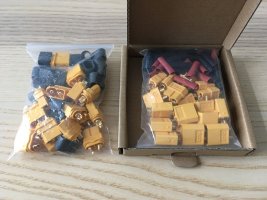 XT60_Connectors.JPG347.3 KB · Views: 170
 -
 SR250_LithiumBattery.JPG495.5 KB · Views: 171
 -
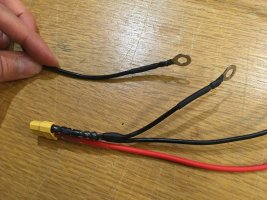 SR250_CustomPowerCables.JPG471.3 KB · Views: 176
 -
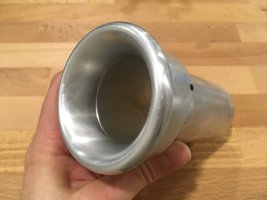 SR250_CustomBellmouth.JPG209.5 KB · Views: 171
 -
 SR250_TunedIntake.JPG291.4 KB · Views: 180
 -
 SR250_Speedobracketmod2.JPG118.8 KB · Views: 205
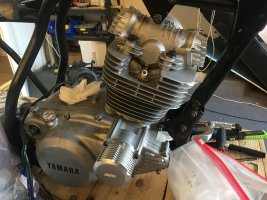
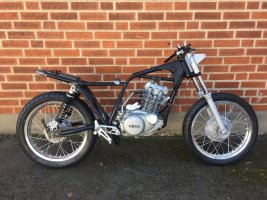
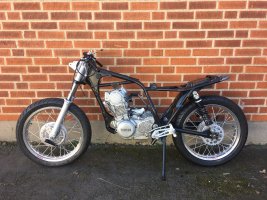
Finally, a decent update...
If all goes well, first start will be by the end of the month (June)!
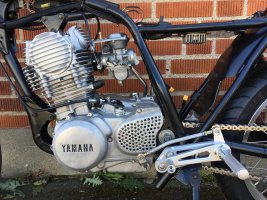
- Carb restored (cleaned, re-jetted, butterfly valve mod, air/fuel screw upgrade)
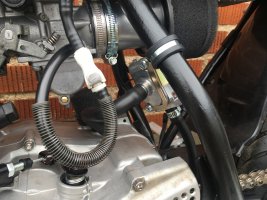
- Wire harness 95% sorted - battery connectors installed, ignition 'switch' (replaces keyed ignition) installed (see above carb), all lights installed and operating - see the solutions for mounting the blinkers, pretty happy about that, speedo and switches installed and wired up, ignition coil and spark lead and plug installed, battery tray and electrics tray installed - with automotive fuse holder and relocated Reg/Rec
- Steering stop bolts installed - to reduce rotational travel of the clipons so they don't foul the tank
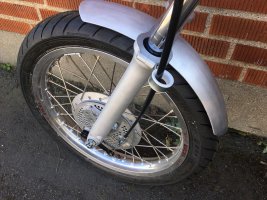
- Drilled fork brace installed with trimmed guard with brushed look and installed with isolation grommets (vibes)
- Front brake bracket installed with custom short brake cable and cable guide from a Yamaha motocross bike
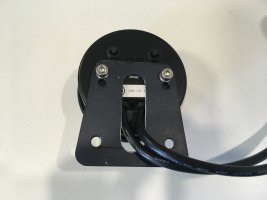
- Speed sensor bracket made and sensor (Hall) installed - picks up the sprocket bolts on the wheel (this is dialled in once running)
- Clutch and throttle cables installed and adjusted (shorter than stock)
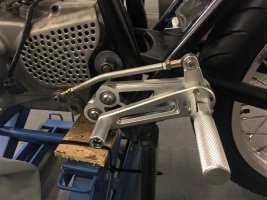
- Rear sets sorted - now with bracket for brake light switch
If all goes well, first start will be by the end of the month (June)!
Attachments
-
 SR250_WiringDone.JPG654.6 KB · Views: 191
 -
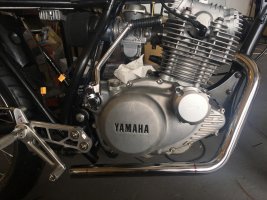
 SR250_CafeRacer.JPG642.7 KB · Views: 185
 -
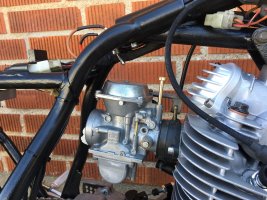 SR250_RestoredCarb.JPG477.6 KB · Views: 186
 -
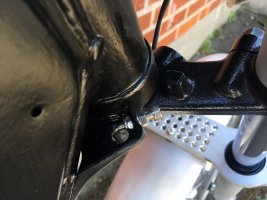 SR250_SteeringStops.JPG371.9 KB · Views: 181
 -
 SR250_ForkBraceGuard.JPG515.1 KB · Views: 180
 -
 SR250_FrontBrake.JPG565.6 KB · Views: 182
 -
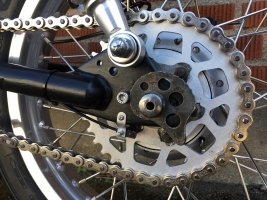 SR250_HallSensor.JPG479.4 KB · Views: 180
 -
 SR250_Rearsets.JPG588.4 KB · Views: 193
 -
 SR250_RearBlinkers.JPG484.8 KB · Views: 191
 -
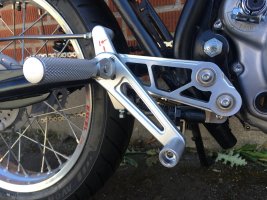 SR250_Rearsets_BrakeSwitch.JPG434.8 KB · Views: 214
wrench85
New Member
Finally, a decent update...
- Carb restored (cleaned, re-jetted, butterfly valve mod, air/fuel screw upgrade)
What’s this butterfly valve mod you did?
Sent from my iPhone using Tapatalk
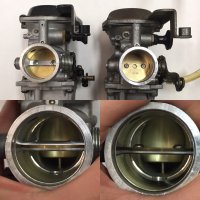
It is old hot rodding trick that increases carb throat area by cutting off one side of the butterfly valve holder - so it is a blade rather than a fork. In this case, area increases by around 10%. Who knows how much it will help, but thought why not try it! Hoping the engine will want to consume that much more air at leastWhat’s this butterfly valve mod you did?
Attachments
As long as it has the space to fit to stuff it in.
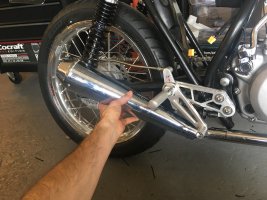
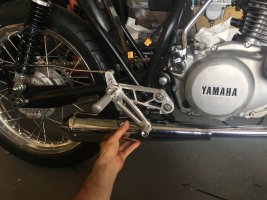
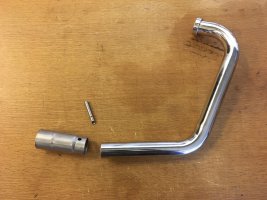
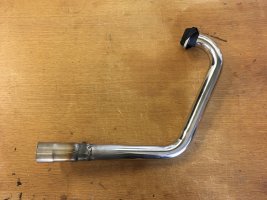
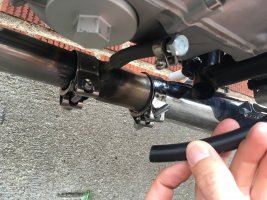
Finally got a decent chunk of time to sort the exhaust. I bought a nice reducer that almost matches the Jadus header and the steps up to match the silencer (almost). In this reducer I welded in a vacuum pick up for the PCV valve/pump that I will be testing once the bike is running. For now it is not connected because it is an extra factor that I do not know enough about when first starting and running in the engine. I will connect it later when everything is dialled in. You can see how it will operate and that I have blocked it off for the time being and am just using a standard crankcase filter for now.
I am completely embarrassed of these welds, they came out terrible - worthy of the hammered dog shit Instagram page. I just couldn't get the settings of the gas welder right for stainless and the metal wasn't flowing right. This has made me decide to finally get a decent hobby TIG welder later this year - at which point I may redo this exhaust or at least try tidy it up. Suggestions for good TIG welders that wont break the bank?
You can also see in the first photos that the original plan was to have a nice upswept exhaust. However from all the header calculations I did with the goals of the engine/power in mind, this style of header would have been far too long for high rpm power. So it needed to be chopped much shorter and just sit straight under the engine/foot peg. The position came out alright and it will not affect handling/lean angle at all.
Still on track for a first start by the end of the month! Hopefully one evening next week!
Attachments
-
 100mphSR250_Exhaust1.JPG444.6 KB · Views: 205
 -
 100mphSR250_Exhaust2.JPG383.3 KB · Views: 187
 -
 100mphSR250_Exhaust3.JPG398.9 KB · Views: 189
 -
 100mphSR250_Exhaust4.JPG381.9 KB · Views: 192
 -
 100mphSR250_Exhaust5.JPG416.8 KB · Views: 197
 -
 100mphSR250_Exhaust6.JPG398.5 KB · Views: 193
 -
 100mphSR250_Exhaust7.JPG395 KB · Views: 203


