Ton up SR250: 100mph, 100kg, 30hp

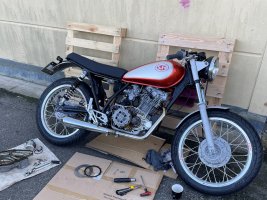
Big news! I got the engine running! Even before the end of the month of July! However, failure ensued right away.

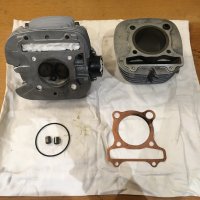
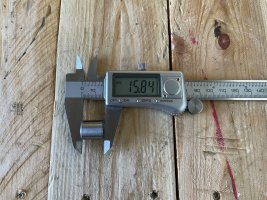
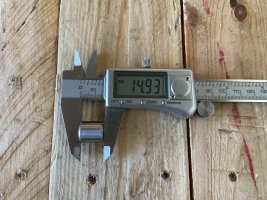
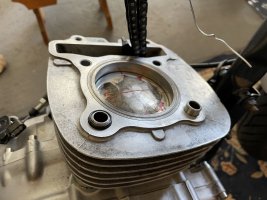
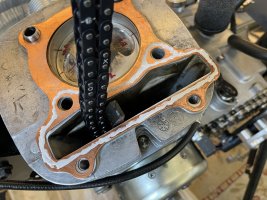
All things considered, the first start went ok. It is always a process to go through and make sure things are right and I was not sure how it would go. But I did manage to start the bike and it sounds great. Reading a post from this thread a few pages back, I mentioned oringing the copper head gasket... I should have done it. I was convinced this is why the head gasket leaked and have therefore handed the cylinder in to a specialist to do the work. He only works when the weather is bad because he lives on a boat and lives the good life (actually an awesome role model!). So, we'll have to see when I can get the engine back together. I say I was convinced because I now think it was something else. Notice in the attached image the leakage is clearly around the dowel area of the gasket/cylinder. I think the dowel stopped the head from being able to be pulled against the gasket and cylinder. Now that the head gasket is 0.5mm thinner than stock, the dowel is 0.5mm too long. It makes sense but it was something I hadn't even considered (duh) when putting the engine together. I thought the dowel fitment would be a relatively loose fit in the vertical axis and there would be enough clearance. Obviously I was wrong. Anyway, I have ordered some new dowels and will file one down removing 0.5mm of material.

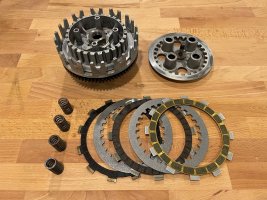
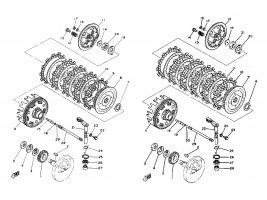
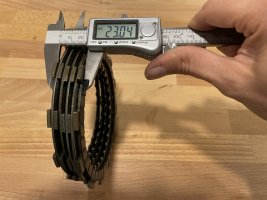
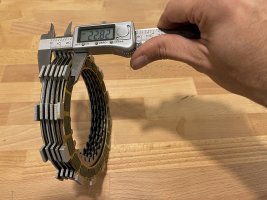
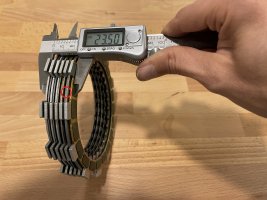
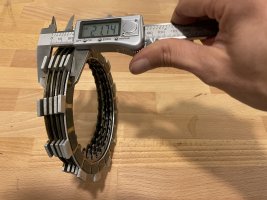
The good thing with this process was that there is good spark, the kickstart assembly works, the head was getting good oil flow and the whole package seems to work. I actually rode the bike up and down the street a few times before calling it a night and man it pulls! It is somewhat aggressive and feels more like my 500. This is when I discovered the second issue that needs to be solved... The clutch slips like crazy, even with new clutch plates and heavy duty springs. To remedy this, I have now ordered an XT250 6 plate clutch (instead of the SRs 5) and even harder springs and will even use spacers with those. Hopefully that helps! Any tips from you lot?

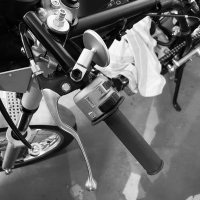
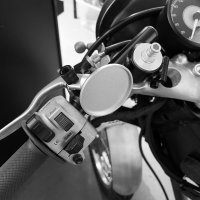
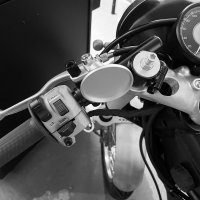
If anyone is interested, I made a start up video. It is not super gripping but at least you get to hear how it sounds at the end:
 

Attachments

  • SR250_Head_Cylinder.JPG
    SR250_Head_Cylinder.JPG
    593.7 KB · Views: 227
  • SR250_Head_CylinderOff.JPG
    SR250_Head_CylinderOff.JPG
    694 KB · Views: 233
While I have been waiting for parts through this project and especially recently waiting for this engine work to be done, I have had a pet side project on the go. A problem I had with the last SR project was finding mirrors that looked good. The same problem was encountered with this bike... So I decided to develop my own design to test and potentially bring to market. See attached some of the prototypes and the first machined prototype. The mirrors are to be used for 'under arm' use - you look behind you along the side of your body and under your arm rather than over your shoulder. This way the mirrors can be much more compact and closer to the bikes centre line - so they do not 'protrude' too much. They are very light and very small at 50mm diameter. Not the most practical no, but very much good enough to see what is coming behind you and keep an eye on things. I have had mirrors set up like this in the past and thought it worked well enough.

The final product would be supplied with proper mounting bolts as well - not the horrible ones in the pictures. The extension bar is supplied to be able to clear the switch gear (not needed in all cases) and to get the right rearward angle on the mirror.

What do others reckon?
 

Attachments

  • Jadus_MiniMirrors1.JPG
    Jadus_MiniMirrors1.JPG
    205 KB · Views: 197
  • Jadus_MiniMirrors2.JPG
    Jadus_MiniMirrors2.JPG
    140.9 KB · Views: 188
  • Jadus_MiniMirrors3.JPG
    Jadus_MiniMirrors3.JPG
    200.4 KB · Views: 197
  • Jadus_MiniMirrors6.JPG
    Jadus_MiniMirrors6.JPG
    388.3 KB · Views: 195
  • Jadus_MiniMirrors5.JPG
    Jadus_MiniMirrors5.JPG
    385.5 KB · Views: 200
  • Jadus_MiniMirrors4.JPG
    Jadus_MiniMirrors4.JPG
    361.2 KB · Views: 194
  • Jadus_MiniMirrors3a.JPG
    Jadus_MiniMirrors3a.JPG
    163.3 KB · Views: 193
  • Jadus_MiniMirrors7.JPG
    Jadus_MiniMirrors7.JPG
    351.6 KB · Views: 202
Yay! Finally got the 'oringed' cylinder back and found some time to assemble the engine again - this time with shortened head dowels for the thinner 0.5mm copper head gasket and sealant added around the 'leaky parts' of the head to cylinder joint. Hopefully a new 'first start' soon :D
 

Attachments

  • SR250_HeadDowel.JPG
    SR250_HeadDowel.JPG
    590.6 KB · Views: 181
  • SR250_HeadDowel_Shortened.JPG
    SR250_HeadDowel_Shortened.JPG
    526.4 KB · Views: 175
  • SR250_CylinderOn.JPG
    SR250_CylinderOn.JPG
    368.9 KB · Views: 174
  • SR250_HeadGasketSealant.JPG
    SR250_HeadGasketSealant.JPG
    447.4 KB · Views: 189
  • SR250_CopperHeadGasket.JPG
    SR250_CopperHeadGasket.JPG
    448.1 KB · Views: 179
  • SR250_CamTiming.JPG
    SR250_CamTiming.JPG
    336.8 KB · Views: 184
  • SR250_HeadOn.JPG
    SR250_HeadOn.JPG
    400.9 KB · Views: 211
not checked in for a while.....some great progress. Looking forward to that speed record being broken !
 
not checked in for a while.....some great progress. Looking forward to that speed record being broken !
Thanks! I finally got it started again on the weekend and it seems to run well. I decided to break up the problems into two separate actions - get the engine running (check) and fix the clutch (next job). So now I will need to take care of that next weekend and take the opportunity to re-torque the head bolts and adjust the valves - tappets are loose already? Is this normal with engine break in?
 
Had an 81 SR250 ‘Exciter’ and got it up a bit over 80 with one of those Viper fairings. I guarantee that I had it running better than it ever had. It would start right up every time even in the cold of winter. Should have kept that little thing.

Hope you hit 100!

 
Hello
I did 121km/h / 75mph on my “bone stock” 1981 SR250.
But Yamaha almost died and I was in “sh…ng dog” position :D so that fairing looks good to me :)

I love to watch progress in your 100mph build :)
Hope to see you braking that barrier :D
 
Last edited:
Hello
I did 121km/h / 75mph on my “bone stock” 1981 SR250.
But Yamaha almost dyed and I was in “sh…ng dog” position :D so that fairing looks good to me :)

I love to watch progress in your 100mph build :)
Hope to see you braking that barrier :D
Haha 'sh*tting dog position'

My other SR's will get 130kph with the performance kit and a 17T sprocket on the front. But air resistance is quadratic so as you go faster, much more power is needed (or less wind resistance). So the step from 130kph to 161kph is huge o_O I am confident I'll get there!
 
I just love the way you’ve poured over every system and made thoughtful, well considered improvement. Loved the startup video ..

I have been thinking about getting another bike and this is inspiring me!
 
I just love the way you’ve poured over every system and made thoughtful, well considered improvement. Loved the startup video ..

I have been thinking about getting another bike and this is inspiring me!
Thanks mate, that means a lot! You should definitely get another bike project! Then you can document it and inspire others like you inspired me and many others with your first build.
 
Now I have had a chance to investigate the clutch problem... it is still not solved. I changed the clutch plates but still get a little slipping. Then I looked closer into the differences between the SR250 249cc (1980-83 US models) clutches and the 239cc (1983-onwards) clutches and realised my mistakes/misunderstandings. I will share in more detail here in the next post. I will also write a blog post about it so other SR250 owners can have access to this discovery.

Because I was going to change the clutch and needed to drop the oil, I figured I would film a bit of a maintenance video for others. It can be seen here:


Then I also needed to adjust the valves so I did a follow up (part 2) maintenance video which can be seen here:


I hope these videos are of some help to some people :D
 
I have some tech that you might be interested in. think of tooling costs as about 1/10 of that. per unit will be higher but still offer a great margin if you price the tanks properly. the cb350 tank on my build thread was done using my tooling tech.
 
I have some tech that you might be interested in. think of tooling costs as about 1/10 of that. per unit will be higher but still offer a great margin if you price the tanks properly. the cb350 tank on my build thread was done using my tooling tech.
Sounds interesting! Would like to hear more about it!
 
I finally got around to sorting the clutch and documented the problems in a blog post here: https://www.jadusmotorcycleparts.com/post/sr250-clutch-woes-and-wins

In short, there are two completely different clutch packs for the SR250 based on whether or not the engine is the 249cc version or the 239cc version. This means there are two part numbers for friction plates and two part numbers for steel plates and you must use an entire matching pack set - otherwise you end up with a clutch pack that is too thin. This results in very low clutch pack pressure from the springs and this was the problem in my case.

Attached are a few images from the investigation but if you want the whole story, check the blog post :D

Once the clutch was sorted, I took the bike out for a short ride and got to 110kph in 3rd gear... Which is promising! Unfortunately riding days are few and far between now that the colder and wetter weather has set in. I may have to wait until next riding season to really wring it out.
 

Attachments

  • ClutchReplacement_100mphsr250.jpg
    ClutchReplacement_100mphsr250.jpg
    330.8 KB · Views: 167
  • SR250_ClutchParts_Real.jpg
    SR250_ClutchParts_Real.jpg
    569 KB · Views: 167
  • SR250_ExplodedClutch.jpg
    SR250_ExplodedClutch.jpg
    747.8 KB · Views: 158
  • SR250_ClutchParts.JPG
    SR250_ClutchParts.JPG
    74.1 KB · Views: 146
  • SR250_239ccClutchPack.JPG
    SR250_239ccClutchPack.JPG
    341.2 KB · Views: 154
  • SR250_249ccClutchPack.JPG
    SR250_249ccClutchPack.JPG
    366.5 KB · Views: 160
  • SR250_249ccClutchPack_Extra.JPG
    SR250_249ccClutchPack_Extra.JPG
    334.4 KB · Views: 158
  • SR250_WrongComboPack.JPG
    SR250_WrongComboPack.JPG
    381.4 KB · Views: 165
I finally got around to sorting the clutch and documented the problems in a blog post here: https://www.jadusmotorcycleparts.com/post/sr250-clutch-woes-and-wins

In short, there are two completely different clutch packs for the SR250 based on whether or not the engine is the 249cc version or the 239cc version. This means there are two part numbers for friction plates and two part numbers for steel plates and you must use an entire matching pack set - otherwise you end up with a clutch pack that is too thin. This results in very low clutch pack pressure from the springs and this was the problem in my case.

Attached are a few images from the investigation but if you want the whole story, check the blog post :D

Once the clutch was sorted, I took the bike out for a short ride and got to 110kph in 3rd gear... Which is promising! Unfortunately riding days are few and far between now that the colder and wetter weather has set in. I may have to wait until next riding season to really wring it out.
Greetings Jadus! I am a fan of your builds and research. I'm going to start this with a THANKS for all the really cool pictures you have taken of your bikes in the beginning of your builds! Believe it or not, they are perfect for slicing and dicing in MS Paint for "concept ideas" ! I have read most of your posts, and it appears you have stuck with the stock CV carb throughout. Have you ever experimented with the Mikuni vm34-168 round slide? I'm asking because I have a SR250 that is totally missing it's airbox. The stock carb looks to be in nice shape, but since I have to go pod-filter, I ordered a vm-34 to try also. From what I understand, CVs are finicky about their air filter properties. Meanwhile, the XT250 exists as a proven example of the Non-CV SR250. Your expertise is welcomed!
 
Greetings Jadus! I am a fan of your builds and research. I'm going to start this with a THANKS for all the really cool pictures you have taken of your bikes in the beginning of your builds! Believe it or not, they are perfect for slicing and dicing in MS Paint for "concept ideas" ! I have read most of your posts, and it appears you have stuck with the stock CV carb throughout. Have you ever experimented with the Mikuni vm34-168 round slide? I'm asking because I have a SR250 that is totally missing it's airbox. The stock carb looks to be in nice shape, but since I have to go pod-filter, I ordered a vm-34 to try also. From what I understand, CVs are finicky about their air filter properties. Meanwhile, the XT250 exists as a proven example of the Non-CV SR250. Your expertise is welcomed!
Thanks for the support mate.

I stuck with the CV carb for a couple of reasons. One being they are very easy to tune and offer a good compromise for low down power and high rpm power. They also self adjust pretty well to different air conditions (altitude etc) and compensate for minor tuning errors. A slide operated carb may offer better throttle response but at the cost of bog if not controlled well (rider control) and if it does not have a pumper circuit. It may even flow better at high rpm, but no one knows because no one has done back to back testing (on the SR at least), including myself. Another reason is purely business - improving on what is already a good system is often better and more reliable that starting from scratch with an entirely new system and trying to make it work. There is also the cost factor - a new carb can be pretty expensive and is not always in the budget for an SR build. I have had the SR on a few different dynos for several days at a time and think that this would be required to get the VM to run well and be able to test it with different air filters and exhaust set ups. But thats just me, I like to do things thoroughly rather than just stabbing in the dark. I have also spent countless riding hours with a home built O2 sensor with and air-fuel ratio gauge set up doing countless jets swaps to test different set ups with the CV carb, so I am quite invested in it.

The only reason CV carbs can be finicky with air filters is if they cover the vacuum intake port (think cheap EMGO pod filter), otherwise any type of filter will work.

In the past I have somewhat successfully tuned a VM34 carb for a DT400 and thought they were pretty easy to work on. But beware, there are different needle jets (emulsion tubes) for the VMs for two-strokes and four-strokes - the two-strokes have somewhat of a shroud at the base of the throat of the carb - this is to do with the different type of vacuum two-strokes pull.

The XT250 came with a 28mm roundslide pumper carb. Already there you have two huge differences with the VM34 - the throat diameter and the pumper circuit. Without going into all the details there, these two factors affect a lot.

If anything, I would want to test a TM33 flatslide pumper carb. 33mm being a good compromise for low end and high end power and the pumper circuit giving good low end response and resistance to bog. The flatslide also flows much better than the roundslide. Alternatively, I would be very keen to test a LECTRON carb at some point! They look like the business! But again, would probably require a lot of testing.

I have had little time to work on my bikes recently and this long winded response shows that I am spending too much time working at the computer and too little time in the workshop! Time to get on the wrenches again :) Best of luck with your build and carb!
 
Back
Top Bottom