1971 Yamaha CS3 Restoration / Cafe Project

MasterOstrich

New Member
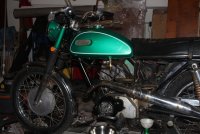
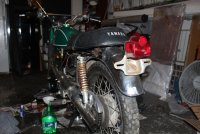
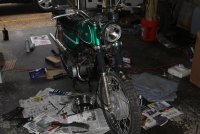
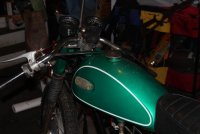
Hey Yall, I recently picked up this old bike as my first. I'm 17 and wanted to get something unlike everyone else who starts riding with a massive cumbersome 250 or a cheap crotch rocket. I wanted something that would turn heads and still be considered a classy bike.

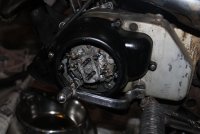
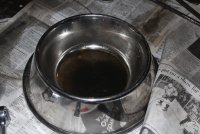
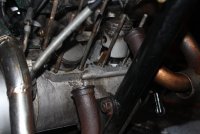
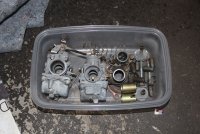
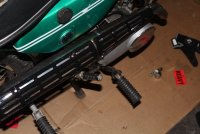
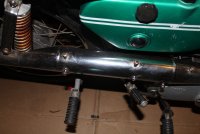
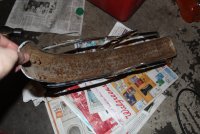
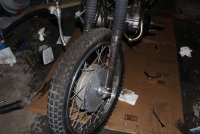
At the time I'm weeks in and working on getting it running. When I bought it, it was beyond help. I replaced the points, set the timing, cleaned and hot-dipped the carbs and rebuilt them. As of now I'm working on getting all the nasty shit that has filled the crankcase. The previous owner left the carbs off and water went down the ports and filled it with sludge. I was surprised to see that the heads and cylinder came off so cleanly. Despite the age, the engine looks almost new (minus the think layer of crap). The pistons look good with minimal carbon deposits, same goes for the cylinders. I spent my afternoon scraping off mud and gasket in preparation for reassembling the engine.

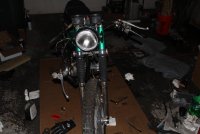
Rather than doing what most have, I decided to keep the bike is one piece and work on chunks at a time. Hopefully I'll have the gaskets delivered and installed and be able to get a feeling for how it rides and see if I need to do work on the shocks or the clutch.

Other than that, the tank is filled with rust, the electrical may or may not be shit, and I'm coming up on random attempts at "fixes" that the owner made. I have to take the extra time to revert his work :mad:

I can add pics tomorrow if anyone wants them. I'll post a few times a week if people are interested than maybe more than that.
 
Welcome! Of course we want pics ;)
Good on you for focusing on getting it running first, that's the right thing to do. I didn't with my first and it still bugs me.
 
Working on trying to clean out the crankcase. I filled it up to the brim and let it sit in there for a few days to perhaps breakup and dissolve whatever solids were in there. It looks as if its worked as the color has changed to a dingy brown. Only issue is I don't know how to get it all out. I gave the kick start a few pumps to get rid of what I could, but the rest was still left. I resorted to trying to blow it out with an air compressor and that did nothing besides spray shit everywhere Including my eyes...

I'm thinking about just turning the bike upside down and hitting it with carb cleaner since that will evaporate. I'll post some photos of the bike when I get home this afternoon.
 
unfortunately if the crankcase was full of water and rusty you will need a new/rebuilt crankshaft assembly,there is no way around it
 
xb33bsa said:
unfortunately if the crankcase was full of water and rusty you will need a new/rebuilt crankshaft assembly,there is no way around it


Thats what I thought, but upon further inspection it looks okay. I think there was enough oil in the crank to keep it from oxdidizing. That means its probably leaking somewhere... Oh well, you win some you lose some.
 
Okay as promised I'm back with photos of the progress so far. Right now I am painting the exhaust (side?) covers a glossy black because the rust was so bad. The pipe itself is actually fairly clean so I think I will keep that as is. I'm going with a Black and Chrome color scheme and am unsure if I will keep the Green or not. Let me know what Y'all think.
 

Attachments

  • IMG_2949.JPG
    IMG_2949.JPG
    5.3 MB · Views: 386
  • IMG_2957.JPG
    IMG_2957.JPG
    5.7 MB · Views: 310
  • IMG_2958.JPG
    IMG_2958.JPG
    1.1 MB · Views: 327
  • IMG_2955.JPG
    IMG_2955.JPG
    6.5 MB · Views: 326
  • IMG_2954.JPG
    IMG_2954.JPG
    5.6 MB · Views: 296
  • IMG_2951.JPG
    IMG_2951.JPG
    7.8 MB · Views: 318
  • IMG_2950.JPG
    IMG_2950.JPG
    1.3 MB · Views: 296
  • IMG_2949.JPG
    IMG_2949.JPG
    5.3 MB · Views: 317
  • IMG_2950.JPG
    IMG_2950.JPG
    1.3 MB · Views: 319
MasterOstrich said:
Thats what I thought, but upon further inspection it looks okay. I think there was enough oil in the crank to keep it from oxdidizing. That means its probably leaking somewhere... Oh well, you win some you lose some.

that is good news !very cool lil bike !!
i have a few parts for that bike if you are missing any give me a holler i might have what you need
 
I'm thinking I'll probably keep the seat thats on there. Its got a nice brat look to it an I can fit a girl on the back.

Also I noticed that the bracket that connects the footrest to the frame was held in place with a random assortment of washers. I don't know what or how its supposed to fit but its certainly not that. The right footrest flexes quite a bit when I try to shift or use the rear brake. Normally I would just say fuckit and use the rear set of pegs but seeing how the kickstand is also attached to that bracket, I'm worried.
 
Congrats on your purchase - I had the identical bike right down to the colour, but it was too far gone to restore (bought it out of a lean-to in rural Ontario, where it had set for many years). I parted it out and got a lot of other guys' rides going in the process.
For a point of clarification, what you have - even though the steering head is stamped CS3, is the CS3C street scrambler version of the 200.
You've got the high pipes - very desirable (but get or make some heat shields for them if you don't have a set) - the braced handlebars and unless a DPO took it off and threw it away, the world's heaviest bash plate under the motor.
The bike was way too heavy to do anything but casual trail riding and even then, dodgey - but it made a great street bike for the day.
If you need a manual for it, email me and I'll photocopy my shop manual and send it to you for the price of copying and postage. I've also got a misc info on these relics that might be useful to you as well.
Have fun with your project and let us know if we can help you out at all.
Pat
pacomotorstuff@cogeco.ca
 
I like the green. If it were mine I'd probably keep it as original looking as possible. Bike has a cool look to it! :)
 
pacomotorstuff said:
Congrats on your purchase - I had the identical bike right down to the colour, but it was too far gone to restore (bought it out of a lean-to in rural Ontario, where it had set for many years). I parted it out and got a lot of other guys' rides going in the process.
For a point of clarification, what you have - even though the steering head is stamped CS3, is the CS3C street scrambler version of the 200.
You've got the high pipes - very desirable (but get or make some heat shields for them if you don't have a set) - the braced handlebars and unless a DPO took it off and threw it away, the world's heaviest bash plate under the motor.
The bike was way too heavy to do anything but casual trail riding and even then, dodgey - but it made a great street bike for the day.
If you need a manual for it, email me and I'll photocopy my shop manual and send it to you for the price of copying and postage. I've also got a misc info on these relics that might be useful to you as well.
Have fun with your project and let us know if we can help you out at all.
Pat
pacomotorstuff@cogeco.ca


Thanks a ton man, I found a pdf online that I have for it, but when I get to something I don't understand I'll definetley take you up on that offer.
 
While I'm waiting ever so patiently for my gaskets to come I've begun thinking about how I am going to change this. One of the first things is to strip the bike of any unnecessary weight. Since this is a trail bike, the fenders are massive. I'm thinking that pulling the rear would really change the look and add to the cafe style. I'm not sure about the front fender though. I'm considering pulling the shield and leaving just the fender stay behind so that I don't lose stability. I'm really not digging the rust encrusted chrome and a lot of it is too far gone.

I painted the muffler side covers today to see how the gloss black finish looks against the chrome exaust. I'm going to wrap the headers anyway.

I'll spend some more time on it tomorrow.
 
You absolutely need at least a short rear fender - from the swingarm up to at least the seat base - or else the rear tire will kick dirt and mud into the back of your motor, into the carbs, whatever. Even on road racers, we put a little fender there.
A couple of ideas - on my Baby Tracker, I used a BSA front fender for a rear and on my BS175 vintage road racer, am using a fiberglass replica '71 750 Duke front fender for a rear - I could never make sense of the no rear fender thing.
You could also look at a tire hugger but I think it would look... odd.
You should be able to find a small fiberglass front fender to fit the front, but keep the fender loop even if you get rid of the stays, as the loop will act like modest fork brace and those 30mm(?) forks need all the help they can get.
As far as weight, they were a heavy bike for a 200 and part of it was the fact it has a huge starter-generator and an equally huge battery to make the starter motor work. I looked at ridding my bike of the stock generator and using something else, but never came up with a solution..
Keep having fun with your project.
Pat
 
pacomotorstuff said:
You absolutely need at least a short rear fender - from the swingarm up to at least the seat base - or else the rear tire will kick dirt and mud into the back of your motor, into the carbs, whatever. Even on road racers, we put a little fender there.
A couple of ideas - on my Baby Tracker, I used a BSA front fender for a rear and on my BS175 vintage road racer, am using a fiberglass replica '71 750 Duke front fender for a rear - I could never make sense of the no rear fender thing.
You could also look at a tire hugger but I think it would look... odd.
You should be able to find a small fiberglass front fender to fit the front, but keep the fender loop even if you get rid of the stays, as the loop will act like modest fork brace and those 30mm(?) forks need all the help they can get.
As far as weight, they were a heavy bike for a 200 and part of it was the fact it has a huge starter-generator and an equally huge battery to make the starter motor work. I looked at ridding my bike of the stock generator and using something else, but never came up with a solution..
Keep having fun with your project.
Pat

Noted. Something to act as a shield so that the motor doesnt get sandblasted. I could probably fab something up.
As for the forks im not sure as to what diameter they are, again I could always buy a real stabilizer. I don't trust this machine :p . The PO did a pretty nice job of abusing the hell out of the thing.
 
While doing the 3rd coat on the muffler covers I noticed that I used Hi-Temp base and a Automotive top gloss coat. So we will see what happens with that. Best case scenario is that it will not make a difference. Worst is that it cracks and explodes into my shins.

Also does anyone have any good suggestions for air filters? The airbox that came was WAY far gone and the filters were practically stuck in there. The carbs on the bike are VM20SC's if anyone cares.
 
Today I pulled the front fender for cleaning and it looks rad, I also was going to pull and cut the bars but theres some sort of dampener in the way of getting the bars off. I need to figure out how to pull that damn thing. Pics in an hour or so.
 
A good place to look is cmsnl.com for exploded views.
Look underneath the lower fork crown. You'll see a cotter key, a nut and a couple of fiber washers. Pull the cotter key out and unthread the nut. The friction damper will eventually unthread itself and be out of the way.
Suggestion: put lots of WD40 or whatever antiseize compound you use, on the threads before trying to unthread the thing. Also expect a couple of fiber friction washers to drop out as you take it apart...
Pat
 
More photos, I haven't figured out how to add them into a body of text so you can just browse through them or whatever floats your goat. In this group I pulled the front fender, painted the muffler covers, cleaned the exhaust, cleaned whatever I could and am working on getting clubmans setup.
 

Attachments

  • IMG_3005.JPG
    IMG_3005.JPG
    866.9 KB · Views: 252
  • IMG_3009.JPG
    IMG_3009.JPG
    1.1 MB · Views: 213
  • IMG_3008.JPG
    IMG_3008.JPG
    4.6 MB · Views: 237
  • IMG_3004.JPG
    IMG_3004.JPG
    5.4 MB · Views: 225
  • IMG_3000.JPG
    IMG_3000.JPG
    5.9 MB · Views: 241
  • IMG_2999.JPG
    IMG_2999.JPG
    1.3 MB · Views: 218
  • IMG_2998.JPG
    IMG_2998.JPG
    1 MB · Views: 225
  • IMG_3006.JPG
    IMG_3006.JPG
    4.9 MB · Views: 239
Back
Top Bottom