
Beaner242
Been Around the Block
Follow along on my project as I try to turn my first classic bike into a mostly, bobber customathingy. This will start out slow as I am still riding almost daily, weather permitting. This is the way I brought it home a couple months ago except the PO had some mini apes on it that i believe he said came off a Honda Rebel? any way this is the way I have been riding it. Long term plans are to strip it, clean it all up, hard tail it and just make it look cool.

Monday I got my Uni filters to replace the cheap Emgo filters that are blocking the air flow, errr I mean filtering the air. After installing those and riding it for a day, holy s**t. Do they wake up the motor. Unfortunately they also lean it out to much to ride. Which I didn't think would be the case. I didn't realize just how bad the Emgo filters suck. The PO told me it had been re jetted for the filters but I'm guessing other wise now. So another order was placed for the Dyno jet kit which should arrive tomorrow. So back on go the air restrictors, I mean filters.
Tonight the bug bit me to get started. So the first order of business was to remove the saddle bags, rear fender, rear blinkers, and the grab bar the PO had installed. So far so good. Saddle bags gone! Check. Rear grab bar gone! Check. Rear fender gone! Check. Now I had to figure out how to mount my tail light. Knowing this is just temporary so I can keep riding it, I had a scrap piece of metal left over from the speedo bracket I had to make. (Whole nother story). The rear tail section has 2 bolt holes at the very rear loop to hold the fender on. So I used those as a starting point for my bracket. I held the metal there while I used my sharpie to mark the holes. Then I used the tail light and its rubber spacer to mark the holes for mounting it. Once I had the general shape marked onto the steel I discovered that my jigsaw was out of blades. What's a guy to do when you want to ride the next day? Well I used my saws all. Now this isn't the prettiest bracket but it serves the purpose for now.

After cutting and grinding I dug through my small box of bolts and lucked into 2 bolts and nylock nuts that were just right. I mounted the bracket up, "hell yeah" I says to myself. Not bad for what I had to work with. Next step. Mount the light. What's that? Well s**t. I forgot to drill a hole to run the wires through. Ok no biggie. Drill a hole with it on the bike, easy enough. Well what happens when you drill sheet metal with a 3/8 bit and no pilot hole. That's right the bit grabs and forces the drill down right into the tire. Ok deep breath. No harm done. That tire will be fine with a small gouge out of it. So now I'm to the point of mounting the light and I've got an extra 8 inches of wire there to hide. That's not fun lets just cut it off and splice it back together. Yeah that's it. Done. Now I wired up the tail light and figured I better check it to make sure we are good. Call for son to help. Son I says, step on the brake pedal to make sure it works. Ok contact not a blink. Ok the next 20 minutes was spent diagnosing what turned out to be blown fuses, yes 2 fuses. I had no brake, running light, neutral light or starterWTF did I do? Anyway, I replaced those and we are good. Shot the bracket with some paint. Mounted the light and all is good. Whats that? oh I should put the seat down? oh no I wont. It hits the light. Dam it. Ok no biggie just drill a second set of holes. So in the end it worked and thats all I got to say about that. Here is the pile of leftovers.

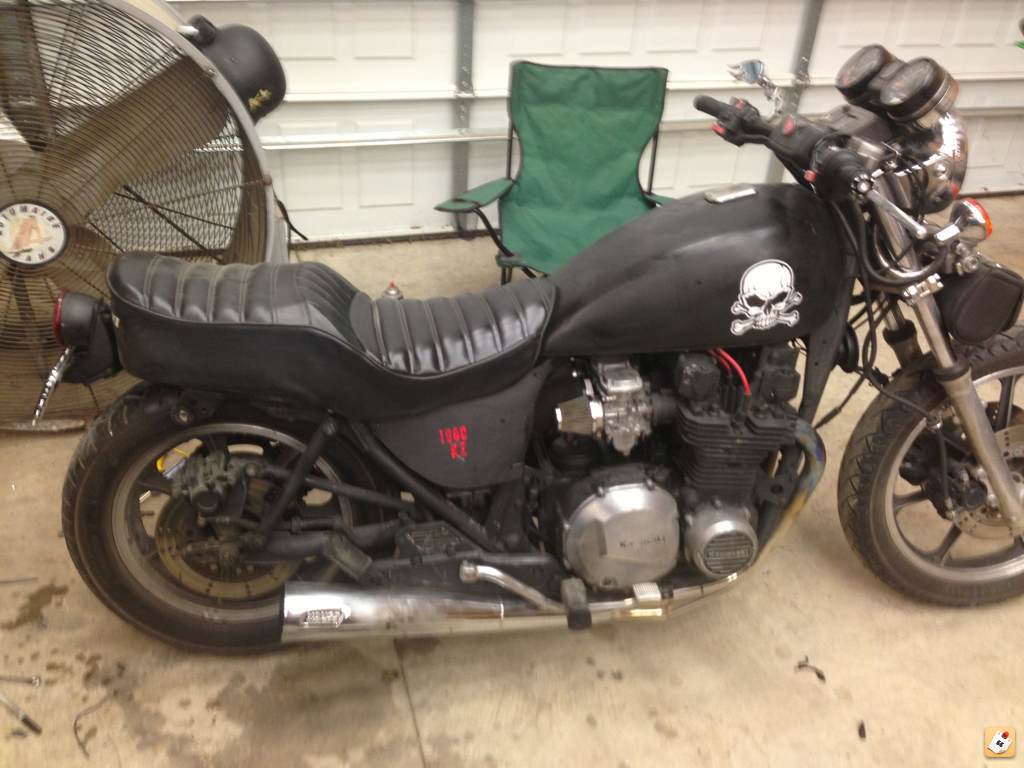
And here is the end result. Not a big difference but I like it better already
As you may be able to tell things don't always go as planned for me. Sometimes my fault, sometimes not. But if you stick around for this I'm sure it will be entertaining to say the least.
Plans for tomorrow eve are to remove the front blinkers and anything else I decide will clean it up. Tune in!
Monday I got my Uni filters to replace the cheap Emgo filters that are blocking the air flow, errr I mean filtering the air. After installing those and riding it for a day, holy s**t. Do they wake up the motor. Unfortunately they also lean it out to much to ride. Which I didn't think would be the case. I didn't realize just how bad the Emgo filters suck. The PO told me it had been re jetted for the filters but I'm guessing other wise now. So another order was placed for the Dyno jet kit which should arrive tomorrow. So back on go the air restrictors, I mean filters.
Tonight the bug bit me to get started. So the first order of business was to remove the saddle bags, rear fender, rear blinkers, and the grab bar the PO had installed. So far so good. Saddle bags gone! Check. Rear grab bar gone! Check. Rear fender gone! Check. Now I had to figure out how to mount my tail light. Knowing this is just temporary so I can keep riding it, I had a scrap piece of metal left over from the speedo bracket I had to make. (Whole nother story). The rear tail section has 2 bolt holes at the very rear loop to hold the fender on. So I used those as a starting point for my bracket. I held the metal there while I used my sharpie to mark the holes. Then I used the tail light and its rubber spacer to mark the holes for mounting it. Once I had the general shape marked onto the steel I discovered that my jigsaw was out of blades. What's a guy to do when you want to ride the next day? Well I used my saws all. Now this isn't the prettiest bracket but it serves the purpose for now.
After cutting and grinding I dug through my small box of bolts and lucked into 2 bolts and nylock nuts that were just right. I mounted the bracket up, "hell yeah" I says to myself. Not bad for what I had to work with. Next step. Mount the light. What's that? Well s**t. I forgot to drill a hole to run the wires through. Ok no biggie. Drill a hole with it on the bike, easy enough. Well what happens when you drill sheet metal with a 3/8 bit and no pilot hole. That's right the bit grabs and forces the drill down right into the tire. Ok deep breath. No harm done. That tire will be fine with a small gouge out of it. So now I'm to the point of mounting the light and I've got an extra 8 inches of wire there to hide. That's not fun lets just cut it off and splice it back together. Yeah that's it. Done. Now I wired up the tail light and figured I better check it to make sure we are good. Call for son to help. Son I says, step on the brake pedal to make sure it works. Ok contact not a blink. Ok the next 20 minutes was spent diagnosing what turned out to be blown fuses, yes 2 fuses. I had no brake, running light, neutral light or starterWTF did I do? Anyway, I replaced those and we are good. Shot the bracket with some paint. Mounted the light and all is good. Whats that? oh I should put the seat down? oh no I wont. It hits the light. Dam it. Ok no biggie just drill a second set of holes. So in the end it worked and thats all I got to say about that. Here is the pile of leftovers.
And here is the end result. Not a big difference but I like it better already
As you may be able to tell things don't always go as planned for me. Sometimes my fault, sometimes not. But if you stick around for this I'm sure it will be entertaining to say the least.
Plans for tomorrow eve are to remove the front blinkers and anything else I decide will clean it up. Tune in!
") Ill just add this in here, I couldnt really find a specific section for frames. Will any of the metal on this page work for hard tail tubing?
Ill just add this in here, I couldnt really find a specific section for frames. Will any of the metal on this page work for hard tail tubing? 


