Yamaha SR250 Brat

PocketsVIC

Active Member
Hi all,

My name is Pat and I'm currently doing up a SR250.
It is my first project, infact the first bike I have ever owned and so far it seems to go alright.
When I first got the bike I stripped it and pulled apart the engine. It had a few oil leaks and need a bit of TLC. This is it after a clean and a paint
 

Attachments

  • photo-14.jpg
    photo-14.jpg
    1.5 MB · Views: 487
  • engine.jpg
    engine.jpg
    752.3 KB · Views: 513
  • painted.jpg
    painted.jpg
    1.7 MB · Views: 502
  • 4.jpg
    4.jpg
    9.7 KB · Views: 2,695
I decided to paint the frame matt black as well because I was stoked with how the motor turned out. The tank had been stripped back, let rust a bit & clear coated by the bloke that had the bike before me. I started assembling it the other week.

Since then I have put the guards, pegs, exhaust carby ect on..
I have decided to re wire it from scratch and have just ordered an Antigravity AG401. As it is a Lithion battery I have been told to change the regulator. If any one can shed some light as to what regulator to get that would help a million.
 

Attachments

  • photo-19.jpg
    photo-19.jpg
    631.8 KB · Views: 496
  • photo-21.jpg
    photo-21.jpg
    566.5 KB · Views: 511
  • photo-18.jpg
    photo-18.jpg
    353.2 KB · Views: 2,206
  • photo-27.jpg
    photo-27.jpg
    718.1 KB · Views: 487
Did a bit more this weekend, I added some exhaust tape and changed the bolts in the motor with chrome ones. I'm currently looking at seat options. I can't cut the frame without getting it engineered for rego so I'm on the hunt for a flat, slim seat to suit the stock frame. If any one knows where to get one could you drop me a line. Thanks
 

Attachments

  • photo-22.jpg
    photo-22.jpg
    665.1 KB · Views: 575
  • photo-23.jpg
    photo-23.jpg
    493.4 KB · Views: 1,586
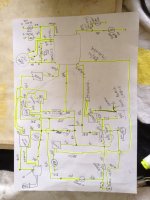
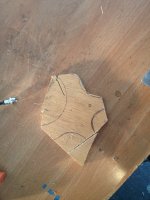
Finally got around to attacking the electrical. When I removed the electrical to strip the bike it was in bad shape. A lot of connections just staying together and at some stage some one had done a hack job trying to remove the old wires for the electronic start. I decided to do a total rewire of the bike, not only because I will be trusting my life to her, but also an effort to understand how it works. I still don't have a wiring diagram for this bike so I traced out every cable and drew one up. It might look like a 2 year old with a crayon did it, but coming from a commercial electrical background it made sense to me.
I started at 9am on saturday morning and didn't leave my shed till 1:30am sunday, good times. I soldured the last connection at 1am and turned the ingnition on. To my frustration the head light, indicator & nuteral LED, and right front indicator wasn't working, and the break light was constantly on. At that stage I was in no frame of mind to investigate, so like a zombie I packed up and staggered to bed.
The following Saturday I did some fault finding. I saw right away a a connection I forgot to soldure, once I did the head light started working. I tested the LED's, indicator and front break switch and it turns out the components them selfs are faulty. So it's safe to say I was pumped that, for my first attempt at wiring a bike from scratch, I only missed one cable and the rest of my wiring is fine.
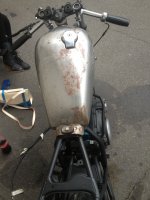
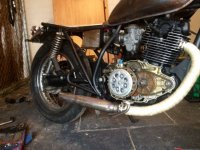
I purchased a tiny Lithum Ion battery roughly 1/4 the size of the original. This allowed me to fabricate an end plate for the battery box and put my battery, ignition, relay, fuse & engine stop switch inside with the regulator mounted on the outside. the original battery was so big it actually pocked out one end of the battery housing.
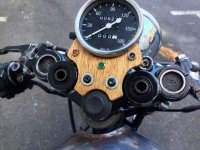
I managed to hide all of the cables with the exception of the stuff at the front forks. I left all cables that go to the handle bars with extra length and coiled up neat behind the head light. I did this because i want the option of putting a flat bar on in the future.


If any one wants a copy of this diagram PM me and I'll draw up a neater copy and email it. Note it is for kick start and doesn't yet have an engine stop switch.
 

Attachments

  • Battery box.jpg
    Battery box.jpg
    562 KB · Views: 6,785
  • wiring.jpg
    wiring.jpg
    649.5 KB · Views: 798
  • wiring diagram.jpg
    wiring diagram.jpg
    675.2 KB · Views: 791
How did I miss this. Nice work Pat. The SR are a great bike.
I really like what you have done with the engine. Just a word of advice from previous experience, that air filter WILL cause you all sort of trouble. It blocks a part of the carb that controls the vacuum for the slide. Had one on my SR when I bought it and it killed the top end.
 
Did a bit more today. I aligned the two cogs the timing chain sits on ( not sure of their official name ) as I took apart the head to clean it and replace the gaskets. I fitted a new oil filter and was fitting the gaskets to the side covers when I realised one of the gaskets I had been sent as part of a pack was wrong. This really pissed me off!! I was really hoping to start the bike today, but instead have to order new gaskets. It would have been the first time I heard it run since I stripped it 6 months ago. Killing my life, o well. Instead I continued on doing a few little things that were bugging me. one was fitting the right passenger foot rest to a thread that had been cross threaded, managed to wrestle it on. However, and I know it's a small detail, but the foot pegs really bug. As I have put so much effort and time into changing the look of the bike, I thing they stick out like gogs balls and bring the whole bike down. I was hopping to fit some thinner bare metal ones, pictured below, but can't find any to fit a SR250. If any one has any info on these please let me know.
I will be starting the seat in the next week or two, will post picks when its done!
 

Attachments

  • original foot peg.JPG
    original foot peg.JPG
    123.2 KB · Views: 2,677
  • foot peg I want.JPG
    foot peg I want.JPG
    72.4 KB · Views: 2,790
Great work so far!!!

I'm building a Suzuki GN250. Looks like yours, so I may steal some ideas, ok?
 
I commend anyone who can wire a bike from scratch. Have a hard enough time just installing aftermarket electronics lol
 
DesmoBro said:
Nice relocation with the switch if I had some decent wiring tools I might attempt such wizardry

Thanks mate, but all you need is soldiering iron $25, soldier $5, cable $2 and some heat shrink $2. Way easier than it looks! Could even get away with using joiners so you don't have to soldier.
 
Knocked up a marine ply base for my seat over the weekend. Cut I roughly to shape then ran a saw a few mm deep along the top and bottom where the seat bends and filled it with builders bog. It held shape prity well when it dried so next step is stick down some foam and apulster it with some vynel (used for boat seat) I picked up for under $30, cheering!

I plan to fix the vynel to the ply with a heavy duty staple gun, unless any on knows a better method?

I also used some of the ply to make a tiny dash as I wired up some new LED's for neutral, high beam & indicator. I ordered in a new front brake switch and front right indicator as the old ones were faulty. Shouldn't take to long to wire them in, after the last thing I have to do is figure out how to wire in my engine kill switch I mounted in on my battery box as the bike didn't come with one. The new switch is just a small contact that opens so I am thinking I can wire one of the cables going to the ignition coil through it, a bit of trail and error should sort that out haha.

As far as the motor goes, I haven't had it running since I stripped the bike around march. I ordered a new gasket kit a while ago and went to fit the last gasket the other day and realised it was the wrong type. So I ordered a new one that came in in two days, I raced home to fit it... Opened the pack and realised it was totally the wrong size. Apparently the right one will be in at the end of the week. Third time is a charm, but all I want to do is kick it over...

Will put up photos soon.
 
Here are some happy snaps
 

Attachments

  • seat 1.jpg
    seat 1.jpg
    779.1 KB · Views: 383
  • seat 2.jpg
    seat 2.jpg
    626.5 KB · Views: 618
  • dash 1.jpg
    dash 1.jpg
    566.1 KB · Views: 369
  • dash 2.jpg
    dash 2.jpg
    454.4 KB · Views: 728
I got the new gasket, fitted it, filled with oil and fuel, put the bike back together and it didn't start. fuck my life.
I wasn't getting a spark at the spark plug, so I took the ignition coil into a wreckers and they tested it and it works fine. I got a new spark plug lead and fitted that but still no spark. I traced and double checked all the wiring and that seems fine so the next step is replacing the CDI unit.
After looking on ebay I thought i would be up for $200+, so have been putting off. BUT, I just found one on gumtree for $35 inc express postage, and its been tested!!!
The bloke was an absolute king, I told him I really wanted to start my bike this weekend so he dropped what he was doing and express posted it straight away and said I could sort him out with the cash when I take delivery.

So if all goes well and it is just my CDI unit I will in theory have it running by Saturday.

Having said that, this is the first bike I have ever owned/ worked on so I'm guessing it will be running a bit rough when it does start. I'll have to cross that bridge when I get to it. If I do get it started this weekend I will try upload a video to youtube.
If it doesnt start, I might require some help trouble shooting. Touch wood.

Will keep you all posted....
 

Attachments

  • gasket 1.jpg
    gasket 1.jpg
    153.5 KB · Views: 1,422
  • gasket 2.jpg
    gasket 2.jpg
    165.7 KB · Views: 1,498
Also I was thinking of slapping some FIRESTONE VINTAGE tires on her, does any one have any knowledge as to how they perform on a sr250?
Any feed back will help.
 
Looks pretty nice for a first bike Pockets! As for your pegs, couldn't you take a piece of pipe about the diameter of the pegs you are looking at, cut down the length with a grinder, then use said grinder and cutting disc to make your cross hatch and have someone weld a small piece of plate with a bolt hole on the end to make your pegs? Also another trick for the seat if you like the finished wood look would be to get an old skateboard deck, looks like it would fit your frame angles perfectly. Whatever you do though it's looking nice!
 
PocketsVIC said:
Also I was thinking of slapping some FIRESTONE VINTAGE tires on her, does any one have any knowledge as to how they perform on a sr250?
Any feed back will help.

DON'T DO IT!

As I have said before they have about as much grip as bowling shoes on an ice rink.

See if you can get some Dunlop K70 or K82. They have a vintage look and will stick well enough for what a SR can put out.

EDIT: because bowling shoes and blowing shoes are two different things.
 
Back
Top Bottom