Follow along with the video below to see how to install our site as a web app on your home screen.
Note: This feature currently requires accessing the site using the built-in Safari browser.
We noticed you are blocking ads. DO THE TON only works with community supporters. Most are active members of the site with small businesses. Please consider disabling your ad blocking tool and checking out the businesses that help keep our site up and free.
Hey guys,
Been lurking here for a couple weeks in anticipation of the new project. With winter approaching, I decided on a new winter project. I've been doing automotive race prep work for many years now on BMWs and decided to give a motorcycle a shot. I picked up this 75 CB360 on tuesday with 5500 miles on it. It fired right up but was not road worthy as the front caliper was sticking and brake fluid resembled a gelatinous goo. The first day was disassembly and taking inventory on what was going to be replaced. I snagged a benellie mojave tank as they have a great shape and have quite big knee dents which I'll need being 6'3. Today I cut off excess brackets, smoothed them out, mounted the tank and cut off the backside of the frame and welded in a 1" piece of 4130 chromo tube as a brace. I have a bunch of parts coming in from various vendors. I don't plan on tearing down the motor. Just want to clean the exterior of it and replace the stripped bolts with polished allens. I'm still deciding on a color scheme but am thinking something like a copper/dark bronze frame with olive drab tank/seat would be sharp. Enough of the blabber, here are the pics of the bike the day I picked it up and where it sits now with the tank mocked up. Thanks guys and any helpful tips/guidance/advice is always appreciated.
I actually did NOT get it off ebay. I saw the one on there but would not be around for the closing of the auction. I contacted Joe at vintagecosmo.com as he has many of them in stock. He was 20mins south of where I picked up the bike so it was a productive trip.
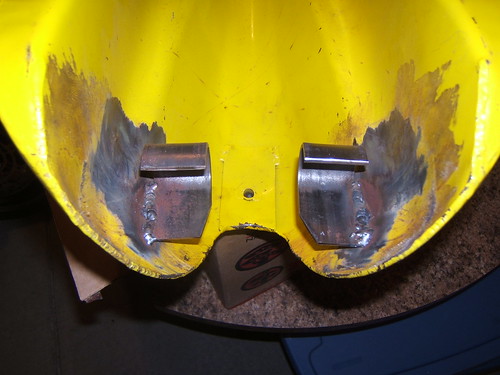
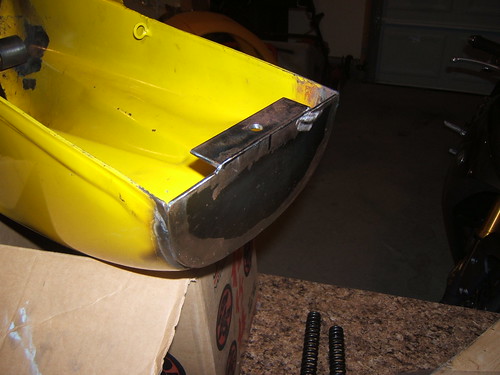
I mounted it the same way chrisf did at motofiaccone.com on the cb360 he built. I welded a threaded bung on the backbone for a 5/16-18 bolt and the backside has two steel straps welded to the underside of the tank and bolted to the frame/front seat area. Just have to modify it a bit for the honda petcock to thread on.
It should fit just fine with some mounting brackets fabbed. Got some more work done today. I was going to buy a pre-made seat in a dunstall style but decided to make my own. It just needs a bit more finish sanding and should be ready for fiberglass layup. Pretty happy with the shape and overall style of it so far. I also received my universal tarozzis from guzzino.com They are a great company to deal with and ship extremely quick. I ordered them Sat and had them today (CA to NJ). I'm going to mockup everything that I possibly can before sending the frame, tank and other pieces out to paint/powdercoat to avoid any fab work during assembly. Here are the pictures along with one from last week when I welded on the rear battery tray and seat mount tray. Thanks guys
Today I decided to clean up the motor and paint it. Used a lot of engine degreaser and acetone to get it spotless. So far it seems to have bonded quite well. To really help it cure, I put it under heat lamps for a bit. I'll probably give it a top coat of 2k clear for added protection and gloss. The Honda cover over the "brushes" will be PC'd the color of the frame which will be a bronze chrome for a bit of contrast. The clubman handlebars also came in from an ebay seller. Very pleased with the fit and overall quality of them. Here are some pics of todays work/parts
Bit of an overdue update. Been busy and really started cranking away on the build. The frame/swingarm are at the powdercoaters as we speak and should be done in a week. I chose granny smith sprakle green as it has a great vintage look with the gold tinge to it. I have a seat coming in on tuesday from Sean and the guys at roccity as well. I got the wheels all scrubbed clean and sprayed with epoxy black paint. I decided on gold accents as well for a bit more contrast and pop. I did the front caliper, rear drum cover and speedometer backing in gold. Today I got the oil filter and oil screen all cleaned out and resealed the motor with new gaskets and the stainless fasteners. I plan on painting the carbs as well with eastwood carb renew paint. I cleaned them a couple days ago and they are in great shape. Just waiting on rebuild kits from ebay. Here are a bunch of pics from the progress over the past week.
Got a little more work done today. The speedometer is reassembled. Just had to touch up the black epoxy paint after i scratched it putting on the sealing ring. Pics will be up shortly of that piece. The front drilled rotor came in today and got that mounted up. I also decided to remove the starter and associated parts as it will only be a kick start only. Blockoff plug will be in soon. I also plasti-dipped the levers for a bit more grip and style. Turned out rather nice.
lookas good. you have made alot of progress. Those wheels look really good and the paint on your frame sounds cool. cant wait to see it all come together.
Nice job on that mounting for the benelli tank. I saw your thread where you shortened your tank a bit. That is executed extremely well! I think I saw the tank holds around 2-2.1 gallons. I made a list tonight of all the wiring supplies I will be using. I've built a complete custom chassis harness on my race car and will make it very similar. It will utilize deutsch dtm connectors for ease of removal/reliability and everything will be in raychem dr-25 heatshrink. Thanks to Chris from motofiaccone for the stripped down wiring diagram. It was a huge help
Nice job on that mounting for the benelli tank. I saw your thread where you shortened your tank a bit. That is executed extremely well! I think I saw the tank holds around 2-2.1 gallons. I made a list tonight of all the wiring supplies I will be using. I've built a complete custom chassis harness on my race car and will make it very similar. It will utilize deutsch dtm connectors for ease of removal/reliability and everything will be in raychem dr-25 heatshrink. Thanks to Chris from motofiaccone for the stripped down wiring diagram. It was a huge help
Nice job on that mounting for the benelli tank. I saw your thread where you shortened your tank a bit. That is executed extremely well! I think I saw the tank holds around 2-2.1 gallons. I made a list tonight of all the wiring supplies I will be using. I've built a complete custom chassis harness on my race car and will make it very similar. It will utilize deutsch dtm connectors for ease of removal/reliability and everything will be in raychem dr-25 heatshrink. Thanks to Chris from motofiaccone for the stripped down wiring diagram. It was a huge help
Had a productive day in the garage. I picked up the frame/swingarm from the coaters today. It came out great and the color is just what I was looking for. Decided to put the motor in and make some progress. Just waiting on my tapered steering bearings to make it a rolling bike. You can see the rear seat/fender is cut. Sean from roccity sent me a file on how to modify this seat of his to be a single seater or a 2 up when needed. This will be perfect as my gf loves bikes. Hope to have a bit more progress to show soon.
Tapered steering bearings came in today and installing them was quite easy. I just lightly smoothed out the steering stem with emory paper, cleaned it and put some redline assembly lube so the bearing slid on. I heated up the bearing with a heatgun and it slid right on top of the supplied washer. Steering is super smooth and decided to throw the forks on to see how she looks w/ the bars and all. Just waiting on new tires to come in to get it rolling again. The most time consuming part will be the wiring harness and the fact I'll be in FL 2 weekends in a row to visit the gf.
This site uses cookies to help personalise content, tailor your experience and to keep you logged in if you register.
By continuing to use this site, you are consenting to our use of cookies.