1971 CB750 K1 Rider Resto (On the road again!)

Re: 1971 CB750 K1 Rider Resto

Luck said:
Sorry, My friends use tanks like scuba tanks filled with compressed air in order to do mobile airbrushing. It works great for things that don't require much air. I thought that's what the blue tank was. Probably wouldn't work for to long if you were using it for soda blasting. lol Is the tank filled with soda? Pressurize it and it becomes a soda blaster? Looks like a great system. Im too cheap and Im still using a plastic hose and an air nozzle. lol

Ya, soda in the tank. Pressurized with my air compressor. Works pretty well, except when it is humid out. Then it likes to clog the pickup in the tank. It actually seems to strip paint better than my bead blaster, it won't touch rust though.
 
Re: 1971 CB750 K1 Rider Resto

Are you going with the original HM300 exhaust, it makes a difference. My 71 CB750 came from a guy in Minnesota and he pulled a fast one by switching the HM341 for the HM300 and then tried to convince me that the 341's are OEM when I noticed the issue several months later. I went ahead and purchased a new set of 300's just to keep it original. Even with the baffles in the 300's really howl and it's nearly impossible to throttle the bike without attracting attention.

1395916_755114027847606_1710586297_n.jpg
 
Re: 1971 CB750 K1 Rider Resto

SPOOKY#1 said:
Are you going with the original HM300 exhaust, it makes a difference. My 71 CB750 came from a guy in Minnesota and he pulled a fast one by switching the HM341 for the HM300 and then tried to convince me that the 341's are OEM when I noticed the issue several months later. I went ahead and purchased a new set of 300's just to keep it original. Even with the baffles in the 300's really howl and it's nearly impossible to throttle the bike without attracting attention.

I have pretty much resigned myself to the fact that I am not going to find any HM300’s that I can justify the money for. Even the HM341 is at the top end of what I (read...my wife) can justify spending.

Nice bike btw.
 
Re: 1971 CB750 K1 Rider Resto

Well, I have no significant other to say no and the result is the first floor of my house including the kitchen and bathroom being full of bikes and parts. I have 2 CL125A's on the second floor that will be floor ornaments once they are finished. I think I paid around $1200 for the new set of HM300's in 2006 and I'm glad I did. I bought them for my 69 750 and after driving it for a summer before parking it for good moved them over to the 71. Had I know the 71 engine had been bored and the cam changed I wouldn't have purchased the bike but I can say it kicks butt when fully throttled. Have fun with the project. I have PDF's of the official shop and parts manuals but don't have any way to send them however since I pulled the plug on my website two years ago. BikeBandit is a good place to purchase Honda parts and they keep their order fiche up to date.

1461121_755514134474262_2093046387_n.jpg


1464611_755514157807593_1644025101_n.jpg


1451989_755514184474257_37108188_n.jpg
 
Re: 1971 CB750 K1 Rider Resto

I don't have much to update here as I have been busy on another project, as well as trying to keep my two teenagers cars on the road. I ended up buying a 2000 Triumph tiger that had been dropped and needed some work. I'm about finished with that, so I can hopefully invest a little more time on the 750.

One of the things that I enjoy about projects like this is learning new skills and techniques. To make a long story short, I did not find any paintless dent guys that wanted to tackle the dents in the tank so I decided to give it a try myself. I thought "what would happen if I welded some pins to the tank with my MIG welder?" (kind of like a poor mans stud welder) I had previously cleaned the inside of the tank with my soda blaster so I was not concerned about a big boom while welding. The soda blaster works really well by the way. The inside of the tank is basically spotless! Nice clean bare metal. So.....I started off by tacking on some nails from a finish nail gun. This worked a little bit, but there was not enough surface area for the nail to really pull out much at all. Those of you who are welders can see that I did not have quite enough amperage here for good penetration either.

20140222_145617_zps0169e3fa.jpg


Next, I dug out some regular nails, and tried welding them to the tank. This worked much better than the wire nails.

20140222_153942_zps8854969b.jpg


20140222_154852_zpsbccb49de.jpg


The big plus of using these nails is that I was able to make a rudimentary dent puller with a piece of scrap angle iron and my rivet gun. It worked pretty well, considering what I paid for it :)

20140222_171158_zpsa3a8a455.jpg


Big dent after the first pull. The nail eventually let loose.

20140222_171313_zps35f7f29b.jpg


Here is where it is at now. It is far from perfect, but its not going to need a 3/4 inch thick hunk of filler like it had before. I have ordered supplies for lead filler and I am going to learn another new skill. Bondo will be kept at a very minimum. While pulling, I ended up tearing a couple nails from the tank, leaving some small holes. I welded the holes shut, but I figure by using lead filler, I am adding another level of leak proofing just in case there may be a tiny pin hole somewhere. I really don't want to use any tank liner because the inside of the tank is so clean. Also, you can see that my makeshift puller was not ideal as it left a few small creases in the tank. I probably should have taken more time to assure that this did not happen.

20140222_153438_zps4b722f78.jpg


20140301_220314_zps14aa4152.jpg
 
Re: 1971 CB750 K1 Rider Resto

Well, I attempted lead body solder for the first time today. Now, I can add "old school body man" to my repertoire. :D It was interesting to learn the process. Comments and critique are welcome. :)

Eastwood sells a lead body filler kit for $109.00. I'm too cheap for that, so I found a 1 lb 70% lead / 30% tin rod on amazon for about $8 and bought Eastwood tinning butter for $20. I used a scrap piece of wood for my spreading paddle....lubed up with some ski wax I had laying around to prevent the lead from sticking to the wood.

The process I used in a nutshell. (disclaimer!!!!! I am a total amateur at this so take anything I say with a grain of salt)

1) Clean the metal! I de-greased, used a wire wheel on the grinder, and de-greased again. Ended up with a nice clean shiny surface.

2) Brush on a thin layer of tinning butter to cover a larger area than the dent. Tinning butter is 75% flux, and 25% lead.

3) Tin the area with a MAP torch using a small to medium flame. I found it best to keep the flame moving over the surface in a kind of fanning motion. As you are heating the surface, you can first see the acid flux liquify, and then the lead flows shortly after. When it is hot enough, it turns a silver color. Have a wet clean cloth available to cool the surface and wipe off any excess flux. Work small areas at a time.

4) After the metal cools, you need to neutralize the acid from the flux. I did this by scrubbing the surface with a baking soda and water mixture. Then I rinsed with plain water and dried.

5) de-greased again with acetone.

6) Now the fun begins. Time to melt the lead and somehow get it to stay on the metal. There is a fine line between not hot enough to work the lead, and too hot. If you get it too hot, it will puddle and just run off the surface. Once again, using a MAP torch, I heated the tank and the lead bar. Most of the time is spent heating the bar because it is fairly thick. The actual surface of the tank heats up pretty quick. I built up the lead in the dent until it appeared to be higher than the surrounding area. It was trial and error to find just the right heat.

7) Next, I worked the area with heat and the wood stick. I heated the lead again while trying to spread it around like butter. I ended up getting it shaped somewhat to the curves of the tank. Again, trial and error. It is a challenge to get just the right consistency to form the lead.

8. The final part involves cold shaping the lead. None of this is to be done with power tools in order to minimize lead dust in the air. First, I used a rasp to get it roughed out. Then, I used regular files, and finally I used sandpaper with a sanding pad. This is a much slower process than plastic fillers as the lead is much harder to work. Also, you only get one shot at the repair. If you have any low spots, or you take too much off, you have to start all over or accept what you have and finish up with a little bondo. (which I will end up doing :mad: )

Tinning Butter

20140308_104648_zpsefbd643f.jpg


Lead Bar

20140308_104709_zpsc1250b9f.jpg


Tinning complete

20140308_104528_zpsb45681c9.jpg


After attempting to spread the lead with the wood stick. The area with the arrow pointed to it is ever so slightly too low. I did not find this out until I was almost finished filing and sanding.

1b7edc4b-0ad8-4e0f-beac-c7e9777b311d_zpsb7cc4f8f.jpg


Filing and sanding. getting there! What a pain in my you know what.

20140308_123554_zpsadd280d0.jpg


Here it is, as good as I am going to get it. I will need a very thin layer of plastic filler on the bottom half of the dent on the front, as well as a small amount of filler near the emblem mount bar. I accomplished what I set out to do. That is, make sure there will be no leaks and to use as little plastic filler as possible. No filler would have been better, but I will take this for a first try.

20140308_173052_zps83e98c77.jpg
 
1971 CB750 K1 Rider Resto

Wow my friend, glad to see you back.

My uncle pulls dents for a living (and makes bank doing it following hail storms) and I remember him telling me tricks he did back in the day, similar to your write up.
 
Re: 1971 CB750 K1 Rider Resto

Drey6 said:
Wow my friend, glad to see you back.

My uncle pulls dents for a living (and makes bank doing it following hail storms) and I remember him telling me tricks he did back in the day, similar to your write up.

Thanks Drey6,

I can certainly see why lead is not used very often anymore. Plastic fillers are SO much easier to work with.
 
Re: 1971 CB750 K1 Rider Resto

This is going to be a loooonnnnggg picture intensive post. It has been over two months since I have updated this thread because I was waiting until I had the painting finished so that I had something of substance to post.

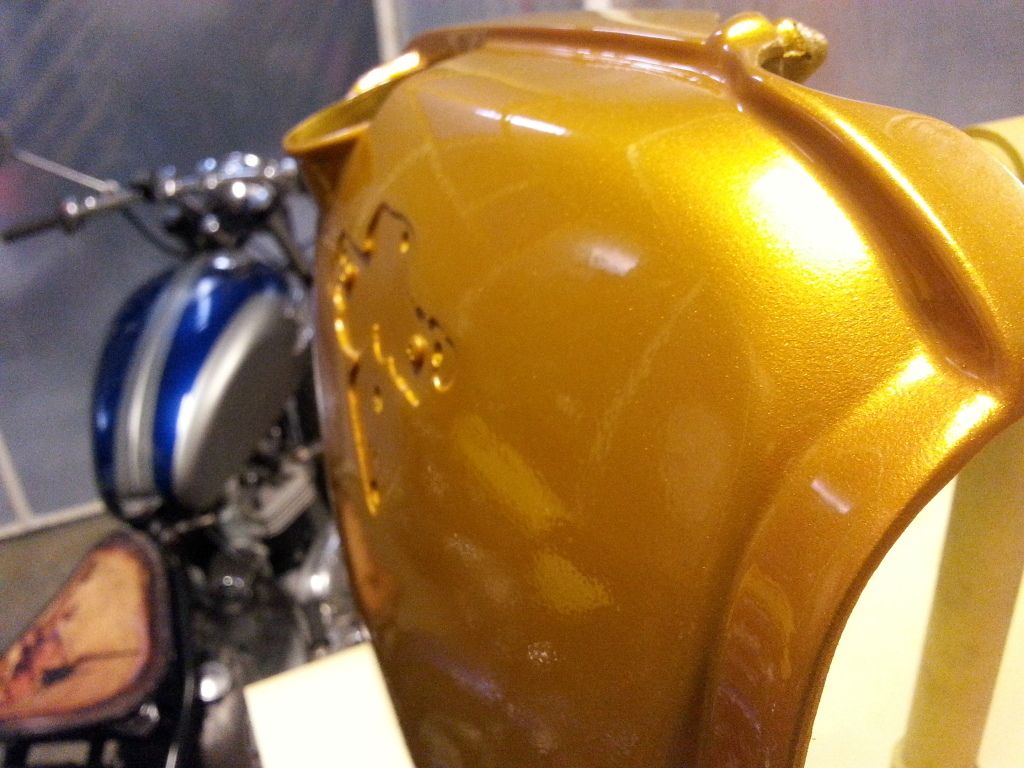
After much gnashing of teeth, wailing, and using the name of god in vain, my painting is nearly finished. The tank is finished. I have yet to decide if I am going to do a little more work on the side covers. They are pretty good, but the tank turned out pretty darn nice in the end. I am my own worst critic....especially when it comes to paint...just ask my wife. She rolls her eyes when I point out what I see wrong with a paint job that I have done.

Oh, I have to mention, I am on glass three of a good bottle of Pinot Noir, so I may ramble just a bit. :)

I have done a fair amount of painting in the past, but this is the first time I have ever attempted painting a candy paint. I must say' that at times, it was a very frustrating experience with a steep learning curve. Unfortunately, this is some expensive paint to be wasting on mistakes. I think I have the process pretty much down now. The only thing that is holding me back now is the total elimination of dust. Normally, a little dust is not that big of a deal with paint that is totally opaque. One can just wet sand the clear coat until it is smooth and then buff it out. No harm no foul, and you would never know that there was an issue to begin with. Not so with candy paint. the candy layer of the paint is translucent, and any dust will cause variations of the thickness of the paint around the dust particle, which will cause the paint to darken in that area. This is very noticeable and bothered me to no end. I did find that one can carefully wet sand the candy coat...and even the clear, to sand this high area down and even out the color around the dust. You have to be very careful so you don't over sand the clear and remove some of the candy layer. If you do, you will end up with a lighter colored area.

I ended up with a total redo on the tank, and a long process the second time around. The first issue I had was that I tried to paint an epoxy sealer, followed immediately with the candy base, candy, and clear. The sealer did not lay perfectly flat, which carried through to the final finish. I could tell that the base color was not totally smooth. Reason number one for a redo. The second problem was the dust issue and the discoloration associated with it. I debated leaving well enough alone, and my wife was actually kind of irritated that I had reservations about letting this paint job out of the garage. In the end, I just could not accept what I had, and ordered some more paint. I have to say that I am very happy with the redo. Money well spent in my opinion.

On to the painting process and some pictures.

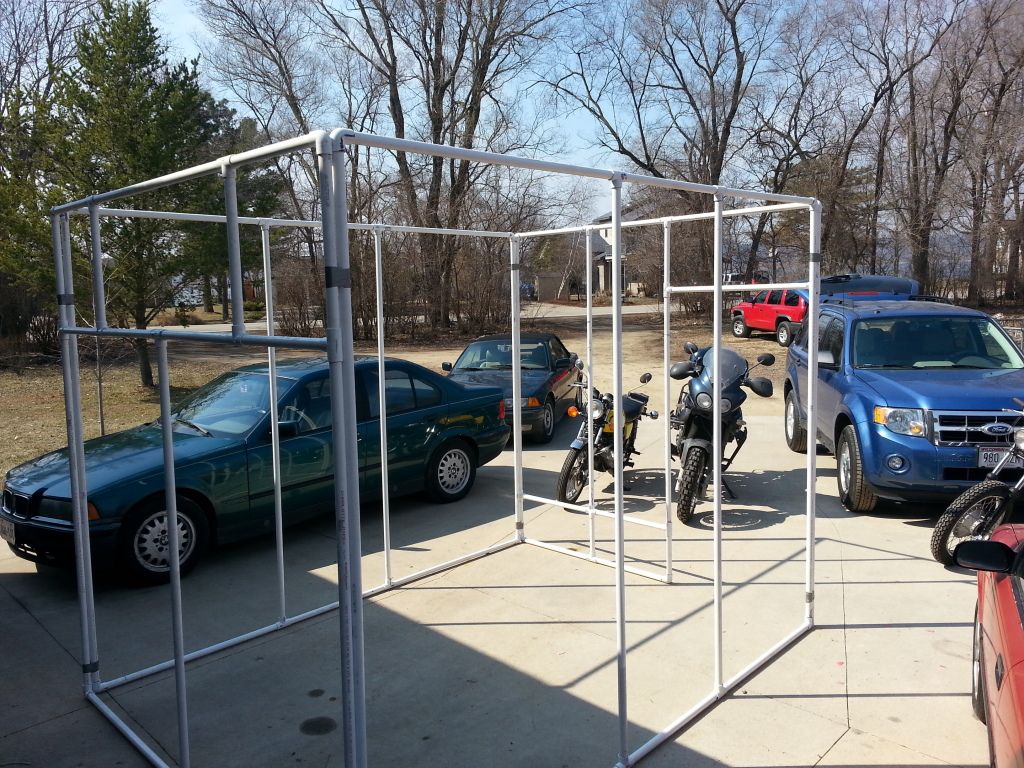
The first thing I did for the paint job was to build a temporary paint booth. This was somewhat successful, but really cemented the idea that I need to build a proper positive pressure booth if I am going to continue to to do this.

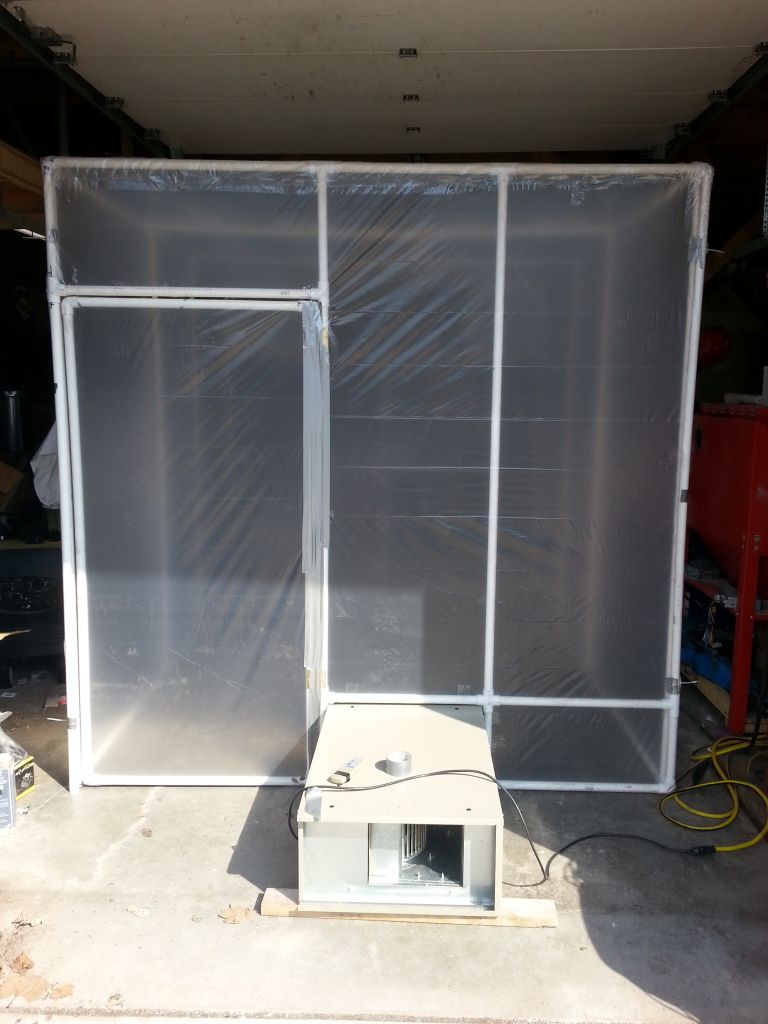
Here are a few pics of the temporary booth that I constructed. It is built to be taken down when not in use and I am able to set it up again in about a day.

20140406_112449_zpsb488e6f9.jpg


A friend of mine gave me this air filtration unit for my booth. I had it set up to suction the air out. This became a problem. Every time I opened the door, air would rush in the booth....carrying dust with it.

20140407_152730_zps0fe879fa.jpg


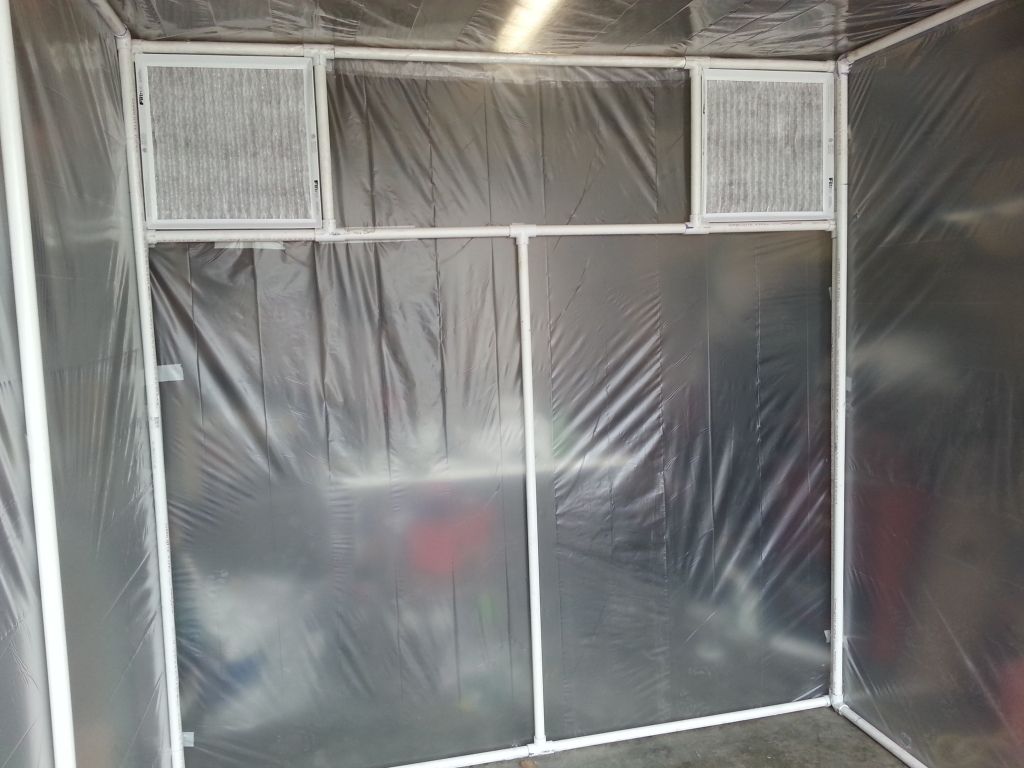
The other side showing the intake filters

20140407_152824_zps692028a0.jpg


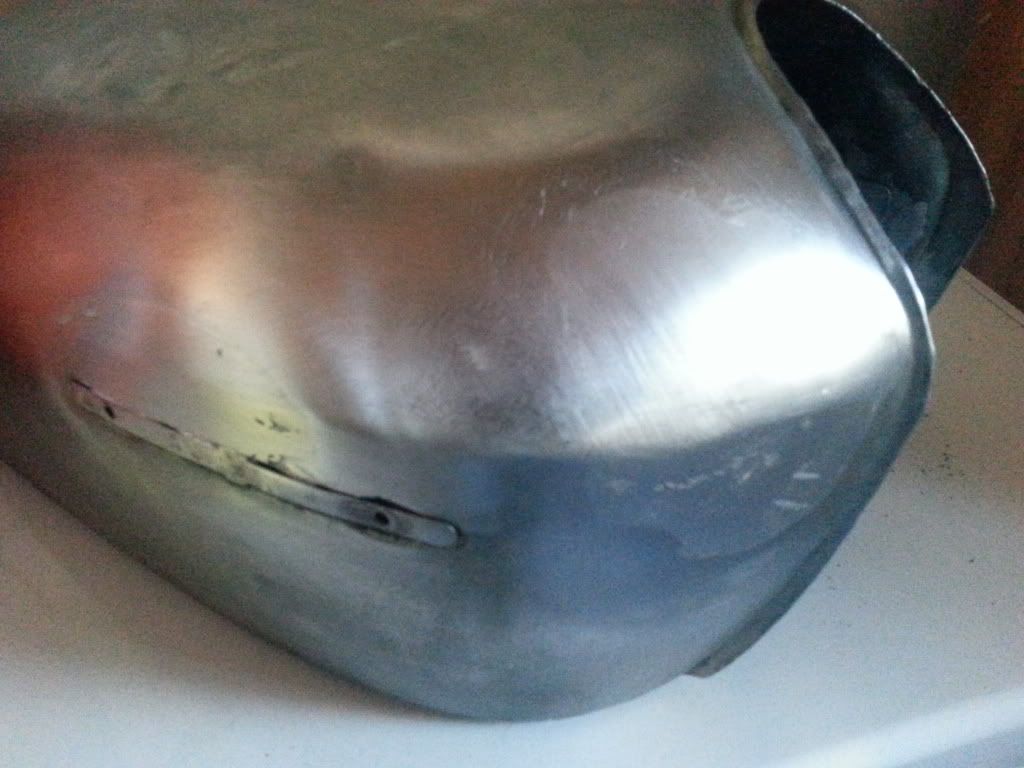
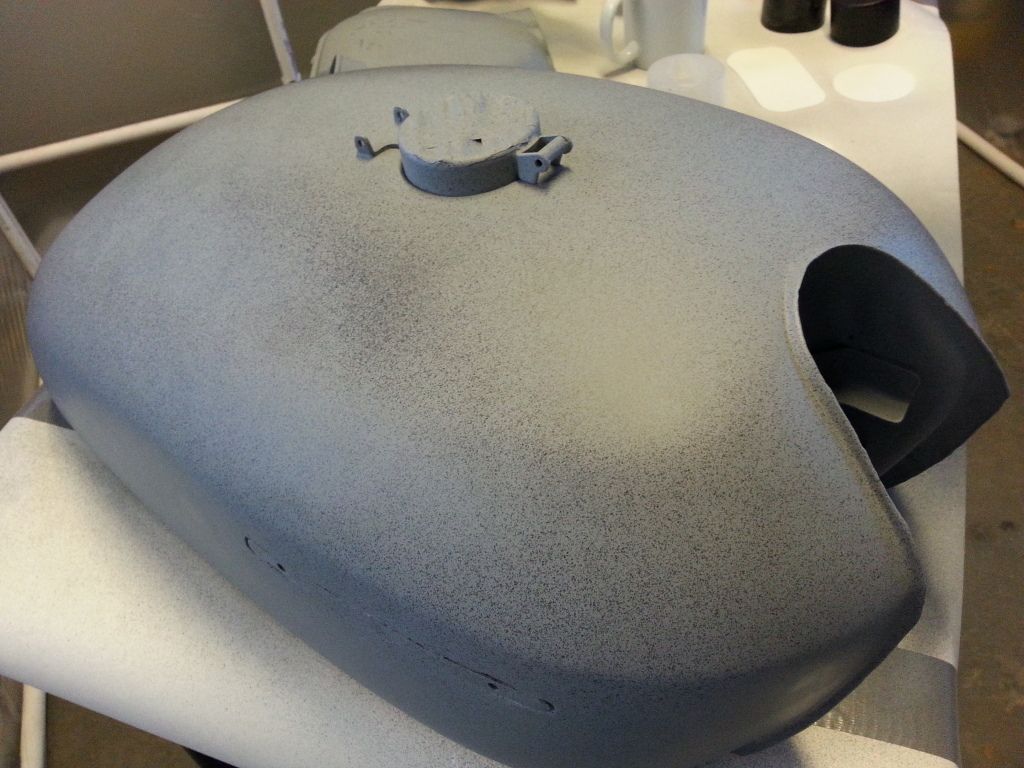
Here is the tank with primer and a coat of guide coat black to assist with seeing any imperfections while block sanding. The guide coat is the black speckles on the primer. Works great. As you block sand the primer, if you sand down to metal yet have a low area where you can still see the speckles, you need to shoot another coat of primer....over and over...until you can block sand the guide coat until it is completely gone without exposing any metal.

20140408_105612_zps60cd2134.jpg


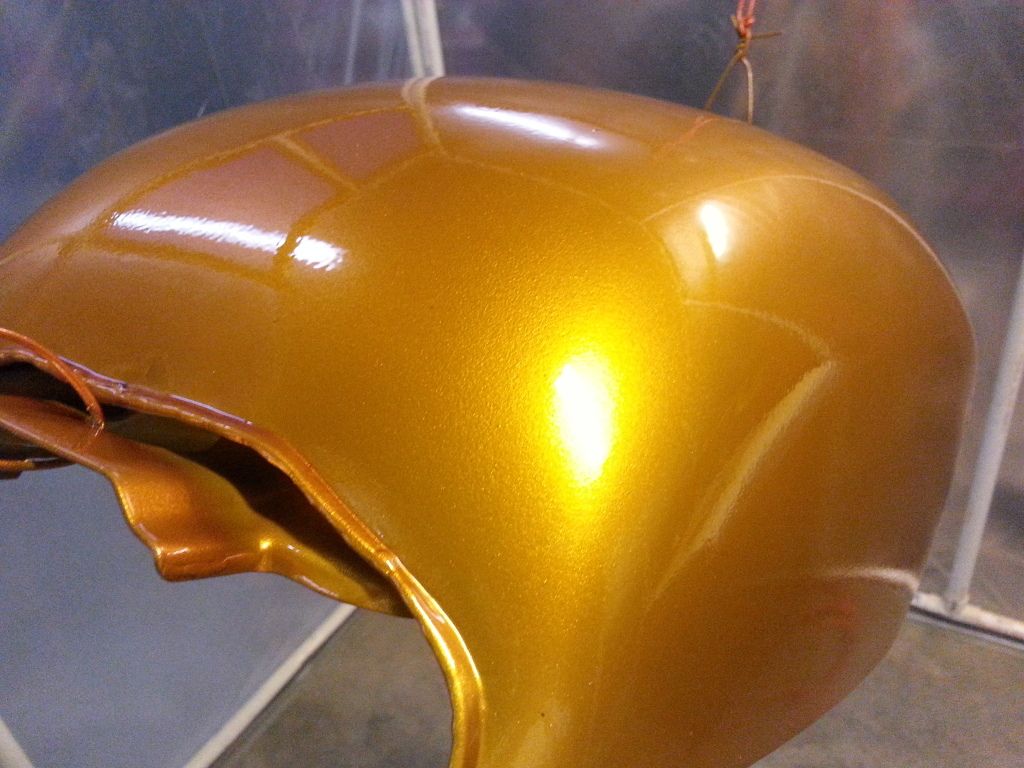
Next set of images is the first try with the candy paint shot wet over the epoxy sealer. I have done this in the past with out any issues. This time, I was not happy with the results.

20140409_211625_zps78e6542a.jpg

20140409_222353_zps9956fa94.jpg

20140409_222423_zps8cf0e4af.jpg

20140409_222455_zpsa64128d1.jpg

20140409_222533_zpsbc3acfb5.jpg


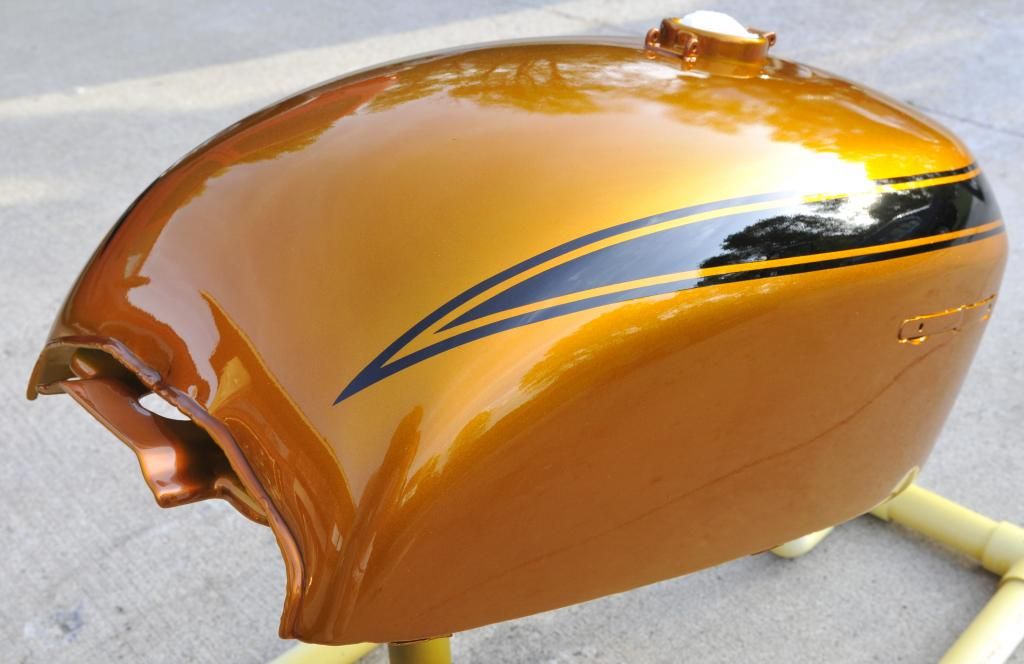
Turned out OK, but not good enough

Take two.

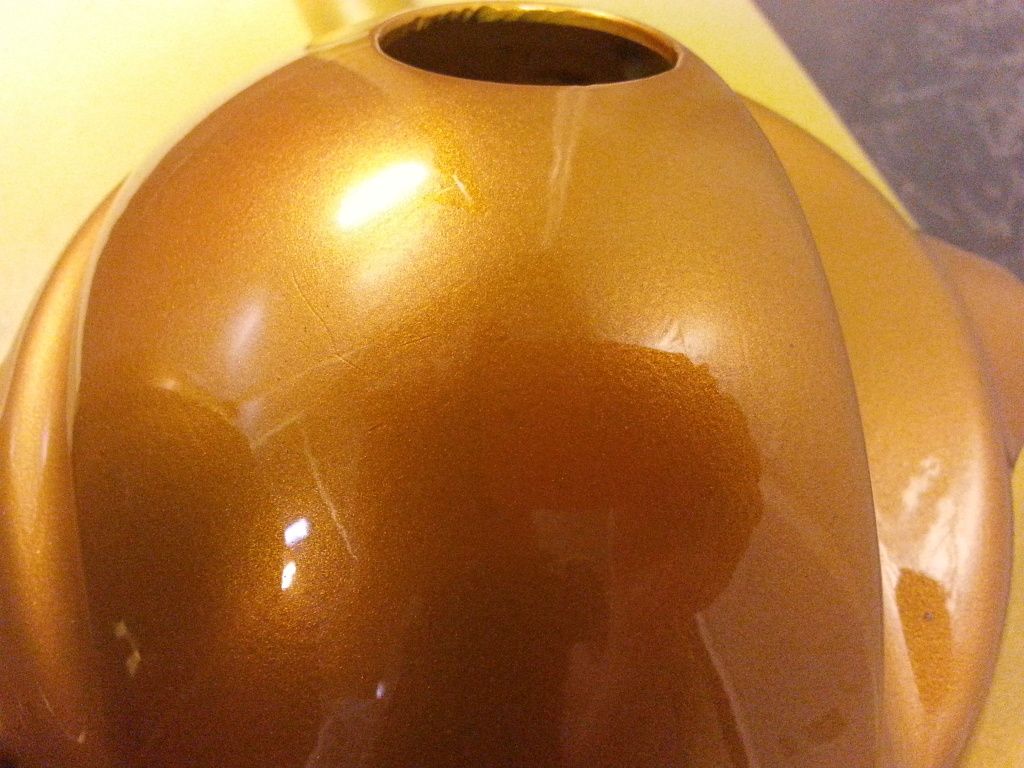
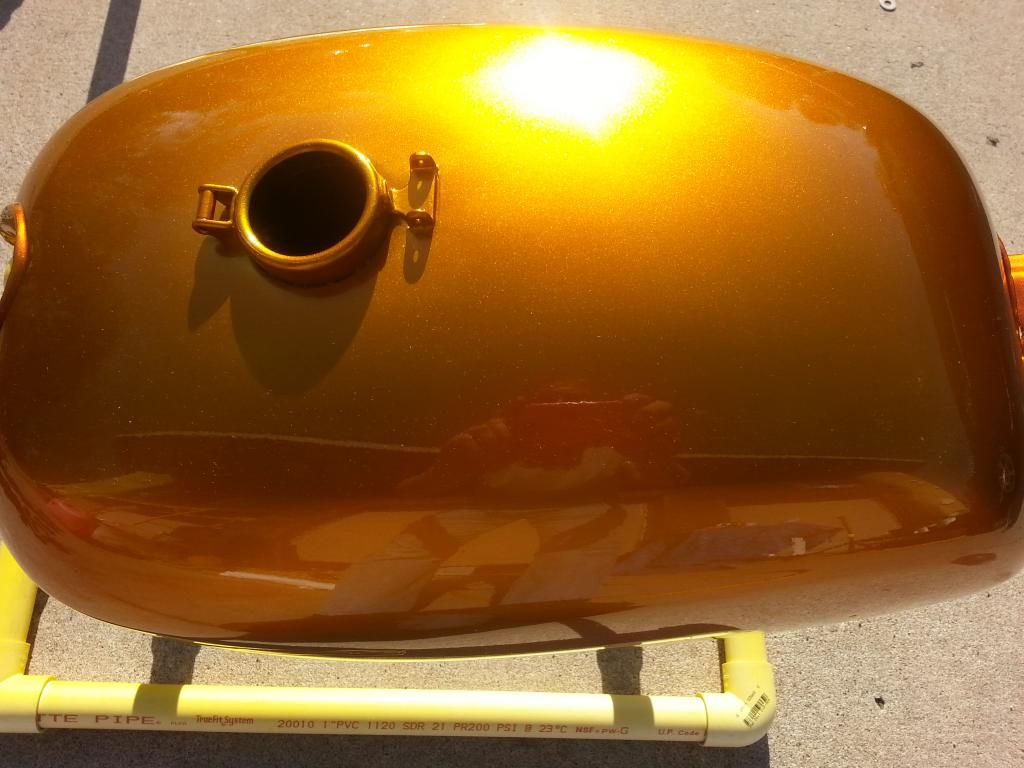
I ordered more paint and started over with the tank. I wet sanded down until I was back to the candy base coat and started over. now, when I shot the new base coat, it was perfectly smooth from the start. I started having issues with dust, and the associated color issues with the candy layer so I stopped after the second coat of the translucent candy paint and walked away for the night. The next day, I did a light wet sand to take off the high spots and continued on. I shot two more coats of the candy paint followed by three coats of clear.

This is the result.

20140523_175803_zps5c58e235.jpg


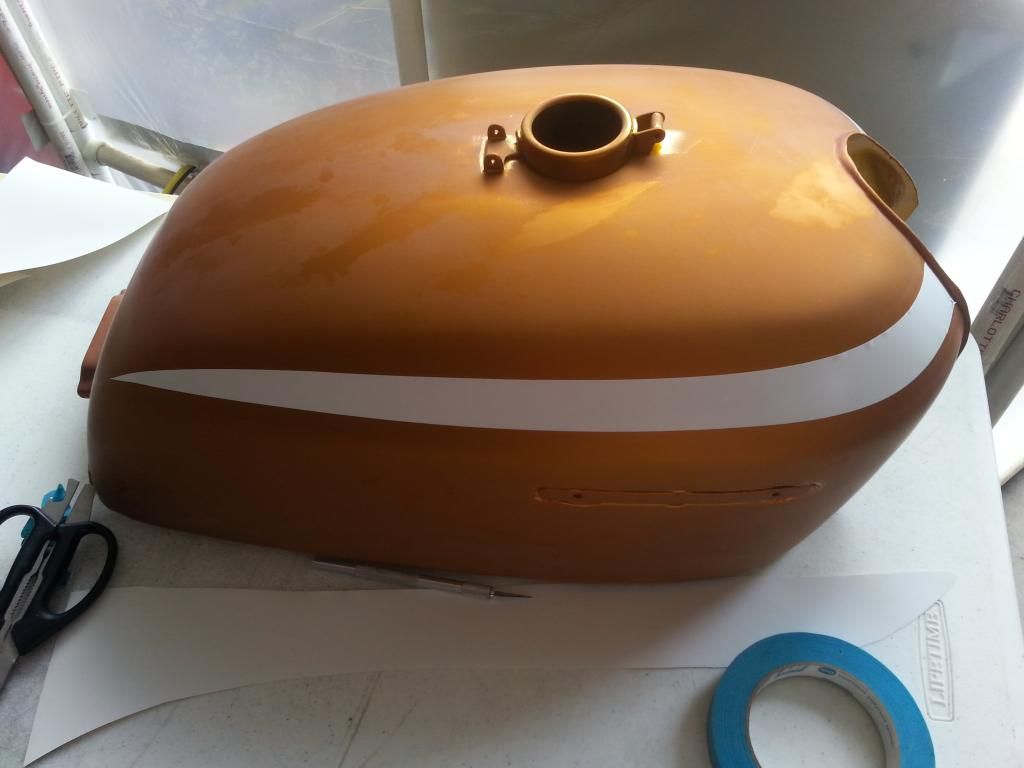
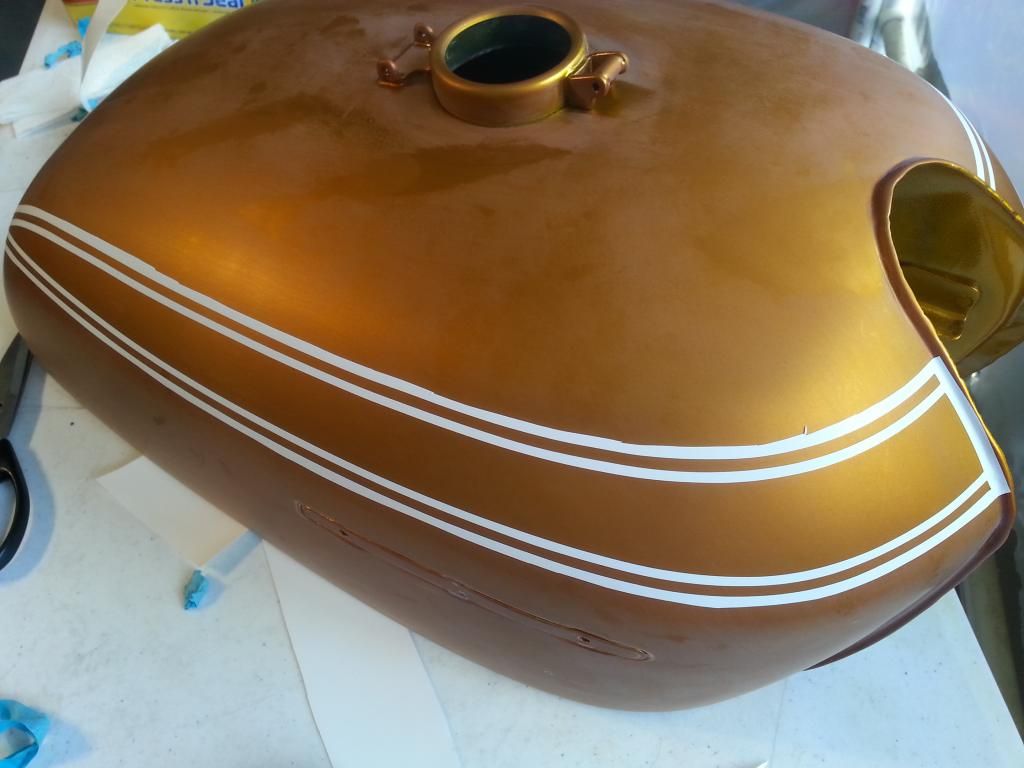
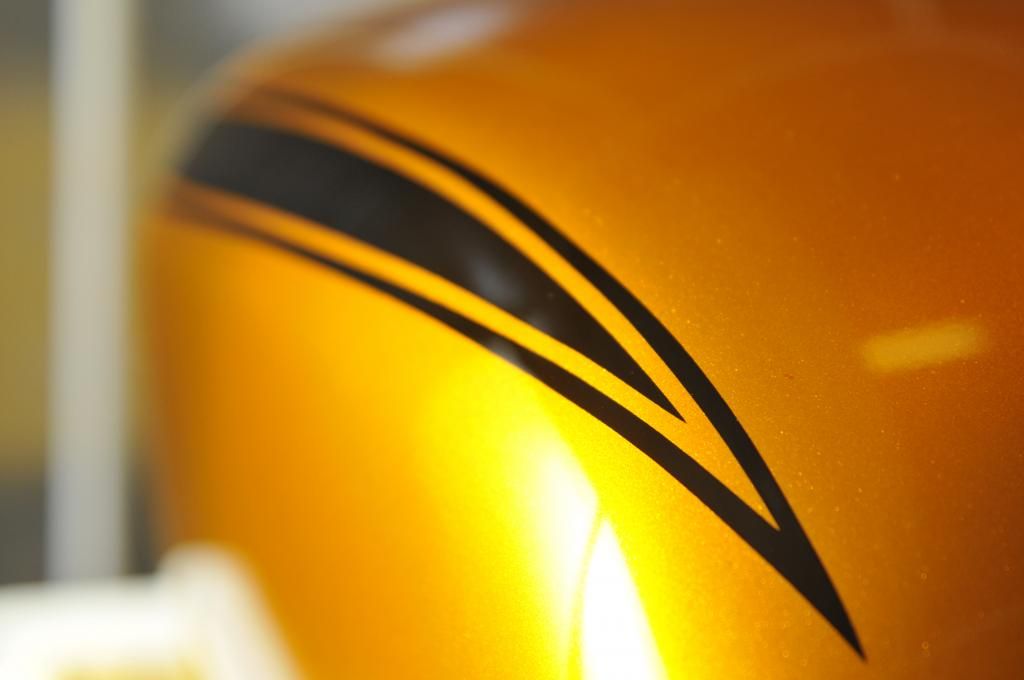
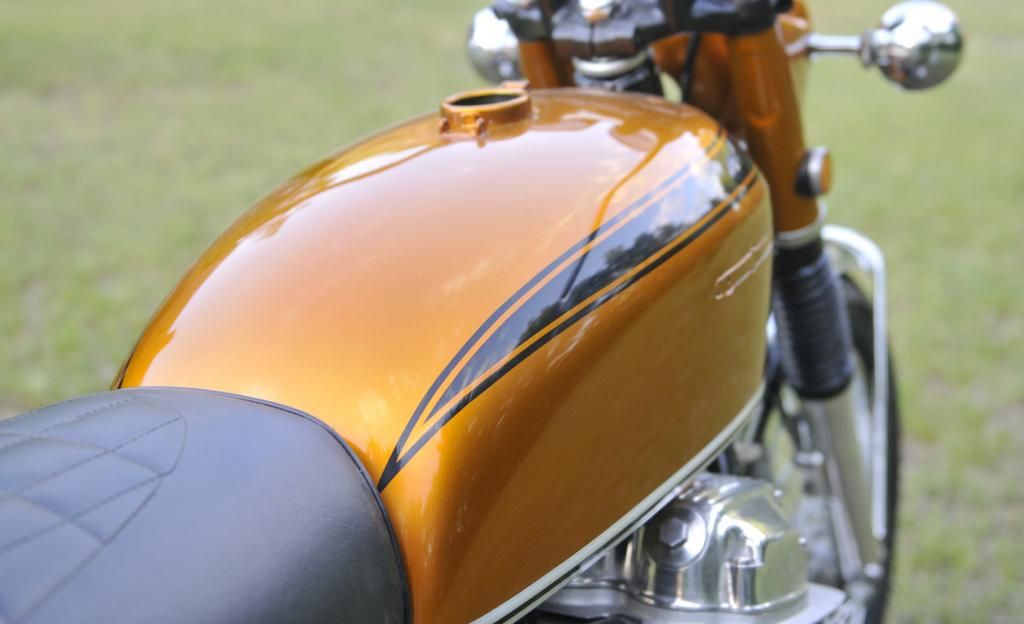
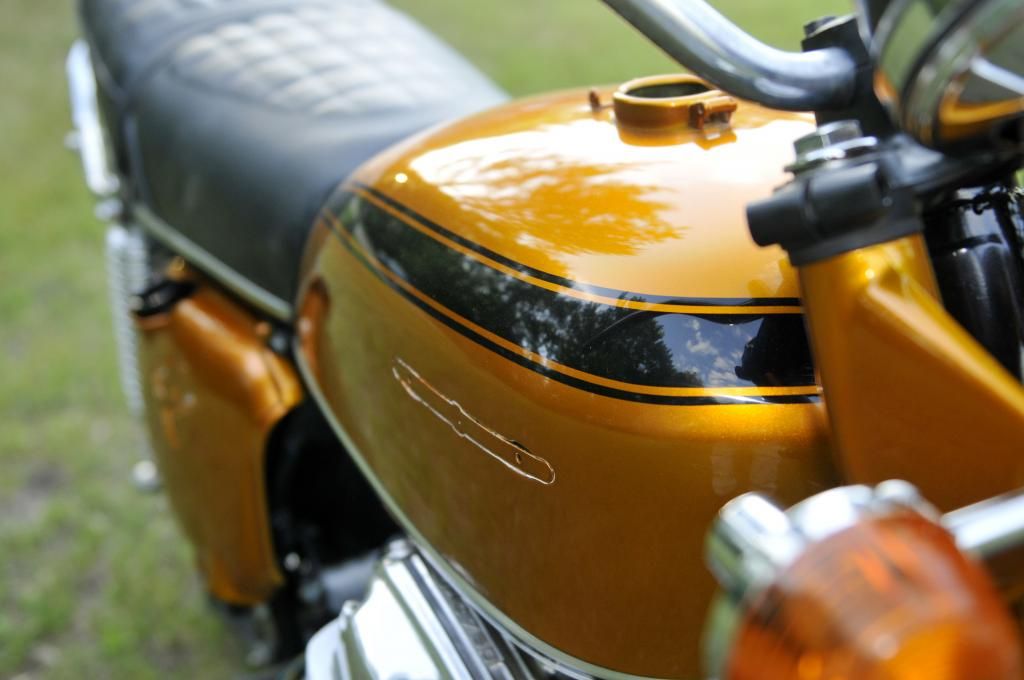
Not bad, but again, I had a few dust spots to contend with. With some very careful sanding, I was able to sand down to where I just took of the high spots in the candy without really touching the candy coat. I don't know if this makes any sense or not, but I was sanding the clear and only touching the high spots of the candy coat that protruded above the rest of that layer. Keep in mind, that these spots were not that noticeable to begin with. Who knows, maybe I am the only one who would have noticed. Now I had a surface ready for the stripes.

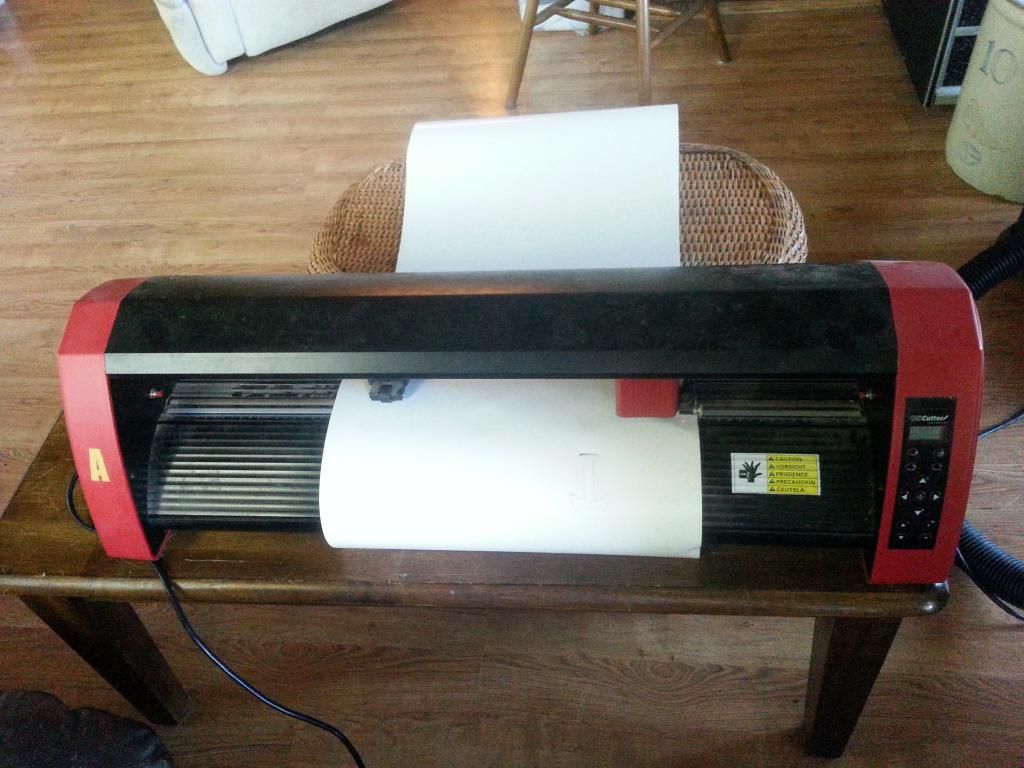
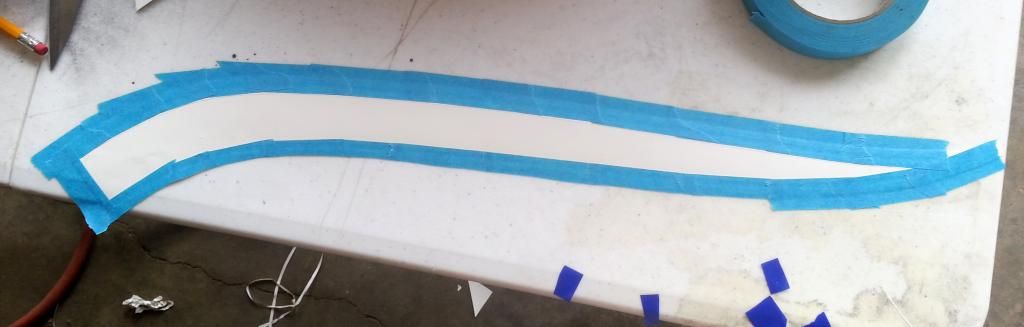
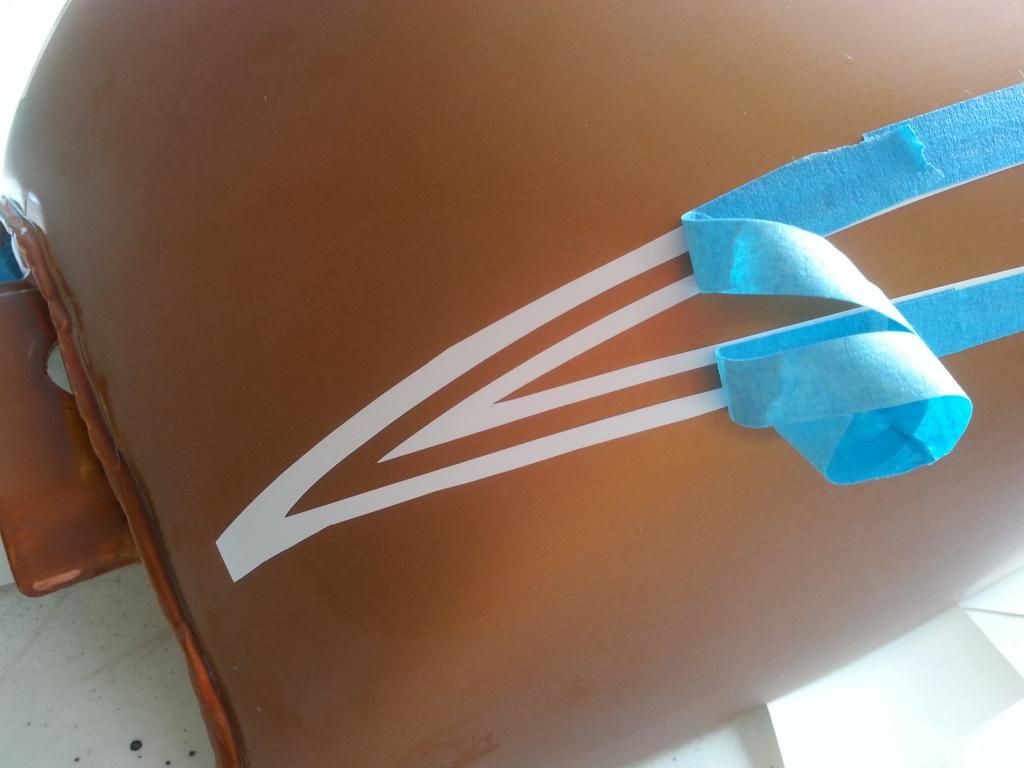
I used my vinyl cutter to cut a paint mask for the stripes.

20140523_181618_zps5b7d1b97.jpg


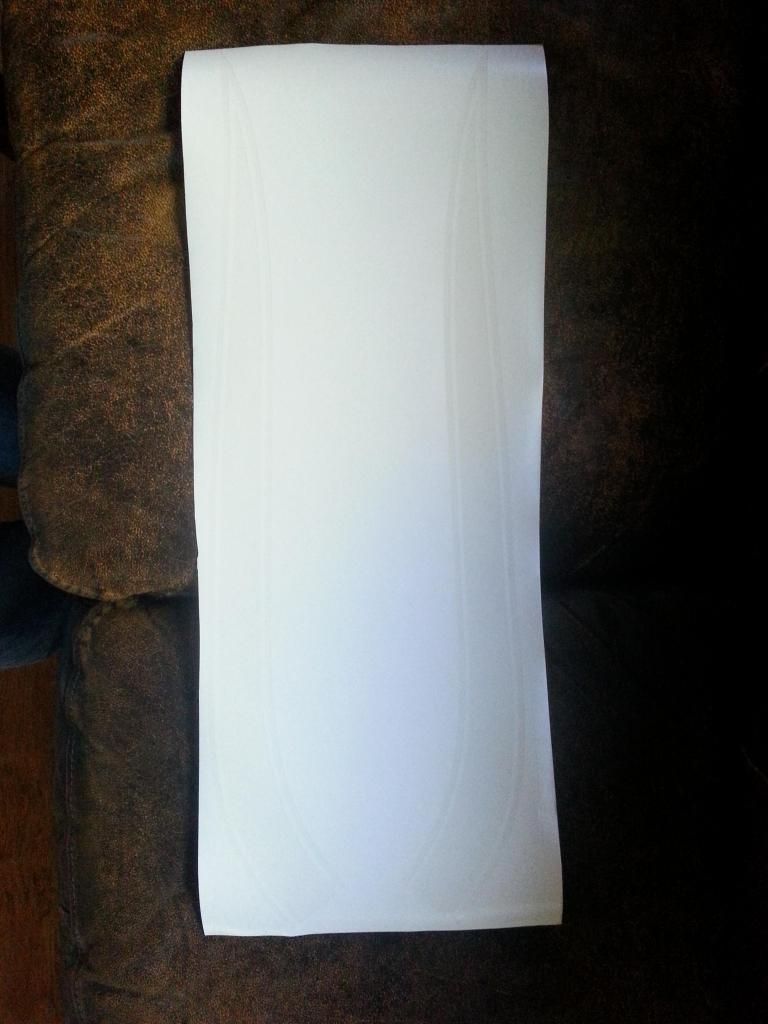
Kind of hard to see, but you can just make out the stripe mask in this image.

20140523_184429_zpsf44b32a6.jpg


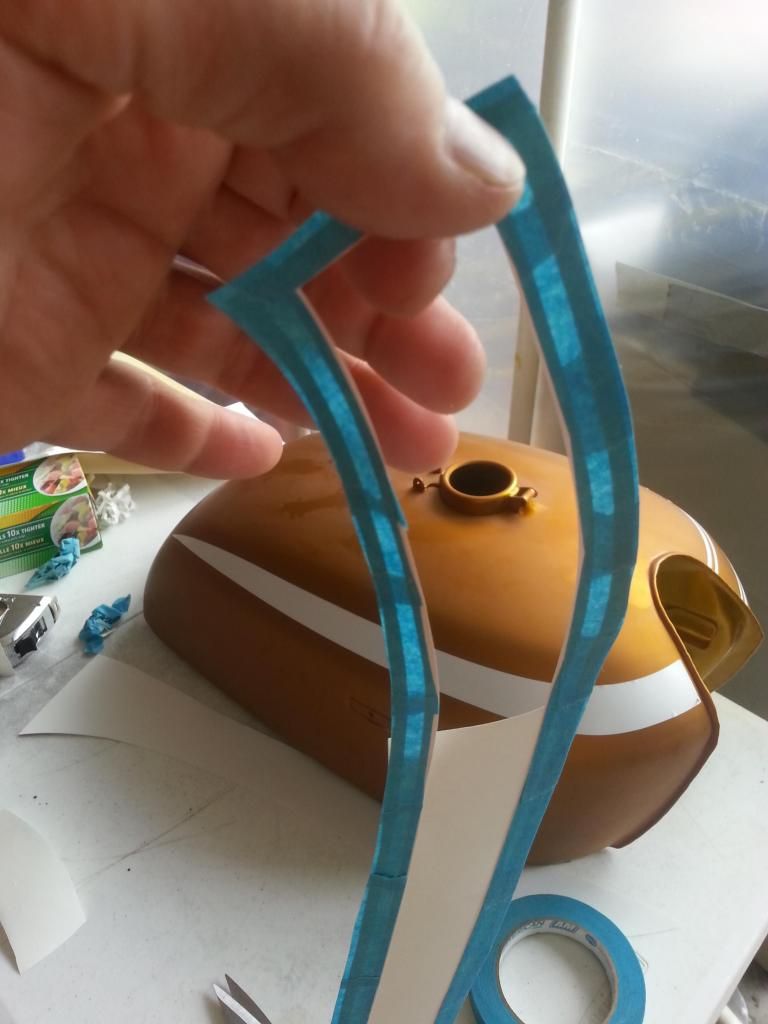
After much trial and error, I was able to get the mask to lay correctly on the tank. First I placed the center section on the tank as a guide for the double stripe piece

20140526_103115_zps9c18191e.jpg


Then I used masking tape to transfer the stripes to the tank. You need some sort of backing to transfer the stripes or they will not maintain the correct shape and spacing.

20140526_103104_zps1e8361b2.jpg


20140526_103403_zpse84aaf21.jpg


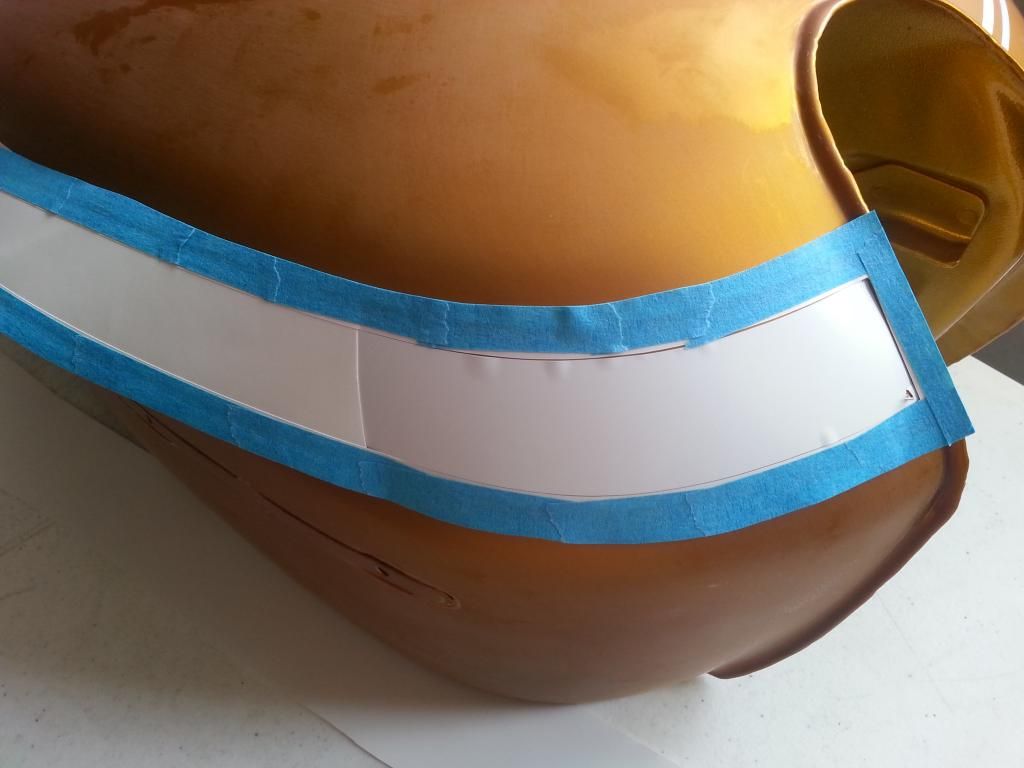
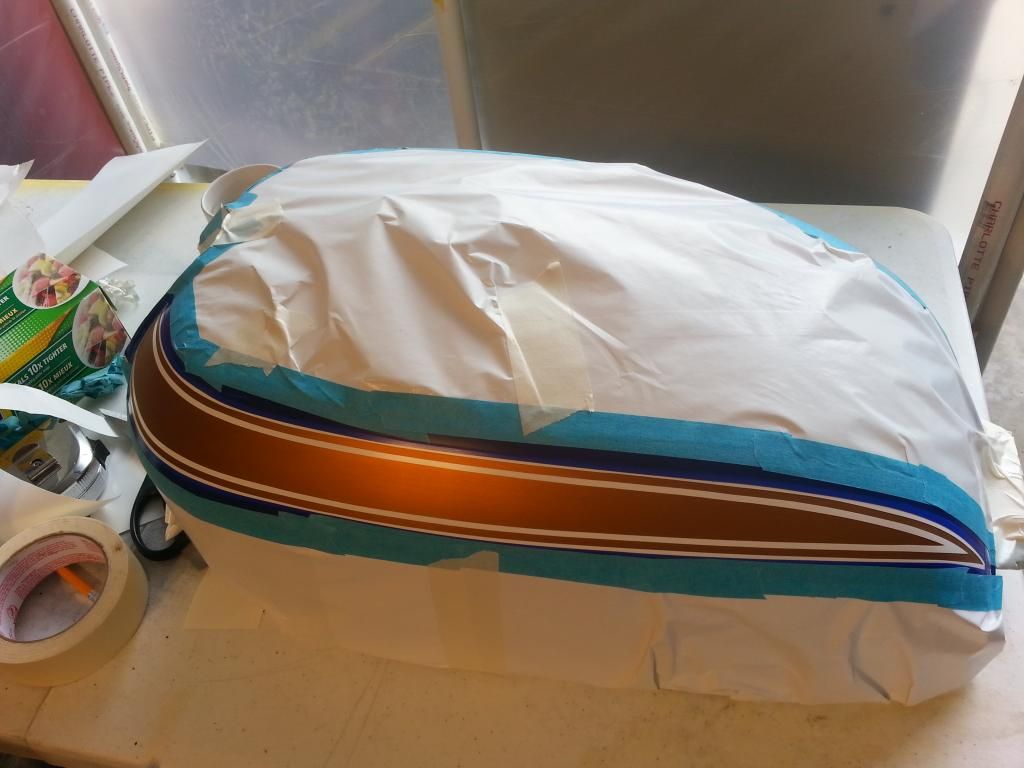
Applying the stripes. I only remove a small portion of the paper backing at a time to make handling of the sticky vinyl easier.

20140526_103534_zpsf970e18f.jpg


Finally, removing the masking tape once the vinyl is in place....notice that I previously removed the white center area also.

20140526_104205_zpsd281c02f.jpg


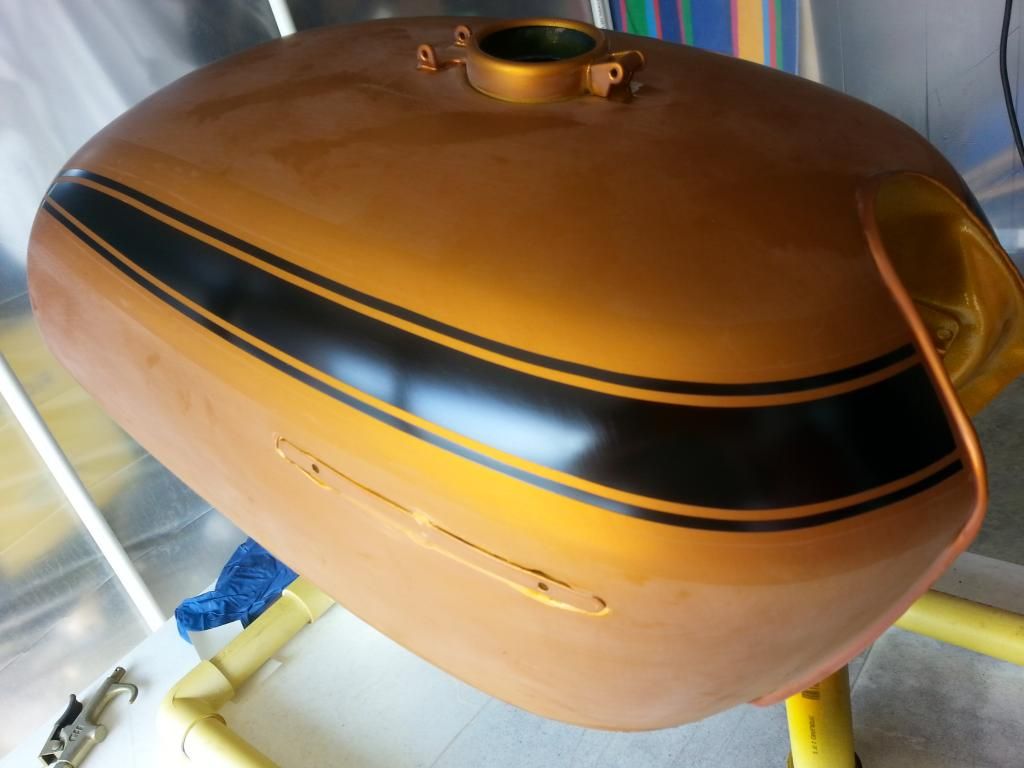
Now all I have to do is mask off everything that I don't want to be black.

20140526_104751_zpscdfb3aba.jpg


Ready to paint the stripes

20140526_121706_zpsffed2a50.jpg


Shot the black

20140526_160203_zpsd6743f2a.jpg


All the masking is removed and almost ready to shoot the last round of clear. The dark patches on the top of the tank are from my sweaty forearms touching the tank while I was trying to get the masking for the stripes to lay down straight. (that was a real PITA by the way) trying to get the paint mask vinyl to lay flat on a compound curve can be quite challenging. So after this, I washed the tank with soap and water, used some wax and grease remover to remove any remaining oils from me touching the surface, blew out any nooks and crannies, and did a final dust removal with a tack cloth. (these steps were followed every time I shot any paint).

20140526_161717_zps77c3922e.jpg


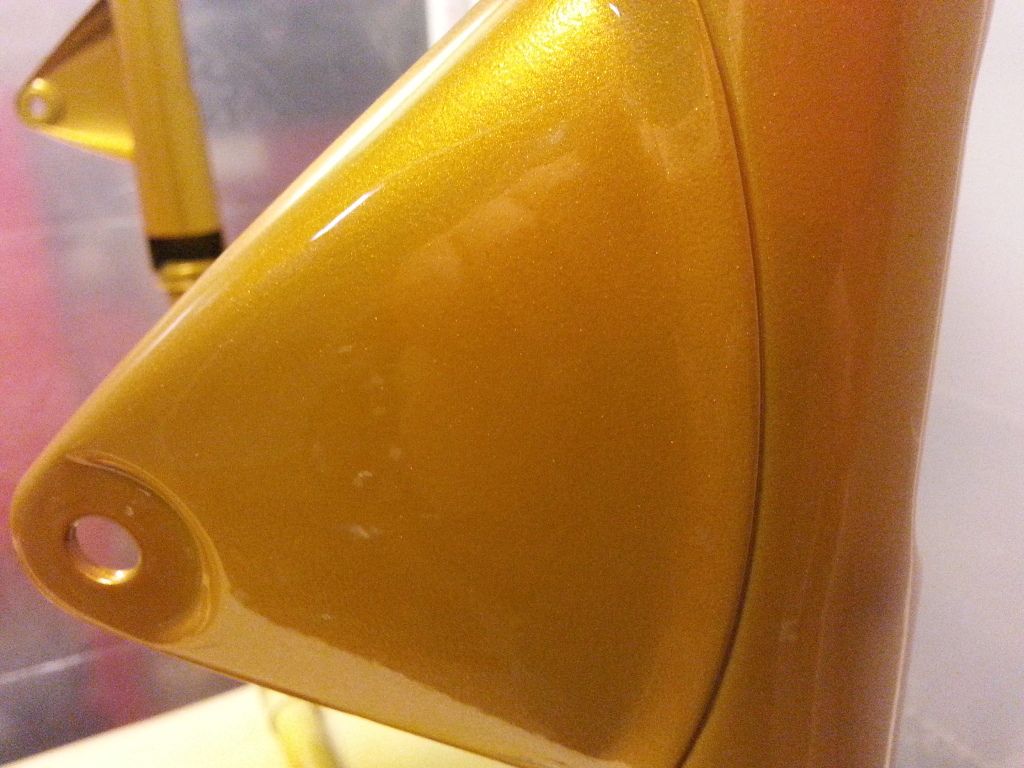
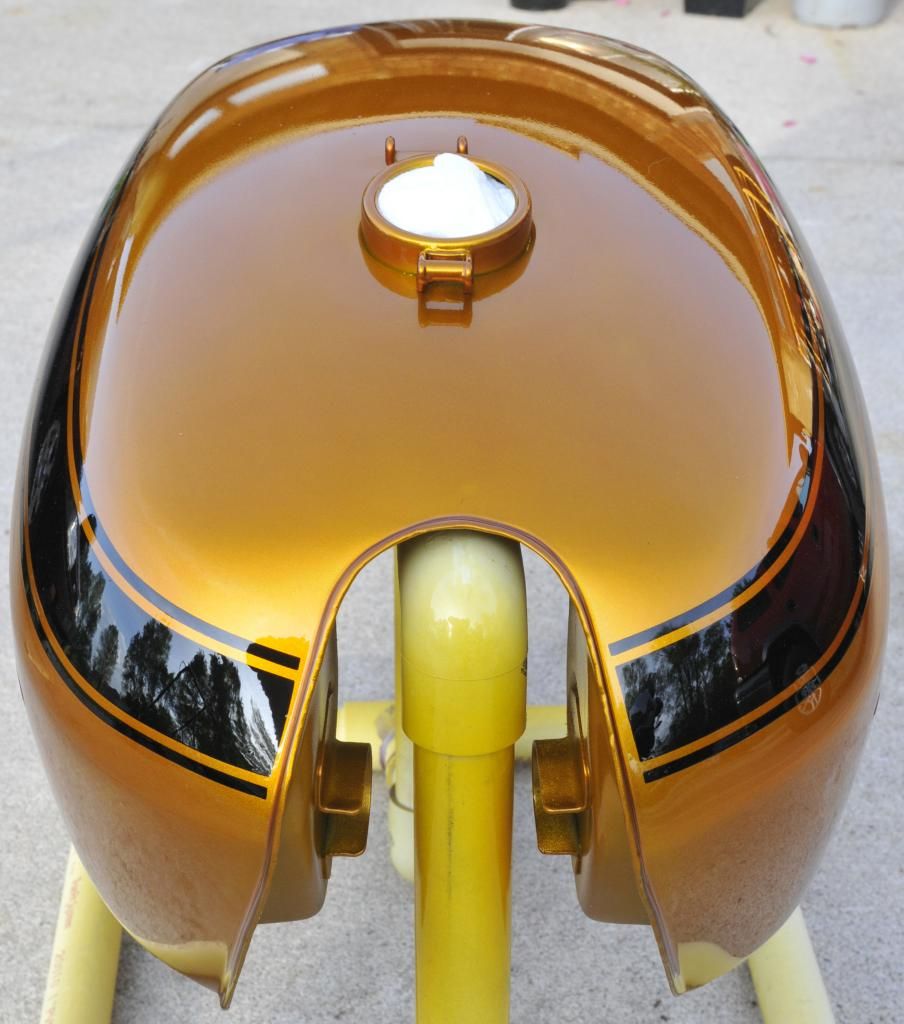
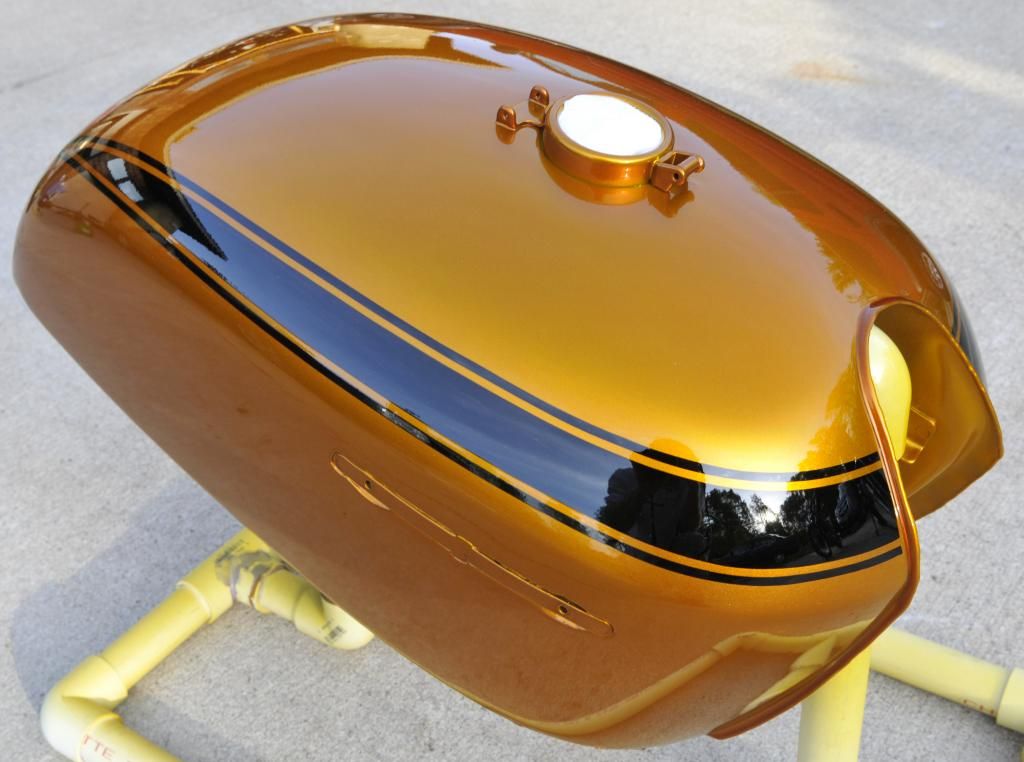
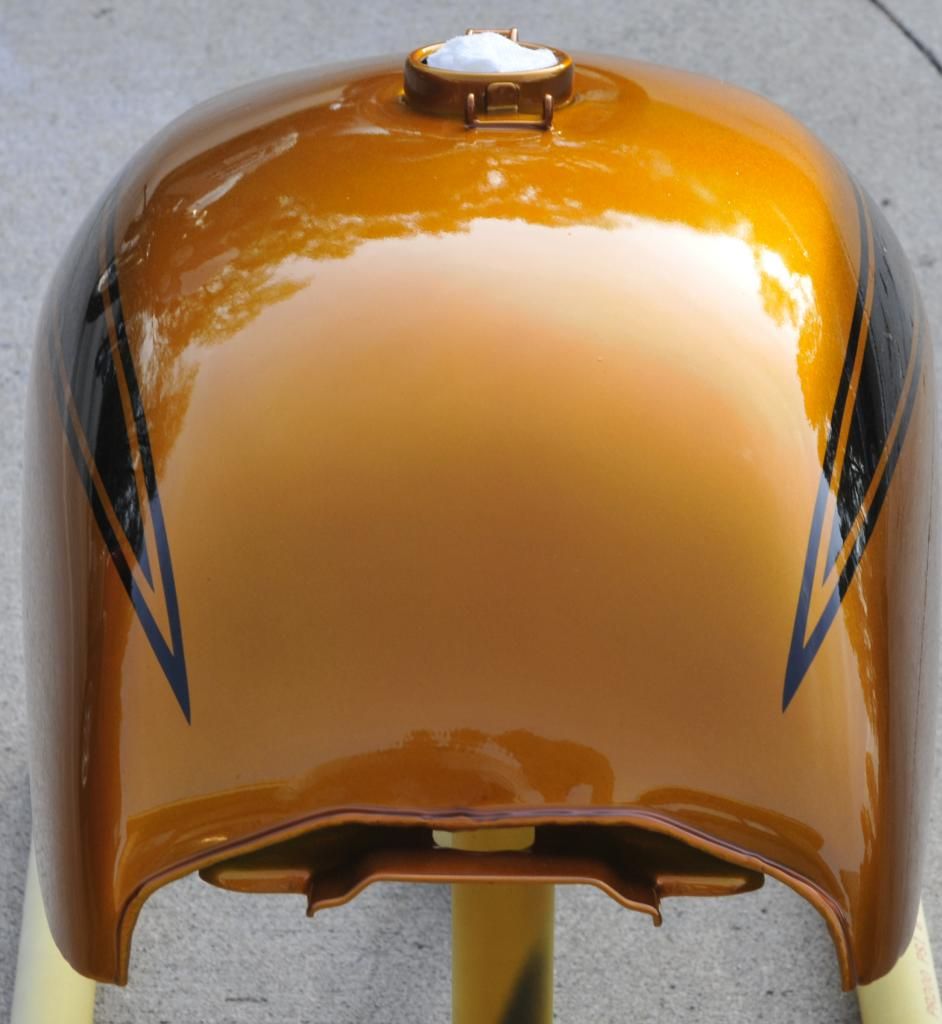
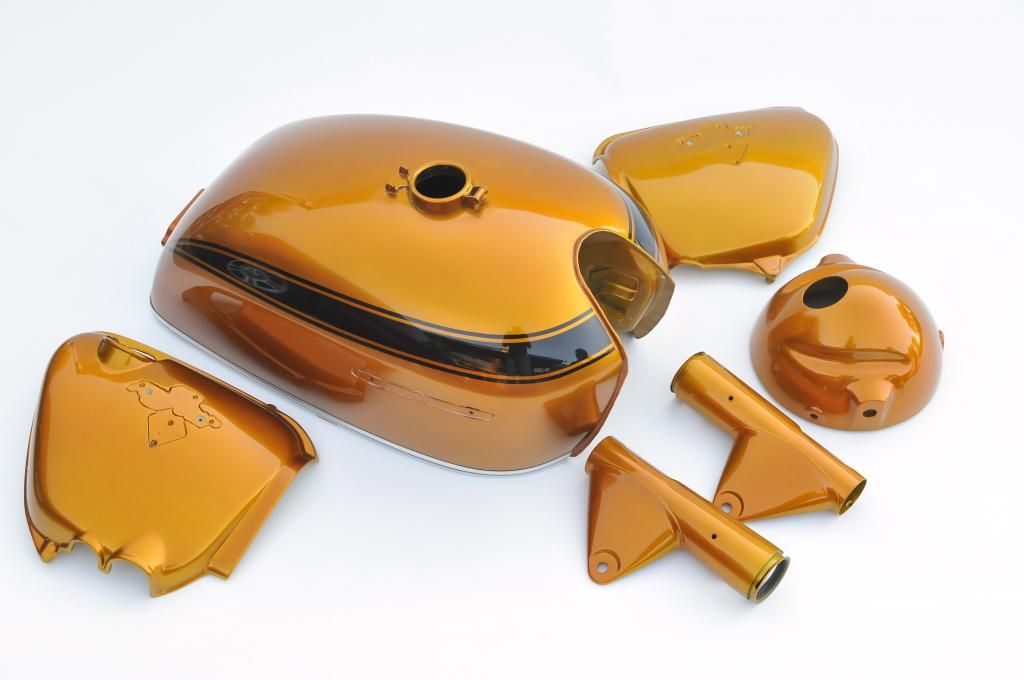
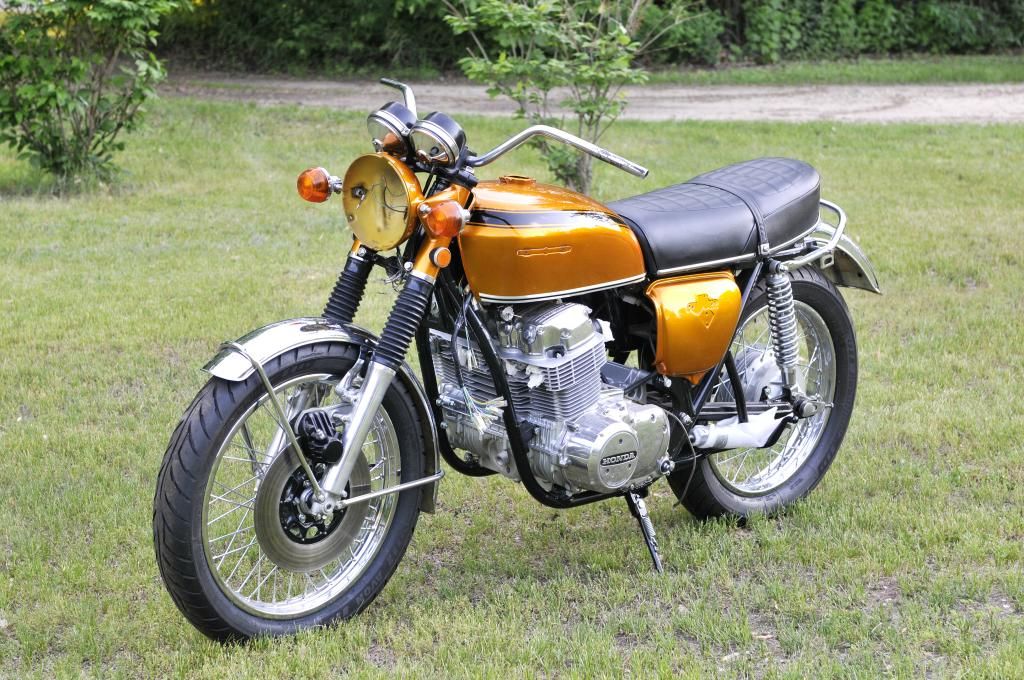
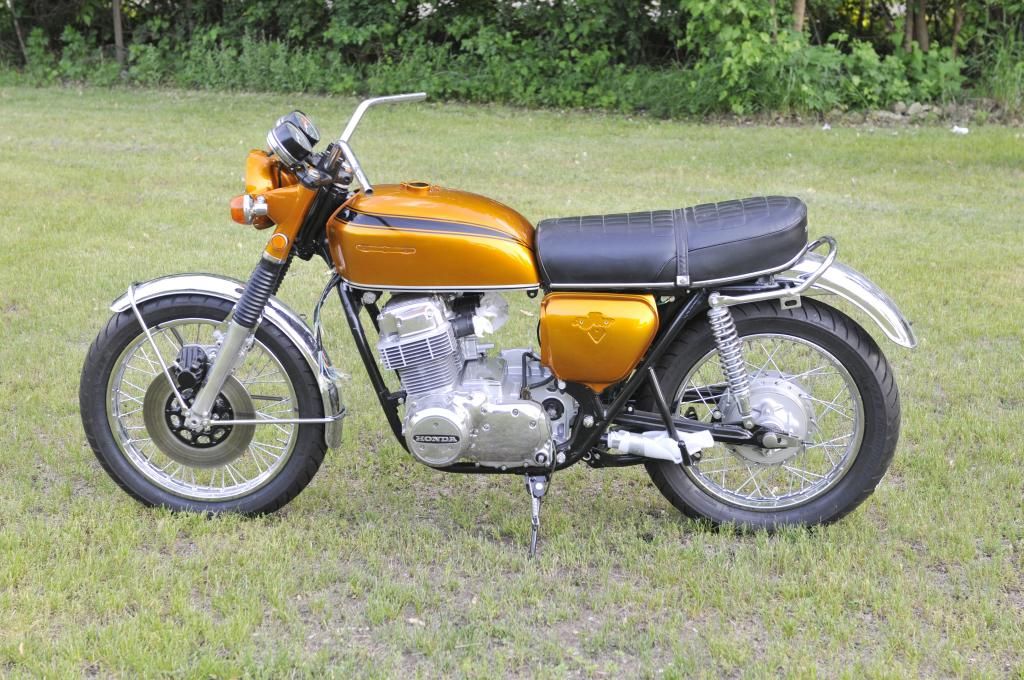
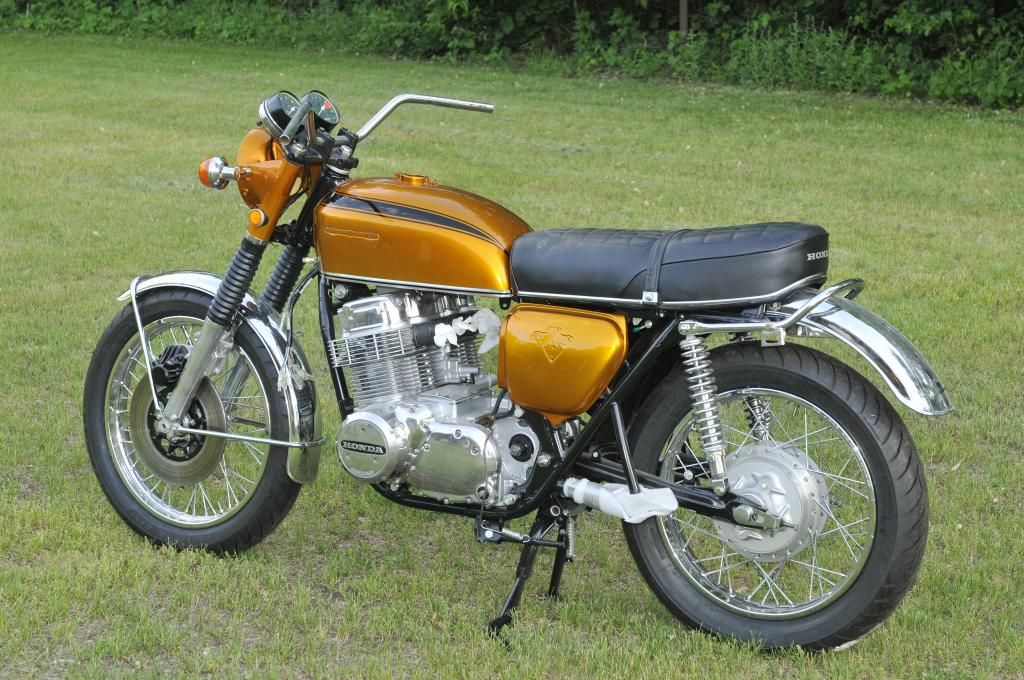
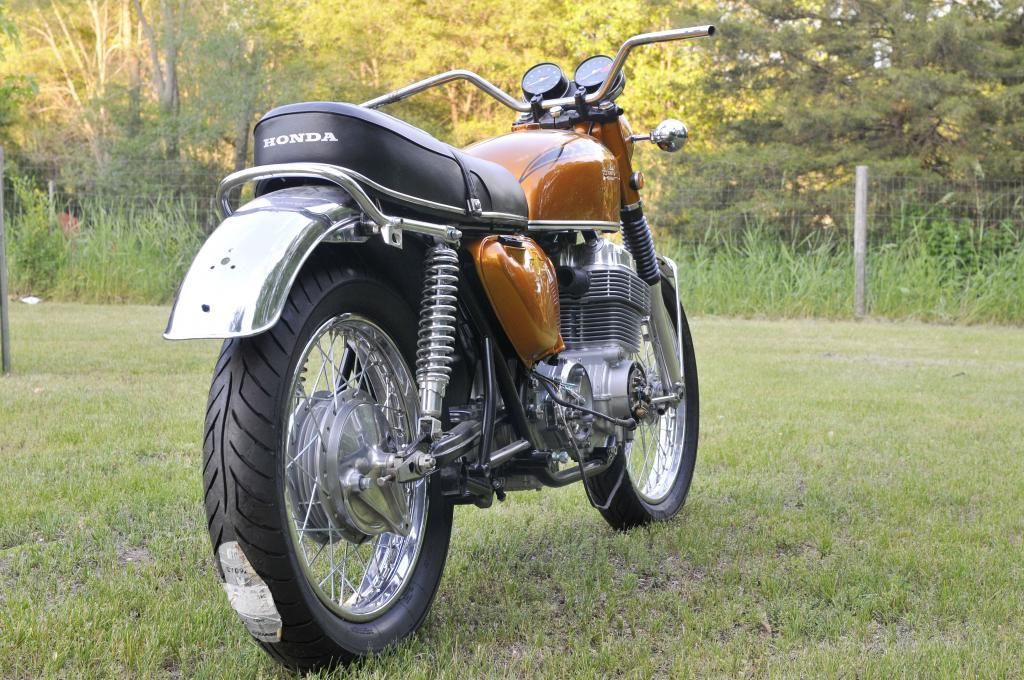
And for your viewing pleasure. Here is the final product. Something I am quite happy with.........FINALLY I have way more hours in this than I should.

_DSC4867_zpsc3fe84b5.jpg


_DSC4872_zps4c960324.jpg


_DSC4873_zps1844764d.jpg


_DSC4876_zpscf4e27fe.jpg


_DSC4877_zps85a9607a.jpg


_DSC4880_zps288364ae.jpg


A few final thoughts on the process. I really wanted to paint the stripes rather than use a decal. I am not sure why. The time involved to cut the masks on the cutter, and especially the difficulty in getting them to lay flat without buckling was problematic. (I cut and used three sets of masks before I got it right...now that I have it figured out, I think it would be a lot faster) If you asked me...."would I go this route again?" before I saw the finished product I would have said "no, it was not worth the extra time involved." But, AFTER I saw the results of my labor, the answer is a resounding YES........It really looks incredible.

More to follow later.....I'm tired and the wine is taking its toll.
 
Re: 1971 CB750 K1 Rider Resto (tins painted!)

Very, very nice work! Cannot wait to see them on your bike.
 
Re: 1971 CB750 K1 Rider Resto (tins painted!)

Thanks Swan, maybe by the end of Summer.


Another thing I did this week was to try to revive my carb rubbers. Mine were in the the typical "hard as a rock condition" that is typical of a bike this age. I had to use a heat gun to remove the carbs when I removed them. A friend of mine and forum member "Swan" has a great method for softening up old hard rubber parts. He has had good luck using this method, and saved a lot of money by not having to buy new boots.

The Mix.........1/3 wintergreen oil and 2/3 xylene. I found a 16 oz bottle of wintergreen oil for around $18.00 or so on Amazon. It was sold by a Horse supply place. Bottled by Tenda Horse Supply Company.

20140527_090326_zps4cf3b46b-1.jpg


20140527_090337_zps2e0fc3f7.jpg


I threw the boots in a couple of mason jars and poured the mixture in until they were covered in the liquid. I let them soak for 12 hours as suggested in another thread by Swan on the SOHC forum. Apparently this is time sensitive as too long will overly soften the rubber.....especially smaller pieces. I am currently soaking the rubber pieces that go from the carb to the airbox, and I am going to halve the time because they are thinner rubber.

20140524_092231_zps089024fd.jpg


when I pulled the boots out of the solution, I wiped them down and checked out the pliability. WOW, what a difference! Seems like 12 hours is the magic number for the heavier carb boots.

20140524_195738_zps9902aff8.jpg
 
Re: 1971 CB750 K1 Rider Resto (tins painted!)

I finished painting the rest of the parts today. I am satisfied with the results. There are a few very small flaws here and there due to the never ending dust problem but I will live with them.

I figure I have about $400.00 in consumables in the whole bodywork/paint project. I had to get all the supplies for lead bodywork, as well as the added expense of a second round of candy base and color. There is a whole lot of labor in this project but I sure learned a lot about tank dent removal, lead body filler, and candy paint. Next time will be quicker. :)

_DSC4881_zpsfb4edd6e.jpg
 
Re: 1971 CB750 K1 Rider Resto (tins painted!)

The paint might have been painful but it is totally gorgeous.

Great work!

D.

Sent from my GT-I9197 using Tapatalk
 
Re: 1971 CB750 K1 Rider Resto (tins painted!)

damiansd said:
The paint might have been painful but it is totally gorgeous.

Great work!

D.

Sent from my GT-I9197 using Tapatalk

Thank You!
 
Re: 1971 CB750 K1 Rider Resto (tins painted!)

Good lord almighty. So stoked to see it together !
 
Re: 1971 CB750 K1 Rider Resto (tins painted!)

Drey6 said:
Good lord almighty. So stoked to see it together !

Thanks Drey! Here are a few more pictures with the tins on the bike.

Painted the oil tank and picked up a few odds and ends so I could put a few more things together. The big things to go are to finish the carbs and find some pipes. I'm not ready to spend $1800-$1900 for a set of repop HM300's though. I am waiting to see if David Silvers ever gets the HM341's in stock again. At least they were under a grand the last time they had them in stock. Lots of time consuming detail stuff to get together yet. In the meantime, here are some photos of the pretty stuff on the bike.

_DSC4921_zpsabe1d71c.jpg


_DSC4917_zpsc24d6d57.jpg


_DSC4903_zps82973e26.jpg


_DSC4925_zps2f5e1f16.jpg


_DSC4927_zps9c3244a8.jpg


_DSC4914_zps366b3862.jpg


_DSC4912_zps9c88fc5c.jpg
 
Re: 1971 CB750 K1 Rider Resto (tins painted!)

I got my carbs all together and mounted on the bike. There was a little head scratching involved as I had taken them apart months ago. My wintergreen treated intake boots were still nice and soft from the soaking they received. I was not happy with the results on the airbox boots so I have new ones on order.

I have some questions on the wiring harness and throttle cable routing.

I originally had the wiring loom routed up the left side of the head tube, but it seemed that the horn wires would not be long enough. Then I tried the right side and the brake pressure switch wires seem to be too short. Does anyone have any input as to which side and general location for the harness? Is it supposed to be inside that triangle gusset like I have it routed? I think I figured out the harness location..outside the triangle running up the left side. input still appreciated

20140614_213137_zps46dbee6d.jpg


Does this throttle cable routing look somewhat right?

20140614_213300_zps6da0431d-1.jpg
 
Re: 1971 CB750 K1 Rider Resto (tins painted!)

Well, I have a #### ton of updating that I should do. Let's just say that this old bird may or may not have seen a couple hundred miles of tarmac in the last three days. more about that later.

I rebuilt the carbs some time ago. The slides were stuck tight when I started. I loosened them up by soaking the carb bodies in carb cleaner overnight.....the kind that separates and makes a protective layer on the surface of the cleaner so it does not all evaporate. After a good soak, I was able to work the slides out without too much resistance. I soaked all the jets in the cleaner also. Then I soda blasted the bodies and bowls on the outside to get them nice and clean looking. After the soda blast, I soaked everything in my little ultrasonic cleaner to clear all the soda and any residual gunk out of the passages. While everything was soaking, I bead blasted, buffed, and zinc plated the the choke hardware as it was grungy looking. Put it all back together and all was right with the world......well almost.

20140610_225629_zpsb10eae22.jpg


20140528_205830_zpsbc9049d6.jpg


20140804_173326_zpsd4b0555e.jpg


I ordered some nice doodads from Yamiya and David Silver Spares....new switches, brake master, mirrors, superbike bars, and grips. Obviously, new cables throughout the bike. (I was going to try to piece some old switches together, but they were just too far gone)

20140618_153925_zps870177f5-1.jpg


Plated the brake line hardware as well

20140625_110254_zps7a442e50.jpg


20140804_181650_zpsdba94aaf.jpg


I repaired some emblems with broken pins because I am too cheap to buy new ones :) I used roofing nails that I cut to length and glued them to the emblems. I ground out a slight depression for the nail head to fit in the emblem so they would fit flush.


20140804_101226_zps302f9c8c.jpg


20140804_101439_zps53ee56e5.jpg


After getting the nail and the emblem ready I covered the side cover with plastic wrap and pushed the nail into the mounting hole. All that was needed was a dab of epoxy and to set the emblem in place until the glue set up.

20140804_101120_zps7317f344-1.jpg


Ready to install

20140804_105900_zps0fd52f0b.jpg


I installed new sprockets and chain also.

Many other things that I can't think of right now
 
Re: 1971 CB750 K1 Rider Resto (tins painted!)

Did I mention that I may have had this bike on the road?

A video of the first start....since then I have sinced the carbs and timed the ignition. It does not have as much cam chain noise as the video seems to show.

Pretty darn close on the carb sinc now

20140731_121305_zps42e6a5f0.jpg


https://www.youtube.com/watch?v=NQ9hV1AmRt4

More to come if I can get some good pictures this evening or tomorrow.
 
Back
Top Bottom