
We noticed you are blocking ads. DO THE TON only works with community supporters. Most are active members of the site with small businesses. Please consider disabling your ad blocking tool and checking out the businesses that help keep our site up and free.
You are using an out of date browser. It may not display this or other websites correctly.
You should upgrade or use an alternative browser.
You should upgrade or use an alternative browser.
1971 Honda CB175 Cafe
- Thread starter NoahAngel11
- Start date
NoahAngel11
New Member
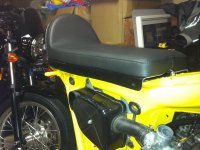
I freehand drew and cut a seat pan from a sheet of aluminum that work was throwing out. The seat I am using is a fiberglass seat that came with padding and vynyl cover. Can't remember the outfit I ordered it from, but I can look it up if you are interested. They actually messed the order up and sent me upholstery with snaps on the side of the seat, and I had specified no snaps. But they corrected it and made me a new seat. So all was good. I had plans to hinge my seat pan somehow from the rear of the bike and tried several approaches before I got what I wanted. More pics of that soon.
Attachments
NoahAngel11
New Member
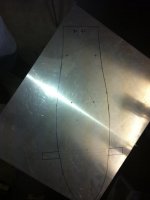
I started the seat pan with a paper template and cut it to fit the underside of the seat. I laced that over the bike frame and drew on some tabs at the rear for hinging.
NoahAngel11
New Member

NoahAngel11
New Member
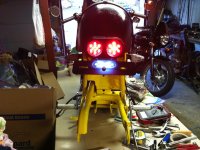
I never put a rear fender on, never intended to. The brake light and plate make for a cool stubby rear end. But I may put a short fender under the frame just to protect from rain and debris off the tire. But it won't stick past the end of the frame at all. We'll see.
NoahAngel11
New Member
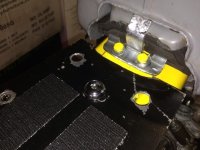
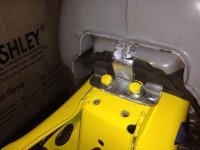
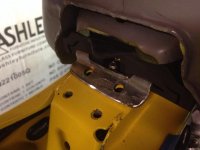
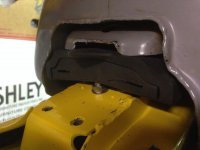
Here is the bracket I attached to the rear of the frame that the seat would attach to. My original tabs for hinging were cut off and I took this approach instead. The bolts go into original frame threaded holes and pass through bushings and washers to make the joint swivel. See how the seat pan hinges up. The front lifts to gain access to the battery. Later I added a key and latch to hold the front of the seat down. The pan also rests on stoppers on the frame rails for support.
Attachments

NoahAngel11
New Member
Also, you may notice in the pic of the seat pan hinged up, I had chopped up and lowered the battery tray significantly to allow clearance of the battery under the seat pan. I remounted the chopped battery tray using bolts that pass into the fender metal and frame.
NoahAngel11
New Member
Now please don't hate me for this. I did not want the 175 logos on the side covers. I wanted that real estate to put some of my own artwork on, some different numbers that mean something to me. So yes, I took perfectly good side covers, removed the numbers and filled the holes with plastic. Don't hate me please.
Attachments
NoahAngel11
New Member
For the 69 tank to fit on the 71 bike, I had to fabricate a new tank mount. I started with a piece of rubber mount from a CB350 I think and I notched it to fit over the bolt that holds the rectifier to the frame. I then took the original metal braket and cut it up and bent it to hold the new rubber mount onto the frame. After that was done I used some stock aluminum to make a hooked strap to hold the tank down. In the pics you can't see it, but the top of the aluminum hold down strap has a bend in it that hooks into the hole in the tank metal. I was rather proud of this accomplishment and the tank is mounted quite securely with a rubber isolation for vibration. It ain't pretty, but hey, it is functional. Isn't this what cafe Guys do anyways? Backyard mods to make your bike cooler, sleeker, lighter, and hopefully faster.
Attachments

NoahAngel11
New Member
In the last pic you can see the mailbox lock that holds the front of the seat pan down. Kinda cheesy. It is covered by the seat which fastens to the pan via Velcro strips. I wanted to be able to remove the seat quickly and pop open he pan to gain access. The Velcro is extensive and holds the seat quite securely,been on cornering it should be good. But I may revisit this later and come up with something different.
NoahAngel11
New Member
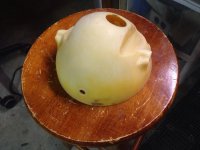
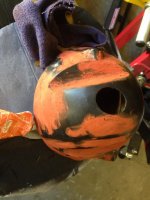
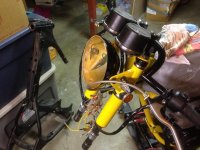
The front light bucket was, well, a mess. BTW, don't use paint Stripper spray on plastic. It eats it. I had to fix a crack on the edge with some plastic. I then sanded the whole thing smooth to fix my paint removal mistake. I glazed in the imperfections and painted the bucket.
Attachments
NoahAngel11
New Member
The frame in the last pic was from a Honda hawk. That is another story.
NoahAngel11 said:I regret it now, but I used Kreem on the tank without even thinking about repairing the dent. Oops. Anyways I think the Kreem liner will come out with some Acetone if I am not mistaken. That being said, what is the best treatment for a tank to restore it? No rust in the tank, just want to protect it.
2 Stroke oil in the fuel. It will leave a lining on the tank that will prevent rust. Then just ride the buggery out of it and the fuel should keep the rust at bay.
K
Kamn
Guest
+1^^
NoahAngel11
New Member
Thanks Brodie!
Sent from my iPhone using Tapatalk
Sent from my iPhone using Tapatalk
NoahAngel11
New Member
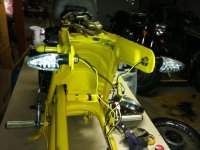
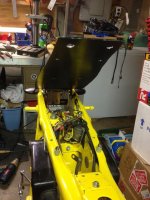
A few shots of the bike so far.


Sent from my iPhone using Tapatalk
Sent from my iPhone using Tapatalk
NoahAngel11
New Member
For now I found some stock exhaust on EBay that is in decent shape. I plan a custom exhaust in the future, but bolted these on for testing and whatnot.


Sent from my iPhone using Tapatalk
Sent from my iPhone using Tapatalk
NoahAngel11
New Member
I just got back the wheel hubs and fork tubes from powdercoat. I need to find some wheel spokes as the old ones were bad. I also have to figure out a place to strip chrome off of the rims, as I want those powdercoated. Any suggestions on tires?

Sent from my iPhone using Tapatalk
Sent from my iPhone using Tapatalk
haircuttergirl
Over 1,000 Posts
I'm diggin' it. Can't wait to see more.


