
Hey I've got a question, someone else adressed this earlier as well, but is it possible to raise the rear of the tank, or would it be possible to mount a similar seat 'lower' on the frame so that it sits flush with the tank? I'm not implying you should do this, I'd just like to know what the possibilities are when it comes to modifying tank height/seat high on that frame.
We noticed you are blocking ads. DO THE TON only works with community supporters. Most are active members of the site with small businesses. Please consider disabling your ad blocking tool and checking out the businesses that help keep our site up and free.
You are using an out of date browser. It may not display this or other websites correctly.
You should upgrade or use an alternative browser.
You should upgrade or use an alternative browser.
1972 CB175. first bike, first build.
- Thread starter andrew
- Start date
andrew
Been Around the Block
it would be easy to do both. to raise the back of the tank all you would need to do is make a spacer out of small tubing (or stack washers) and you could raise it whatever height you wanted. my seat sits up above the frame a little more than an inch because i didnt want to have to relocate all my electrics and battery. i used 1x1 square stock aluminum and 1/4 wood to make a base on top of the square tubing to equally distribute the weight on the fiberglass seat when i sit on it. i probably didnt need to as i only weigh 145 lbs,and the seat itself has a ridge going down the center on the seating area, but better to be safe then sorry.nzr-trk1 said:Hey I've got a question, someone else adressed this earlier as well, but is it possible to raise the rear of the tank, or would it be possible to mount a similar seat 'lower' on the frame so that it sits flush with the tank? I'm not implying you should do this, I'd just like to know what the possibilities are when it comes to modifying tank height/seat high on that frame.

andrew
Been Around the Block
just finished my lastest project tonight. i won an old silver metalflake helmet on ebay and it showed up yesterday. it was pretty gross in side so i figured id give relining it a try. must say im pretty happy with how it turned out, given i have no experience with this. the photos are pretty bad, but the material is red crushed velvet.
before:

after:

.

before:
after:
.
andrew said:my seat sits up above the frame a little more than an inch because i didnt want to have to relocate all my electrics and battery.
Man! that's the easy part!! I know it looks daunting but really its just wire and a crimper. maybe you need a plate welded under the seat hump is the worst of it. getting that seat down on the frame and in line with the tank and then eliminating the side covers will make all the difference in the world to the look of the bike. Give it some thought! Bike looks good though, but that seat/tank line is distracting.
andrew
Been Around the Block
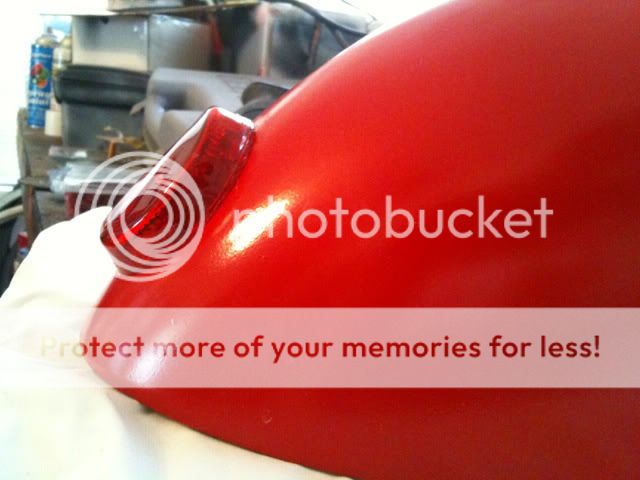
well after endless searching for a tail light that i could flush mount into the seat, i gave up and made my own. i got a marker light from pepboys and took it apart, only using the lense. its a 2" light. i used a heat gun to mold it to the curve of the seat, and it supprisingly molded very easy and pretty quick. heres a few photos of my "home depot special" tail light. im still waiting for everything to cure, then ill put it all togeather and take some photos of it on the bike.

.
.

.

.

.
.
.
.


andrew
Been Around the Block
Rocan said:that blue plate just ruins it!
check with local law to see if you can paint it red...
to each their own. im fine with the blue plate, i dont think it hinders or enhances the "look of the bike." it's a licence plate..
andrew
Been Around the Block
ive been enjoying the bike all summer, riding it every day. i recently sold one of my cars, so that means new parts for the bike! new parts soon to be on the bike are:
-hand made aluminum clip ons (super light!)
-NOS white gran tourismo grips
-new stator cover
-new sprocket cover
-shorty megaphones (will be using these for my new upswept exhaust im building)
-all new engine gaskets
-Motobits rearsets
-new fork seals
-new cb200 fork gaiters
-new chrome/black foam filters
thers probably more but thats what i can remember off the top of my head. once the stator cover and sprocket cover arrive the cases, clip ons, and parts will be sent out to polish and new hardware will bolt them back on. ordered new tires last week, so we put the new front on tonight, got too tired and sweaty (still hot as hell here) to do the rear. ill keep this updated as new parts arrive and are on the bike. so excited.
photo from today.
need4steed
Active Member
whats your carb settings at? what is the mixtures screw set at along with the jets you are running. thanks.
andrew
Been Around the Block
parts are showing up daily. got the clip ons drilled and mounted today, the tires are on as well. the rearsets showed up as well and will be put on tomorrow. tomorrow ill hopefully start on the exhaust as well. still waiting on the engine cases to show up and then will be sent out to be polished.

.

and here is the general idea for the exhaust. the pipes will be wrapped with black header wrap and the mufflers are shorty megaphones. sorry for the crappy pshop, its just to give an idea of the look.

.
and here is the general idea for the exhaust. the pipes will be wrapped with black header wrap and the mufflers are shorty megaphones. sorry for the crappy pshop, its just to give an idea of the look.
andrew
Been Around the Block
the mains are 100's. nothing else has been touched. its running great, a little rich, so im going to play with the needle height when i remember, probably tomorrow haha.need4steed said:whats your carb settings at? what is the mixtures screw set at along with the jets you are running. thanks.
need4steed
Active Member
This bike is badass. I am going to use this as a reference. Do u know what your mixture screws are set at?
andrew
Been Around the Block
To those of you with motobits rearsets, what have you done to keep a normal exhaust? I don't like scrambler pipes, and will not put them on my bike. Any tips or tricks? I know the exhaust will have to be slung lower and closer to the frame, but any advice is greatly appreciated.
andrew
Been Around the Block
i dont think youd want them as theyre in 3 pieces. i got frustrated trying to pull the wires back out and cut them apart. ;D sorry.treitz said:You want to sell me your clubmans? Since you switched to the clip-ons.


