Follow along with the video below to see how to install our site as a web app on your home screen.
Note: This feature currently requires accessing the site using the built-in Safari browser.
We noticed you are blocking ads. DO THE TON only works with community supporters. Most are active members of the site with small businesses. Please consider disabling your ad blocking tool and checking out the businesses that help keep our site up and free.
After bodyfiller was smoothed out I hung stuff on my mobile rack I built from black-iron pipe and parts of an old hand-trunk my neighbor left on the curb. The rack adjusts up and down and can be taken apart for so store in less space when not in use
I'm using paint from thecoatingstore. First I sprayed everything with epoxy primer and then hit it with single-stage (no need for clear coat) black
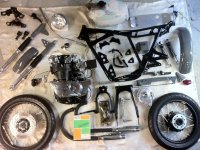
After the paint was dry I realized I was tantalizingly close to being able to assemble the bike at least into a roller and fire it up. But first I could not resist laying all parts out for a "some-assembly-required" photo:
May 2015 Assembly Time ! Laid the engine on its side and draped the much lighter frame over it (love that trick!)
Tipped it up and started bolting on various bits and pieces
Starting to look a bit like a motorcycle again. The poster-board indicates I am not happy with my custom headlight brackets and wish I'd made them so the headlight sits lower.
It was around this time I fired up the engine and she ran great. There's a video on youtube, but I'll not post the link because I sound like such a doofus in it. Feel free to search for it if you dare...
By the end of May 2015 I had decided the stamped passenger peg / muffler brackets needed a little bling so I made some little plates of polished aluminum and riveted them on
From the same day here's a close-up of the battery-box area and the main power and ground cables. If you peek closely you can see the Kolher lawn tractor rectifier/regulator bolted to the bottom of the battery-box. If only there was some cool way to clean-up the top of the battery-box . . . . . .
By mid-June I had used my $200 Brother sewing machine, some 1/2-inch foam and marine vinyl to make a little cover that fits over the top of the battery-box to hide the battery, wires, and fuses. The "skirt" of the cover has elastic and the front has hook/loop straps to help keep the cover from going anywhere.
I even made and sewed on piping and did a little "french seam" on the back. It is so cool how you can pretty much learn to do anything via youtube videos
June 2015 and I'm working on the seat. I cut some foam from HF floor mats and an old pool float used DAP Weldwood contact cement to glue them to the aluminum seat pan
Then I made a sandwich of marine vinyl, 1/2-inch foam, and cotton stuck together with temporary fabric adhesive. I marked out lines for my pleats using a Stabilo pencil and sewed them using white thread on the $200 Brother machine. I also made some piping by wrapping 3/16-inch cording inside strips of the vinyl sewed together on the bias
This was my first ever attempt at making and covering a cycle seat and I was really happy with how it turned out
I did a french seam at the back
And riveted it to through holes drilled around the perimeter of the aluminum pan. I had to make a bunch of large "washers" out of 22ga to prevent the vinyl from tearing around the rivet. Finally I used contact cement to glue a piece of black felt to cover of the rivets and give it a nice finished look
Late June 2015 and a major setback This was the third engine I'd completely rebuilt since 2012 and all had fired right up and ran great which was nice. But this one now had a major transmission issue -- it was very hard to shift and could easily get to a point where the transmission was all but locked up. Apparently I had not benched tested shifting through all the gears as I should have and had done on the previous engines. I pulled the clutch cover and messed around and inspected the shift drum and linkage over and over hoping there would be some way to fix it without having to pull the engine. But alas no. So out came the engine from the freshly painted frame
And the case were split
It turned out that the shift fork closest to the case wall was bent by less than 1mm, but that was just enough to cause the fork to lock up hard against the case wall. So I bought an entire used CB450 transmission via ebay and cherry-picked the best parts from that and the original one. I'm happy to say after it was all back together it was shifting like new.
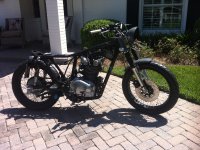
So the engine was back together and back in the frame and nothing much happened for a couple of months. All that was left was the painting of the tank, fenders and a few other parts and bike would be done. Below is a pic of the bike on 28 August 2015 (my 55th birthday.) She is out in the sun for the first time on her new tires. She is heading from the hot garage to the shiny new workshop around the back of the house. I had no idea then, but it would be 9 months before she'd get worked on again...
So 9 months went by during which time I was setting up the new shop. I used a french cleat system to make it easy to hang stuff on the walls and that took a while to set up (and lots of 1x4s) but it was well worth it. Nothing is bolted to the wall except the cleats. Then you just use scrap wood to make hangers for tools, etc. If you don't like where something is you simply yank it upward to unhook it from the cleat on the wall and move it somewhere else. I also had to figure out a paint booth with fresh air in and overspray laden air out (via paint arrestor pads, of course) and some kind of curtain. All this took a while to set up. But it was well worth it.
It is now early June 2016 and the next Jax Beach Vintage Moto night is barely 4 weeks away (last Wednesday of the month.) And I was determined to debut the CB450 there. So work resumed with bodywork and playing around with paint scheme ideas
By 12 June 2016 bodywork is done and I'm laying on House of Kolor KD3000 primer/sealer. This stuff is amazing! You can use it as high-build, medium-build, or as a sealer and it lays down like silk -- highly recommended!
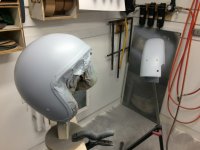
I had a beat-up 3/4 helmet that I decided I would paint to compliment the bike
Also mid-June 2016 I've rigged up the battery on blocks of wood since the battery box is yet to be painted and fired up the engine for the first time in 9 months
My Dad told me the best way to handle the tire-side of the fender with to spray on some rubberized undercoating. He was even nice enough to send me a rattle can of Eastwood brand that works beautifully
26 June 2016 at the very last minute I realized the rusty original gas cap that I had sprayed VHT satin black many months before looks like shit compared to the rest of somewhat spiffy paint job. So just when I thought I was done painting, I had to paint one more part, but it was well worth it
27 June 2016 I rolled her out into the sun for a few glamour shots and to take some rides and do the usual adjustments and tuning. She runs very well and made her debut at the bike night two days later (we got rained on, but still had fun) and was well received which was very gratifying.
This site uses cookies to help personalise content, tailor your experience and to keep you logged in if you register.
By continuing to use this site, you are consenting to our use of cookies.