1972 Honda CB350 First Build

Fa$tFreddy100

New Member
Hello to all,

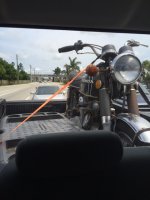
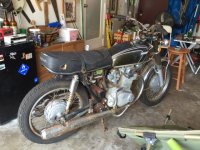
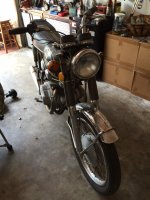
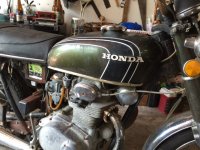
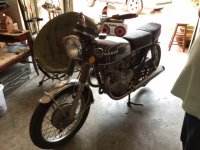
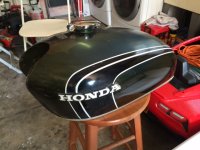
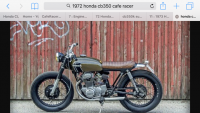
My name is Freddy but you probably already guessed that by looking at my username. I've purchased this 1972 Honda CB350 about 2 weeks ago. This Motorcycle will be the first street bike I own. And my first Café Racer project. I'm looking forward to both the project and any advise I can gain from you guys. the Bike wasn't running when I purchased it. But the gears seem to shift smooth. And when I hit the kick starter I can feel good compression in the motor. Regardless of what ever may be wrong I plan on stripping this bike down to the bare guts. Most of the Bike appears to be in fair condition. The frame looks nice and straight. Gas tank is a bit dirty inside and out. But nothing a little vinegar cant fix. Other then that just dirty and lots of surface rust. I purchased the bike for $800 on craigslist. No title which is common amongst these bikes. But we are working that part out soon enough!

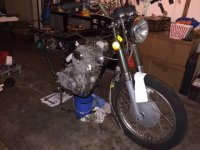
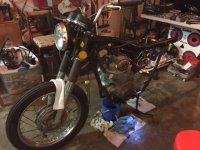
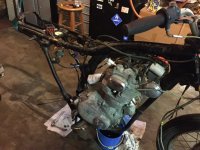
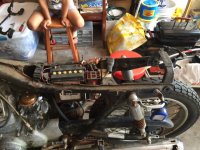
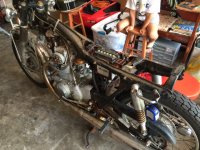
And so the build begins. Or should I say the Taking Apart 8)
 

Attachments

  • IMG_1530.JPG
    IMG_1530.JPG
    101.4 KB · Views: 1,390
  • IMG_1533.JPG
    IMG_1533.JPG
    149.1 KB · Views: 1,394
  • IMG_1534.JPG
    IMG_1534.JPG
    138.1 KB · Views: 1,444
  • IMG_1536.JPG
    IMG_1536.JPG
    141.8 KB · Views: 1,449
  • IMG_1537.JPG
    IMG_1537.JPG
    124 KB · Views: 1,525
Re: 1972 Honda CB350 Twin

Fa$tFreddy100 said:
Regardless of what ever may be wrong I plan on stripping this bike down to the bare guts.

No offense but I'd rethink this strategy.

First, I'd wait to you get the title situation all sorted out - no use spending more money on something you can't actually ride. Second, I'd try to get it running before tearing it down. You may realize certain things need to be repaired, replaced, changed, or (god forbid) left alone. Then, your build can focus on those things in addition to the cosmetic stuff. Only exception would be if you are planning a complete motor tear down and rebuild.

Also think about this - if you jump in too fast you very well may be left in your garage for the whole summer riding season. Ask me how I know. Get it titled and running now and you can ride for a while while you plan and collect parts, then you can do upgrades next winter.

Either way you go, good luck and welcome to DTT.
 
Re: 1972 Honda CB350 Twin

+1 ^^^^ on this

Get it running first
 
Re: 1972 Honda CB350 Twin

BarnBurner said:
No offense but I'd rethink this strategy.

First, I'd wait to you get the title situation all sorted out - no use spending more money on something you can't actually ride. Second, I'd try to get it running before tearing it down. You may realize certain things need to be repaired, replaced, changed, or (god forbid) left alone. Then, your build can focus on those things in addition to the cosmetic stuff. Only exception would be if you are planning a complete motor tear down and rebuild.

Also think about this - if you jump in too fast you very well may be left in your garage for the whole summer riding season. Ask me how I know. Get it titled and running now and you can ride for a while while you plan and collect parts, then you can do upgrades next winter.

Either way you go, good luck and welcome to DTT.
"Ask me how I know."

That hit the funny bone. I don't even want to ask.
 
Re: 1972 Honda CB350 Twin

This is Good. Sometimes you know its good advise when you don't like what your hearing. Wish I would have heard that piece of advise 3 weeks ago. I have pretty much taken apart the entire bike I'll post some pictures of where I'm at currently on the build. On the upside I do plan on stripping her down to the bare guts. I am going to do a full teardown of the motor. There for I don't think the running part should affect me too much. I'm will also be posting a timeline from beginning to the end to serve as reference for others with this same model. As for the title I sent out the paperwork and I have my fingers crossed and everything should work It's self out.

I would like to give credit to "Saturdays Wrench" find them on YouTube and subscribe. This dude has some pretty detailed videos on taken this bike and motor apart. Thanks a Million you been a great help.

On another note, can anyone recommend a good impact wrench I have pretty much gone through 2 of them by now. The first i purchased at Harbor Freight. The second one was Purchased at Autozone. Both kick the bucket in a matter of 2 days.

Here is an example of where I'm at now in present time.
 

Attachments

  • IMG_1677.JPG
    IMG_1677.JPG
    115.9 KB · Views: 1,198
  • IMG_1672.JPG
    IMG_1672.JPG
    123.2 KB · Views: 1,248
  • IMG_1670.JPG
    IMG_1670.JPG
    131.5 KB · Views: 1,133
Re: 1972 Honda CB350 Twin

don't throw anything away and try your best not to destroy things you are taking off!

check ebay for used impacts theres a ton or get the dewalt Milwaukee Makita electrics?
 
Re: 1972 Honda CB350 Twin

And so I begin. I have started off by removing the Original Seat from bike. Remove a few pins and screws underneath and it should come rite off.

Next I removed the gas tank. Once the seat is removed the gas tank should pop rite off. First drain all gas from the tank just unplug your fuel lines and turn your Petcock to the on position. the tank is being held in place by some rubber's in the front and back of the tank. Before removing the tank. Don't forget to turn your Petcock in the Off position to insure you don't spell excess gas all over the place.

If anyone is interested I'll be selling the Original Seat. I'll ship where ever you want. Has a small tear on Right side. Make me an offer and feel free to text me. (954) 701-2164 - Freddy. please don't fill this post with talk about buying the seat. I will have many other parts for sale as time passes.

Does anyone have any advise on cleaning the inside of the tank. I've heard that Vinegar works well. I'd appreciate any advise I can get.

Thanks and Happy Wrenching!
 

Attachments

  • IMG_1553.JPG
    IMG_1553.JPG
    85.9 KB · Views: 1,124
  • IMG_1552.JPG
    IMG_1552.JPG
    112.4 KB · Views: 1,215
  • IMG_1597.JPG
    IMG_1597.JPG
    112.8 KB · Views: 1,160
  • IMG_1548.JPG
    IMG_1548.JPG
    153.4 KB · Views: 1,158
  • IMG_1547.JPG
    IMG_1547.JPG
    160.1 KB · Views: 1,125
Re: 1972 Honda CB350 Twin

Nj732port said:
don't throw anything away and try your best not to destroy things you are taking off!

check ebay for used impacts theres a ton or get the dewalt Milwaukee Makita electrics?

Thanks for the advise. When it comes to screws do you think that Electric Wrench might be a bit strong and tend to strip them?
This has been a concern to me, and one of the only reasons I have not purchased one.
 
Re: 1972 Honda CB350 Twin

you mean things like Phillips head? I use the best fitting screw driver a tap from a hammer and downward force so I don't strip them out anymore. A set of JIS screw drivers would be a good investment and id stay away from any power tools on em.

thank tank cleaned up nice! fill it up with vinegar while you work on the rest and just let it do its thing it.

I put my carb in a gallon of berrymans and forgot about that for a while too ;D
 
Re: 1972 Honda CB350 Twin

Fa$tFreddy100 said:
Thanks for the advise. When it comes to screws do you think that Electric Wrench might be a bit strong and tend to strip them?
This has been a concern to me, and one of the only reasons I have not purchased one.

Don't use an electric impact! Those bolts will break as soon as you touch that trigger. This is what you need: http://www.sears.com/craftsman-impact-driver/p-00947641000P - probably the best $20 you'll spend on a tool for disassembling an old bike.

Good luck on this project. Looks like you've got a lot of work ahead of you, and don't expect to be riding her any time soon ;D Be as systematic as you can when disassembling, especially the motor. I kept everything in ziploc baggies and labeled them with sharpies, and don't get rid of any parts until you're DONE re-assembling (even if you are scrapping different parts of the bike, I always end up reusing stock parts to remount/fabricate new stuff).

What does the inside of the tank look like? If it has a coating already installed that you want to remove, usually acetone is the way to go. If its just rusty, vinegar should work. You may want to throw a handful of drywall screws or BB's in there and shake the crap out of it to remove any big flakes of rust, but again that depends on how bad it is. I used POR-15 metal treatment and tank liner to spruce up the inside of my tank. It takes a bit of work to do it right, but it gives a fantastic coating that you'll never have to worry about.

What direction are you thinking about going with this build? Before you get too far disassembling, it can help to mock up some seat and fender designs with the engine/tires still in to see how it looks. ALSO - if you're going to put rearsets on, fit them with the chain installed and tightened to spec and the swingarm on. I didn't do this, but somehow got lucky and everything had enough clearance and I didn't have to cut anything off ;D
 
Re: 1972 Honda CB350 Twin

For the tank - save yourself the time and get a rust converting product. I love Metal Rescue. I've used it on 3-4 tanks with good results every time. It's more expensive than vinegar but can be filtered and reused. Also, I think it's now sold at most generic auto parts stores. I'd wait to do it right before you ride since sitting on the shelf without fuel it may get more rust.
 
Re: 1972 Honda CB350 Twin

This:
http://www.ebay.com/itm/Black-Decker-Industrial-VSR-Versa-Clutch-Scrugun-Screwdriver-2054-/301939223719?hash=item464cfaeca7:g:gm4AAOSwubRXHQWM

Is absolutely, UNASSAILABLY the best tool EVER crested for removing stuck, stupidly soft screws. Nothing, and I mean NOTHING is even close, not even in the same sport. Really, if you have not used one of these for this purpose, you absolutely have no idea how excellently this thing works for this task. Get good bits (JIS is important!) and if it is at all possible to remove the screw, this will take it out and leave not the slightest mark on the fastener. NOTHING I have ever seen has a similar action. It wasn't designed for this task, but it works incredibly. Don't confuse it with anything else - ONLY INDUSTRIAL old Black and Decker guns with the "versa-clutch" work like this. The clutch is infinitely variable and interacts with the amount of pressure you place against the fastener. I stumbled onto this tool as I used them commercially in my business years ago. Very expensive back in the day, but they are absolutely bullet proof. I still have 2 of them, probably both are on their 5th or 6th power cords and have survived the combined abuse of countless employees for 30 years. The impact action they make is infinitely variable in both frequency and pressure, so you can put a low pressure high frequency impact action on a super soft delicate screw (even a teeny tiny one!) and it will eventually go "snap!" and spin out like it was never used without a mark on it. You can also dial it up, and it has enough ass to break most any screw or bolt on a bike if stuck that bad - not a mark on the head though - some screws really are seized that bad!
 

Attachments

  • BD scrugun.jpg
    BD scrugun.jpg
    175.1 KB · Views: 271
Re: 1972 Honda CB350 Twin

jpmobius said:
This:
http://www.ebay.com/itm/Black-Decker-Industrial-VSR-Versa-Clutch-Scrugun-Screwdriver-2054-/301939223719?hash=item464cfaeca7:g:gm4AAOSwubRXHQWM

Is absolutely, UNASSAILABLY the best tool EVER crested for removing stuck, stupidly soft screws. Nothing, and I mean NOTHING is even close, not even in the same sport. Really, if you have not used one of these for this purpose, you absolutely have no idea how excellently this thing works for this task. Get good bits (JIS is important!) and if it is at all possible to remove the screw, this will take it out and leave not the slightest mark on the fastener. NOTHING I have ever seen has a similar action. It wasn't designed for this task, but it works incredibly. Don't confuse it with anything else - ONLY INDUSTRIAL old Black and Decker guns with the "versa-clutch" work like this. The clutch is infinitely variable and interacts with the amount of pressure you place against the fastener. I stumbled onto this tool as I used them commercially in my business years ago. Very expensive back in the day, but they are absolutely bullet proof. I still have 2 of them, probably both are on their 5th or 6th power cords and have survived the combined abuse of countless employees for 30 years. The impact action they make is infinitely variable in both frequency and pressure, so you can put a low pressure high frequency impact action on a super soft delicate screw (even a teeny tiny one!) and it will eventually go "snap!" and spin out like it was never used without a mark on it. You can also dial it up, and it has enough ass to break most any screw or bolt on a bike if stuck that bad - not a mark on the head though - some screws really are seized that bad!

Thanks for the great advise! I'll be sure to look on Ebay for one of these.
 
Re: 1972 Honda CB350 Twin

adventurco said:
Don't use an electric impact! Those bolts will break as soon as you touch that trigger. This is what you need: http://www.sears.com/craftsman-impact-driver/p-00947641000P - probably the best $20 you'll spend on a tool for disassembling an old bike.

Good luck on this project. Looks like you've got a lot of work ahead of you, and don't expect to be riding her any time soon ;D Be as systematic as you can when disassembling, especially the motor. I kept everything in ziploc baggies and labeled them with sharpies, and don't get rid of any parts until you're DONE re-assembling (even if you are scrapping different parts of the bike, I always end up reusing stock parts to remount/fabricate new stuff).

What does the inside of the tank look like? If it has a coating already installed that you want to remove, usually acetone is the way to go. If its just rusty, vinegar should work. You may want to throw a handful of drywall screws or BB's in there and shake the crap out of it to remove any big flakes of rust, but again that depends on how bad it is. I used POR-15 metal treatment and tank liner to spruce up the inside of my tank. It takes a bit of work to do it right, but it gives a fantastic coating that you'll never have to worry about.

What direction are you thinking about going with this build? Before you get too far disassembling, it can help to mock up some seat and fender designs with the engine/tires still in to see how it looks. ALSO - if you're going to put rearsets on, fit them with the chain installed and tightened to spec and the swingarm on. I didn't do this, but somehow got lucky and everything had enough clearance and I didn't have to cut anything off ;D


Thanks for the Link I'll be sure to grab one of them. Cheap and seam to get the job done... Till the brake. lets hope my luck changes.
I know I got a lot of work but I'm in it for the work. I'm more excited about the build then riding the dam thing. This has been a learning experience for me. And I have fallen in love with the art of working on these things. I'm working on getting some welding lessons from a friend of mine. And as far as mechanics go's I take what I get from the forum and others around me. Some things got to give.

As far as organizing of parts and Screws I've been implementing the Ziploc and Sharpy method from the start. I've been able to keep everything together pretty well. Apparently the tank has Turpentine inside since I bought it. The inside looks like just a bit of minor rust and residue. That BB trick sounds like a dam good idea. I'll be testing that out soon, I happen to have some in my garage compliments of my son. I will also do some research on this POR-15 metal treatment and tank liner.

Its a bit to late to mock up anything because of how striped she is. But I have a dam good idea of what I want it to look like. I knew what I wanted before she was purchased. See pictures below as reference. I'm leaning toward more of a Brat Look, With a side of sleek antique mashed in there. I've gone ahead and ordered a few parts. but I'm still missing a lot of stuff.

Do you have any advise on a good small battery?

and perhaps a sleek and small battery box?
 

Attachments

  • FullSizeRender2.jpg
    FullSizeRender2.jpg
    82.2 KB · Views: 1,111
  • IMG_1813.PNG
    IMG_1813.PNG
    357.4 KB · Views: 1,134
  • FullSizeRender.jpg
    FullSizeRender.jpg
    39.4 KB · Views: 1,112
  • IMG_1805.JPG
    IMG_1805.JPG
    136.2 KB · Views: 1,099
Re: 1972 Honda CB350 Twin

With the tiny batteries make sure you upgrade your regulator rectifier. The old one isnt good enough to protect those things, and is likely worn out. As far as a battery box make one. Fun easy little project! Easy if you can weld, but can also be riveted out of thinner materials.
 
Re: 1972 Honda CB350 Twin

wahvtec said:
With the tiny batteries make sure you upgrade your regulator rectifier. The old one isnt good enough to protect those things, and is likely worn out. As far as a battery box make one. Fun easy little project! Easy if you can weld, but can also be riveted out of thinner materials.

Thanks for the tip. And as far as the Battery box go's I will most likely wind up doing that, just wanted to speed things up a bit. But then again it maybe best I slow it down and enjoy myself. I'm going to look into building one myself. "Saturday's Wrench" has a good Video on youtube where he fabricates one for this exact bike. I might use it as a base to start with.
 
Re: 1972 Honda CB350 Twin

I'll look up the battery I used and post a link later. It's a 12v I believe 5aH security system battery. Be sure to implement some kind of vibration reduction, as the vibration can cause them to give out. I used cork, but rubber is ideal, I just didn't have the clearance.

It's never "too late to mock up," trust me. Especially if you are mounting rear sets its incredibly important so you don't end up building something that you can't ride for more than 15 minutes on. It's worth spending an extra hour to throw s few parts back on before you weld something on just to find out it doesn't clear your rear tire or chain, etc. what's that saying, "measure twice, cut once"
 
Re: 1972 Honda CB350 Twin

Ok gents I'm stumped. I'm not able to remove these. Should I just dip both these puppies in carb cleaner first? I've read these jets should slide rite out. I speak of the pilot jet, idle jet, and emulsion tube. But not having any success. Any suggestions please?
 

Attachments

  • image.jpeg
    image.jpeg
    1.3 MB · Views: 252
  • image.jpeg
    image.jpeg
    1.2 MB · Views: 251
  • image.jpeg
    image.jpeg
    694.1 KB · Views: 263
Re: 1972 Honda CB350 Twin

By the way Incase your wondering. I just received these in the mail. They came along with a warning saying that some pieces my not fit. And that would have to ousource, but after comparison seems that everything is on point.
 

Attachments

  • image.jpeg
    image.jpeg
    1.1 MB · Views: 257
Re: 1972 Honda CB350 Twin

The jets need to be unscrewed to be removed. Make sure you are using the correct size flathead screwdriver. Its worth taking some to the grinder to make sure they fit properly, otherwise you risk mucking them up for good.

Emulsion tubes can be pushed out from the bore side with a wooden dowel.
 
Back
Top Bottom