
We noticed you are blocking ads. DO THE TON only works with community supporters. Most are active members of the site with small businesses. Please consider disabling your ad blocking tool and checking out the businesses that help keep our site up and free.
You are using an out of date browser. It may not display this or other websites correctly.
You should upgrade or use an alternative browser.
You should upgrade or use an alternative browser.
1975 Honda CB360 Brat style - Growing Up
- Thread starter Woodsy11
- Start date
Got the engine painted finally. I am taking all the covers off in order to place the stock bolts with stainless allen head bolts. Also, I decided to check out the cam chain tensioner to see if it is in decent shape. Boy am I glad I took a look. It is about 2 seconds away from shattering into the engine. See the attached picture. A new set is on its way.
As I await my tensioner system and engine cover gaskets I will spend the time stripping the paint off the tank and sanding it down. It has a couple small dents/bumps which will be covered with body filler. Paint will be this weekend or early next week.
As I await my tensioner system and engine cover gaskets I will spend the time stripping the paint off the tank and sanding it down. It has a couple small dents/bumps which will be covered with body filler. Paint will be this weekend or early next week.
Attachments


Hey all
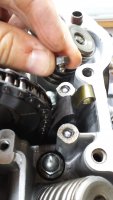
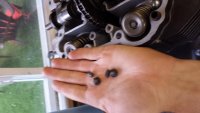
Well I managed to have my first major setback today. I overtightened the bolts on the bracket that holds the cam chain tensioner in place. Both bolt heads sheared right off. Not sure how I managed to be such a moron but, I guess it happens.
I am hoping they can be salvaged by drilling them out and then retapping the holes?? Any advice would be great.
Thanks
Attachments
Saturdays Wrench
Been Around the Block
Don't beat yourself up man.. I've been experiencing a huge uphill climb lately (hense no videos or updates!). I used this clear coat stuff for my hubs. It's from a spray can and I totally over sprayed the hubs, causing a foggy result and drips! I then knocked in the bearings on my front hub too far causing them to seize! So I now have to take them to a mechanic to get removed, buy new bearings, strip the clear coat off the hub and repaint and re-install.. Major pain in the ass but you live and learn man. I was super bummed out about it but I just remembered that this process is suppose to be a learning experience (for me and others) and I'm a noob who will make mistakes.. That's life! There's no 'real' timeline. So just go with the flow man. I really hope you figure this out. I have seen a system that taps into that bolt and you can remove it, I forget what it's called. I had to drill into my cases a few times due to stripped bolts and the last one I did I drilled the head off, then I set the drill bit to go in reverse and applied pressure to the broken bit inside the case.. the force of me pushing and the drill bit going counter clockwise was enough to make the broken bolt stem actually start turning outward! I was able to get it just enough out so I could use my fingers to turn it the rest of the way.. try it, it may work! 8)
Stay positive man!
Stay positive man!
The portions still threaded into the head are likely quite loose. However, If you try to drill to drill them out, the drill will spin them down to the bottom of the threads. This will jam the bolts pretty tightly, because the tap that created the threads in the head is tapered. So your bolt spins down and jams in the taper of the threads. The best solution is to get a left-handed drill bit to drill a hole in the broken bolts. Very likely they will spin right out in the drilling process. If not, and especially if you used a chemical threadlocker (loctite), apply some heat (which loosens the threadlocker) and try an easy out. Broken bolts require patience and a determination to not cut corners while making your first attempt at removal. The first attempt can often be your last without having to do a repair to fix the mangled part, so make your first attempt the best you can. If you can't buy an appropriate left hand high speed steel bit locally, order on line and be patient!
Takes a bit of practice to be able to correctly judge how tight to make any fastener. Torque wrenches are as often used to tighten very small fasteners to avoid over tightening as they are to tighten high strength applications such as head bolts to a minimum and even value. Get one and practice! Those slipper bolts you broke off probably only are supposed to get 7 to 10 foot/lbs of torque, which you can deliver holding just the head of a 1/4 inch ratchet without straining! (totally guessing at the torque value so look it up!).
On the bright side, you broke the bolts as opposed to stripping the aluminum! You still have a good chance to fix it without having to do any machine work !
Saturdays
Thanks for the moral boost. Honestly, I needed it. Sorry to hear you have had your struggles as well, but I am glad to know I am not the only one. I did further research on this topic and found a few potential solutions, one being the Easy out that mobius suggested. Thanks again for being so positive. It has brought me back to reality. Also, I am super stoked because I am doing my safety course next week and I can't wait to get out and ride.
JPMobius.
I really appreciate the breakdown about the left handed drill bit. I have been researching all day and that definitely seems to be the best idea. Either that or the easy out system. Fortunately for me I did not use locktite in this situation so I am really hoping the left handed drill bit will work. My dad is a tool freak and has some that I can borrow. I looked through the manual before I tightened the slipper bolts but, I was unable to find the value (or I just missed it completely). I will definitely have another look or just be more gentle on the next go around. As you said, on the bright side, I did not likely strip the aluminium. Gotta look at the positive in each scenario and learn from it.
In other news, I have started reassembling the rest of my engine. I have replaced the side covers with brand new stainless steel allen head bolts, as well as fresh gaskets throughout. It looks amazing. I stripped the paint off of my gastank and spent half a day sanding it down. I followed up today with some body filler to cover up some minor dents and gouges. More sanding to commence tomorrow. Pics to follow shortly.
DTT members are the best!! Can't thank you guys enough for the support.
We had a tappet adjustment loosening, which turns in to loose tappet adjustment screw bouncing around top end, which turns into broken cam chain problem that we diagnosed was the exhaust valve springs upside down.


