1976 Yamaha XS500 cafe project...Nearly Road Ready!!!

kb1oju

New Member
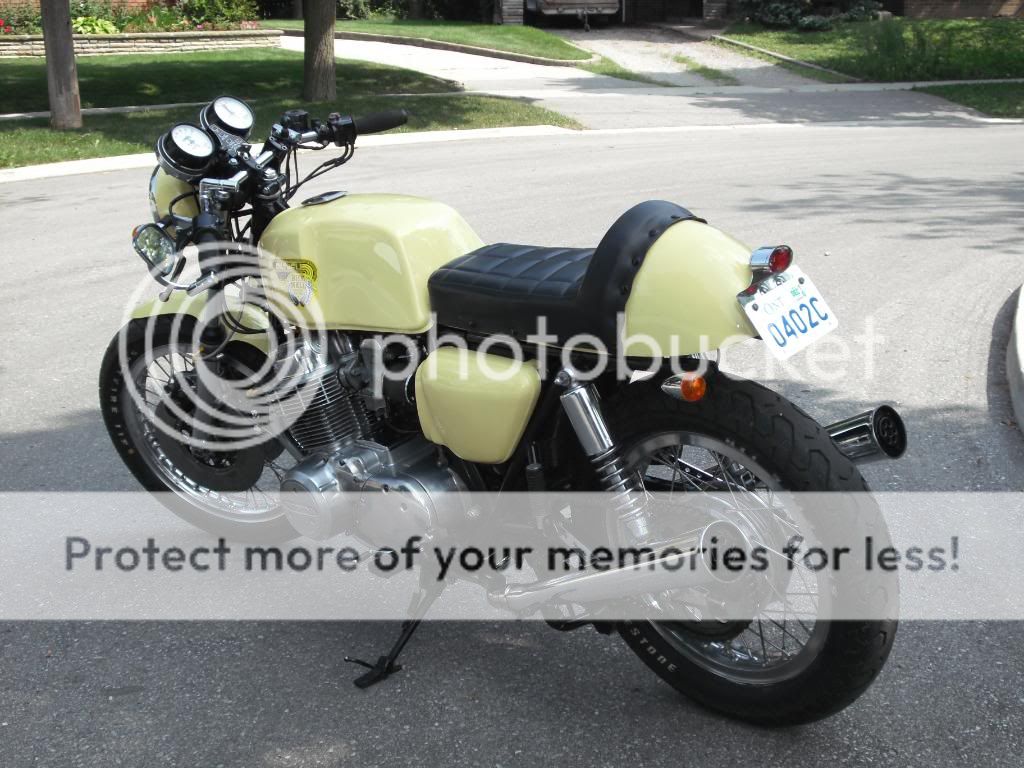
This passed summer, a buddy and I took a trip to niagara falls on an 86 goldwing, and a 76 xs500. the goldwing was in much better shape for the trip, engine overhaul over the previous winter, the bike only had 35k on the clock so it was still fresh. The yamaha was in much rougher shape, but surprised us both by holding up the entire time we were on the trip! the week before the trip we got new plugs, oil and lube, battery, the basics for it pretty much, and paid off well. no issues the whole trip! throughout the process and journey of setting the bike up for the trip and while we were on the road, i always made it clear i wanted to buy the bike from him before he left for basic training or whatever, but he didnt really want to sell it. which was fine, but i still wanted it. so about a week ago, i asked if he would sell it, i know what he paid for it, and i know what he put into it, so i didnt want to rape him at the knee caps for buying it from him. i offered 250, and he said sure! so today we got it running, and he rode it over to my girlfriends garage before we did the final tear down. he is going to help with the process which is nice. he always wanted to do something like this, but never really had the time or money. here is what we started out with:

IMG_20110715_063612.jpg


i can instantly see a successful cafe build. making everything work right, thats a different story, but im damn sure i can get the job done just fine. first thing we did when we got digging into it was take off the ugly chrome rack. thing served its purpose, but its ugly and doesnt fit the build.

IMG_20111016_135519.jpg


i Gracefully employed my girlfriend to help my buddy and I out stripping the bike down, and since i decided to painters tape the entire bike on the last day of our niagara trip, i gave her the best job in the world!......taking it off! something shes great at (GIGGITY!).

IMG_20111016_144145.jpg


thats the guy i bought it from, and my girlfriend, hiding behind the other side of the bike taking tape off patiently. it started taking shape once the rear fender was off, and thats when i started to really see how the bike was going to look!

IMG_20111016_145709.jpg


i took the front fender off and helped get a little extra tape off the tank, and that was where i stopped for the evening, have to work 4 to midnight tonight, so i cut the work short due to giving my buddy a ride home since he rode the bike over.

now starts the list of really what i want to do with the bike. we were discussing painting the tank white with the jap rising sun on the sides, and coming down to the side covers, as well as well as including the tail section in the logo as well. for the rims, my buddy, joe, was thinking about painting the mag spokes red, and the rim white, and my thought is to paint them like, a magnesium/dark gold color. i am pretty sure the magnesium or dark gold color would work better, only because it wouldn't be an over-baring amount of color, as i want it kind of dark. for the handlebars, i believe my woodcraft clip on bars will fit with new inserts. they are for 36mm forks (from a ninja 250 i had), and woodcraft can supply inserts for smaller forks if people need them. should be able to work something out with it!

for sidecovers of the motor, i really would like to have them chromed, along with the valve cover of the head. and the rest painted black. pulling the motor seems teribly simple on this bike, its just awkward and fk'ing heavy ha.

for the forks, im debating painting them white to match the tank and tail sections, or getting them chromed or polishing the hell out of them. looking at the front end kind of confuses me, it seems to sit a little higher than the rear, so ill end up lowering the front end an inch or two and finding some stiffer shock springs/heavier shock oil to swap out. also, i really want to use a chrome front fender, and half one of those flat vertical "pedestrian slicer" things that go on top of the fender. dont know the actual name, but you guys will know what im talking about!

the rear end, i would like to get ohlins or something similiar that has the oil resevoir, mikes xs has some, they are like 200 bucks or something (not ohlins, but look alikes that have yellow/gold frame work and spring) so ill add that to the list. im also going to integrate turn signals and brake lights into the tail section, LED's of course, so its a little more modern, and looks decent. with this, i am going to chop off the rest of the frame after the shock mounts, so the cafe seat is going to be short, and flow well with the bike. the cafe seat im going to use is kind of blocky, to match the tanks square-ness flow.

something i plan on buying, is a mig welder, to weld up brackets and shit if i need them, i dont need something fancy, just something to get the job done, and nothing with crazy duty cycles or whatever. my buddy and i will be going to sears this coming tuesday to take a peek at what they have.


thats all i have for now! should be a pretty fun project!
 
Re: 1976 Yamaha XS500 Cafe project...first build evar!

Boy, I'm really enthused to see all the Yamaha 500's popping up on the forum. Looks like you've got a pretty solid foundation there. Good luck!
 
Re: 1976 Yamaha XS500 Cafe project...first build evar!

hey thanks! im finding more 500 projects the harder i look, so if all stays afloat and on course, this thing should be done mid winter and be dialed by the spring time! its running now which is freaking sweet and a HUGE plus for me. the thing went to niagara and back no issues, so i think it will be a pretty good around town rig. im a bit of a picture whore so ill keep it limited but of course, ill keep the thread updated!

im trying to find a box like tail section for it, without spending the 270 bucks for the wrenchmonkees tail section. that one fits the xs5 perfectly as it was designed around it. so hopefully ill come up with something.

i dont know if ill strip the frame or not yet to get painted. it would look hella cool but i just dont know yet. i may simple green it and make it a little shiny, but we will see how in depth it gets! its all very exciting!
 
Re: 1976 Yamaha XS500 Cafe project...first build evar!

turns out i got more done today than anticipated, ill post pics in a little while!
 
Re: 1976 Yamaha XS500 Cafe project...first build evar!

well today was pretty cool.


i figured out that my woodcraft clipons will fit just barely onto the fork tubes, so thats one less thing i have to buy! i disconnected the ignition switch and will be rigging it to headlight or the side of the bike somewhere. a gps will be used as a speedo so ill be ditching the horrendous mickey mouse looking set thats on it now. heres how she sits:


IMG_20111017_143210.jpg


we cut the exhaust so i can run it straight piped for a little while until i figure out what i wanna do for an exhaust. im thinking dual yoshi pipes off ebay...my friend thinks i should just stick to retro chrome pea shooters, idk yet, still thinking:


IMG_20111017_143218.jpg


throughout the tear down process, i have begun to realize the importance of remembering wtf im removing or disconnecting, so quickly enacted a "tape" policy with the build:


IMG_20111017_143239.jpg


this policy is to tape and label all parts or connections that have been disconnected or removed, so later its easier to connect the fk'n things!!! im going to keep the stock headlight, but paint the housing the same color as the tank. im sure a lot of people here have seen the "Solus" build by lossa engineering or whatever. its a pretty sick sr500


Lossa Engineering's short film "Solus"


i like the color of this build. its perfect. and stupid clean. i dont necissarily want to copy this, but i like the style that was used. black rims, white tank/tail, contrasted color fender. perfect. sleek. thats what i am going to aim for. here is a video that is meh'...we had rick ross blaring in the garage, i had no idea he was actually going to video tape this to be completely honest, figured ide throw it up of proof that it runs!


http://s937.photobucket.com/albums/ad216/kb1oju/?action=view&current=VID_20111017_130801.mp4


Plans for the next garage session:


- complete removing the excess wiring from the headlight housing/label it
- remove battery track and figure out where the hell to stuff it
- remove the air box to figure out what size pod filters i need to get
- remove tank in the process so i can start sanding and getting it ready for paint at some point


That's the plan, and I'm sticking to it!
 
Re: 1976 Yamaha XS500 Cafe project...first build evar!

looking good man ! always good to have a runner to start with . theres all kind of things you can do will be keeping a eye on thins one !
 
Re: 1976 Yamaha XS500 Cafe project...first build evar!

nice! thanks for keeping an eye on the build. its pretty fun so far. im having a blast ripping things off. i finally decided instead of buying a cafe fiber glass seat im going to make my own out of the stock seat pan. make an aluminum tail piece out of sheet metal, bend it up, make my own seat cushion too. should be a fun try at making something!


ill be sure to take pictures along the way!
 
Re: 1976 Yamaha XS500 Cafe project...first build evar!

Nice Project, man. I love the shape of the XS500 tanks.
 
Re: 1976 Yamaha XS500 Cafe project...first build evar!

Just picked up a 79 SR500 a week ago. Gonna start my first build in a week or two. Just wanted to get the last bit of riding in before it turns to cold. Anyway would like to stay in contact with u through the builds for ideas and advice if u dont mind. Also gonna start a thread on this web site when the build starts. Thanks and great bike to start your build with.
 
Re: 1976 Yamaha XS500 Cafe project...first build evar!

justin, these tanks rock! they fit so well and can be made pretty unique. i love the square LEGO-ish look to them, i am planning on molding a custom tail piece from the stock seat pan, should work out somewhat well i think!


Petri, great snag on that sr, those things look and sound awesome. the bikes are rather similiar i have found. minus a cylinder, they are close. no problem on asking questions, im not the smartest guy in the world, but i am kind of a jack of all trades and master of none really. ill know enough to get me by on this build!


ok, today was fun. got the gauge cluster off, and ran into a little snag.......the cluster is off, but now the electric start wont work. it kicks over fine, but electric is a no go. i think i may have un plugged a ground for it...the horn works, so ignition switch is good, at least thats what the tx500 service manual said. and it left me baffled for a few hours quite honestly. any help would be appreciated on that as the electric start still works and would love to utilize it if i can!


IMG_20111018_175620.jpg


tanks off, now to dig into the carbs. i am deciding to run pod filters, so i yanked off the stock air intake and no i have to measure up filter sizes. idk where to buy them locally, so i may have to order them (Patient i am not, if i can buy it local from a local dude, i will. lawlz) here is how the carbs sit as of now:


IMG_20111018_175508.jpg


IMG_20111018_175458.jpg


IMG_20111018_175640.jpg


plenty of room as you can see. so ill find a nice sized pod filter to fit snug where it needs to go! from there came the tucking of wires and setting up the clipons and stock headlamp. i wanted to keep the stock headlamp and its mount, as it flowed well. so my buddy and i trimmed the top and bottom of the headlight mount to fit with the clipons stil in between the triple tree, and ended up with a slick looking cafe front end!!!


IMG_20111018_191338.jpg


IMG_20111018_191459.jpg


i threw on the side covers to get a look at how the hell its going to look in the end, along with the seat pan. im going to do this pretty much on a daily basis after everything gets put on or if anything major happens with the bike. i like to see things progress. that way, if i see that something is a little off or doesnt flow properly, i can make an adjustment where i need to in order to find where im going wrong. process of elimination. just wish i used process of elimination a little better with my gauge cluster!!!


any tips on how to get my electric start working again? i know it works, i checked all fuses, and i opened the controls up to take a look. the button looks pretty used and rusted. i cleaned it out a little in hopes of it working, and it just didnt want to work. it sucks. i know something in the guage cluster made it work. shitty wiring from the factory i say...and thats who im blaming it on!! ha. like i said, any tips on getting the electric start working would be badass!


at the end of the night, we were cleaning up and decided to have a photo op:


IMG_20111018_194009.jpg


thats joe, the guy i bought the bike from, kids awesome. spent a week traveling to new york and back with him, and would make a year out of it. awesome dude to be around, and fun to work with. we blast gangsta' beats while working on the bike and have fun during the process.


IMG_20111018_194035.jpg


and thats me. quickly after this photo was taken, i had to adjust myself as the hard on i got from getting a feel for the clipons was protruding into the tank painfully. i fk'n luv cafe bikes even more now!


something i need peoples help on is colors/designs for the bike. i keep thinking white and red, but its definitely copying the "solus" sr5, and i dont want to copy. i thought about mimicking the stock tank design but with different colors. such as a white and mint green, or maybe even a combo of white and different shades of red. just some way to mimick the stock design of the tank, to keep it a retro design but still have a new color scheme to follow suit. i am going to use the retro yamaha logo badges like the sr500 had from solus, thats an absolute must. shit would look legit with it.


Next garage session goals:


- Cut seat pan and figure out how im going to make my rear end
- Clean engine side covers a little bit with brasso and some steel wool


Secondary objective:


- Remove wheels for cleaning and paint
 
Re: 1976 Yamaha XS500 Cafe project...first build evar!

Keep up these goals and and updates! I personally like the ps cans!
 
Re: 1976 Yamaha XS500 Cafe project...first build evar!

take a good pic of your bike and put it on your comp. then pull up paint shop that comes with it and just mess around . and if you can print it out and hang it in your shop to get ideas. did this 3 or 4 time befor i found what i wanted to do . its not the best way but can give you ideas ! heres one i did even tho im not going with it lol to much brain storming or to many beers lol......
wheels-1.jpg
 
Re: 1976 Yamaha XS500 Cafe project...first build evar!

well today was pretty cut and dry. i cut the rest of my seat pan:


Before:
IMG_20111019_131852.jpg


After:
IMG_20111019_141227.jpg


after i did that i tried polishing the side covers, didnt put in a whole lot of effort, as the seat pan took a little while (Working off an uncharged dremel tool didnt help either, charge for five minutes, cut for 30 seconds, pretty lame :\ ) but all in all, i got something done. i tried forming some cardboard just to get a visual:

IMG_20111019_143107.jpg


IMG_20111019_143055.jpg


as you can tell, it turned out shitty hahahaha. tomorrow im going to get some sheet metal and form out something a bit easier on the eyes. i thought of a pretty sick idea. using a thin diamond plate "Pad" for the seat, and on the edges, i would put the illusion of it being held down around the border with hide. i would weave leather strapping through some holes to make it look like its being held down by leather. it would look neat. either way, ill figure something out. im trying to match the style of tank with the tail piece and forming it to be a bit square.


i also got to thinking about colors. the wheels will definitely be black, so that solves that problem. once they are painted ill get tires mounted, and as for tires i have no idea right now, i want something borderline racing slick, as i am trying to go for function rather than form at the moment. i wanted big firestone deluxe champion tires like the wrenchmonkees bike, but quickly said fk' that because i heard how shitty they were for handling. thats another time though...lightyears ahead. anyways, the color i was thinking of for tank and tail, is white, with a mint green stripe down the middle, and mimicking the stock yamaha tank, with white as the base color, than the sides of the tank would be the stock tanks design but with different shades of that mint green.


aaaaNNOooother thought was going with a norton metallic green, and hand painting yamaha in the side, and mimic that norton look, but quickly shook that off, as well...its not a norton, and two, its not a norton. good idea, just not a norton :D 
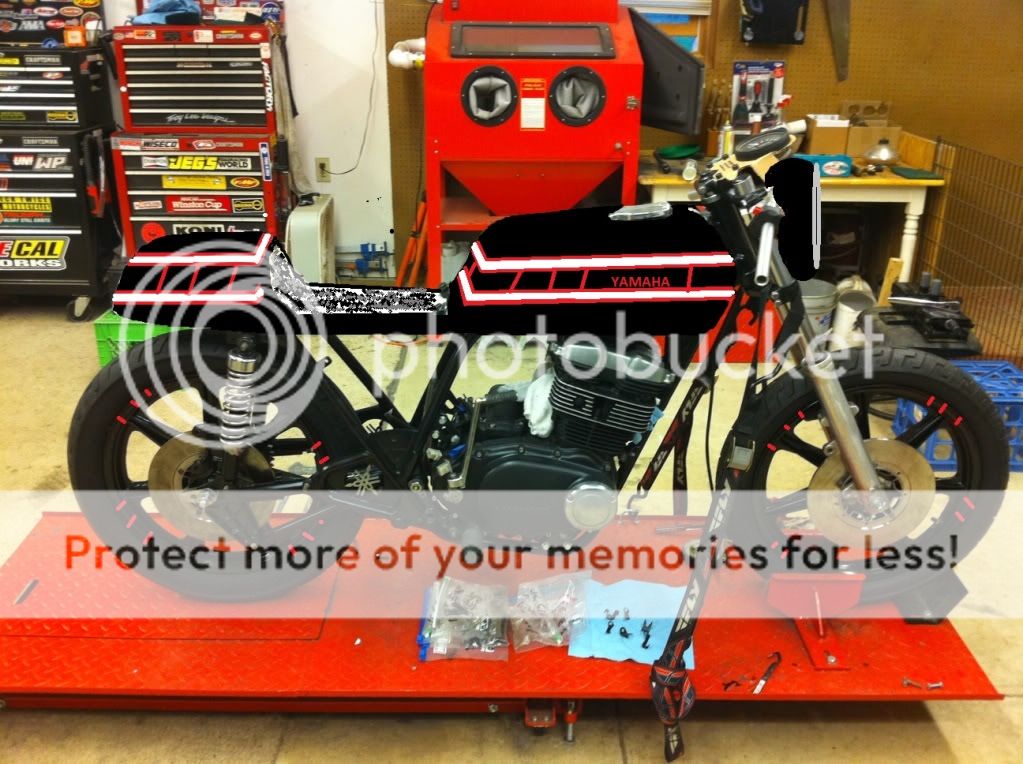
the japanese rising sun logo has always hit me well with this kind of build. its a japanese bike, so why not incorporate some japanese cuture shiz with the paint.


Rising+sun+W650+1.jpg


kinda like that, but also on the tail. i saw a build where a guy had a silver base color, an orange stripe down the middle, all the way through the tail piece, and on the sides of the tail piece in the same color orange, he had the rising sun design, looked pretty sick, but again, i dont want to copy anybody, as i think thats probably what im going to end up doing on accident. everytime i come up with a great idea, it gets shot down as someone has already done it. so its back to the drawing board.


came across this as i was looking for sweet stuff:


peytonplace_sr500.jpg


totally badass sr500....mint colors, mint plastics, just a sick ride. i like this photo because it shows what the black wheels would look like with a gold rear sprocket. which is what i was looking for. i was looking for a bike that had this color combo so i could figure out if i wanted to go with gold or just polished/silver sprockets.


harley-davidson-nigh-2_800x0w.jpg


the bike above is another look i thought of. springer seat, super light baby blue, retro yamaha logo, black wheels still. it would look pretty sick. just wish someone i knew that was a photoshop guru to help me get my ideas in a picture to see haha. thats all i have for tonight until i get more shiz tomorrow, sheet metal and try and form a tail section!


Next Garage Session:


- Buy sheet metal
- Use said sheet metal to make tail piece


Secondary Objective:


- Not f**k up and waste money on purchased sheet metal!
 
Re: 1976 Yamaha XS500 Cafe project...first build evar!

78Bike001.jpg


THIS IS IT!!!!!! the color i want to involve in my build. instead of white, as its dull, gay, boring and bland, a chreme'/off white color is waht i want involved. this, mixed with the harley above's color (a super light blue) would be epic as FUK!
 
Re: 1976 Yamaha XS500 Cafe project...first build evar!

Not sure if I missed this somewhere, buy what was the painters tape paint job for again ???

Sent from my PC36100 using Tapatalk
 
Re: 1976 Yamaha XS500 Cafe project...first build evar!

TV, That painters tape thing was the cure to boredom at the last day of camping on a trip to niagara falls from maine. it was pretty fun, took a few hours. i found a brand new roll of it in my goldwing saddle bag and decided to put it to use. used an entire roll to cover the thing!


Today was awesome. i bought the sheet metal that was needed to start on my tail section. bought some thin stuff to mess around with and get the shape:


IMG_20111020_142511.jpg


IMG_20111020_142531.jpg


IMG_20111020_142545.jpg


i plan on running this style tail piece until i get bored with it. figured i would get one on while i could and figure it out from there. i bought some thin diamond plate for the seat that i was going to border up with a marine grade leather or hide of some sort. using the stock seat pan has left me with a little play in my plan for the build which is fine with me, but i may end up just buying a fiber glass tail if i cant seem to make what i have made work with the tank and all that.


also, if anyone here has any tips or knowledge on getting my electric start to work again, that would be fantastic. and would gladly reward in paypal moneyz. im not much of an electronics guru but know enough to get by, but i just cant figure out how to get it to work again. it all started when i disconnected my guage cluster in the headlight, i was careful to not unplug anything that didnt need to get un plugged, but now im at a standstill with a working electric start, that wont turn over! any tips on that, again, would be greatly appreciated and would be more than willing to reward through paypal for whomever succesfully gets it to work again!


http://www.dotheton.com/downloads/Yamaha_TX500_500A_Service_Manual.pdf


i have followed that wiring diagram (its the yamaha tx 500a service manual if your not so good at reading links..) and i still cant figure it the hell out.


thats all i got today! tomorrow i should have a final draft of that tail piece mounted up or ready to be mounted up.


[/size]Next garage session:

- Make final draft of tail section
- Mount tail section (If not mounted at least have completed and trimmed for mounting)


Secondary objective:

- Possibly get a form made from cardboard for the diamond plate seat "Pad"
 
Re: 1976 Yamaha XS500 Cafe project...first build evar!

I wired my electric start to a key switch. The solenoid works by connecting to ground with the button on the handle bar- it always has positive power. If you look at the solenoid, it'll have a blue wire with a white stripe. That is the ground from the handle bar switch. I'll leave you to figure out how you want to do it, but that's the basics. Connect that post to ground, the starter activates.
 
Re: 1976 Yamaha XS500 Cafe project...first build evar!

total brain blast just now (Jimmy neutron reference for the youngin's out there!)


i bet in the disconnecting of that gauge cluster, there was a ground that was going to the control unit on the handlebar...and its now disconnected somewhere in the headlight area.......i bet thats it.


thanks for that one two smoke, thats the first thing im going to try tomorrow. ill figure out another ground to go to, and put an aligator clip on a longwire and connect that white and blue sleeved wire from the button to the longwire going to a ground.


would a good ground be to the negative on the battery?
 
Re: 1976 Yamaha XS500 Cafe project...first build evar!

Obviously, the battery is the best ground, but then you'll be able to activate the starter without a key in the ignition. Just fyi. The bike won't start without the ignition being on to connect power to the coils, it'll just crank over, but it may be a little disconcerting. What I did was get a universal key switch with turn-key start, then I disconnected the hot side of the solenoid. I connected the ground post directly to a chassis ground, then ran the hot side through the key switch. Eliminated the original button and key switches entirely and start the bike automotive-style.
 
Back
Top Bottom