1977 CB550 SS complete engine rebuild....going to need help I think...

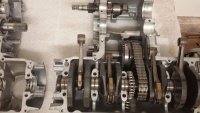
Will do. I think I'll grab the transmission parts and bring them in tomorrow so I can take pictures and ask questions. REALLY appreciate the help and feedback so far guys. I've now found out how so many of these bikes that get pulled apart to this level...remain at this level. It's daunting to start back in on it! ;)
 
.
measure the pistons for wear . . if the very bottom is smaller then 1.5 inches up from the bottom, they are jumk.

if they are pitted, they are junk

measure the bore for taper and out of round.

if the bore is scored above the 1/2 way point it needs a rebore.

use muriatic acid and a wire brush to get the aluminum off the bore

partzilla does not have parts . . go to cmsnl.com they also have parts fishes.
 
Trust me, I know all about CMSNL :) Practically on there daily for help on customer bikes and answering questions for people. However, they are overseas and I was hoping I could find something here in the states :( Guess not. I know one piston is toast and the others might be pitted from sitting apart for a while. I'l double check the other 3. Otherwise it gets pricey getting a Dynoman Performance set of pistons etc..

http://www.cmsnl.com/honda-cb550f2-super-sport-550-four-1977-usa_model468/partslist/
 
MotorbikeBruno said:
Otherwise it gets pricey getting a Dynoman Performance set of pistons etc.

yes it does but thats the price we have to pay for our hobbies . . im just happy we can get pistons and some other parts at all.
 
canyoncarver said:
If you build it out these boxes of parts, you'll be my hero.

Well, it WILL be built out of the boxes...just wanted to verify which parts really should and which parts NEED to be replaced. If anyone has a good lead to a one-piece cam chain, I'm all ears. I hate pressing and staking those little chains...I did it 3 times on my other CB500 because I was paranoid that I had done it too tight or too little!

Updates: Went through BikeBandit to start pricing things out. Not sure if I should order up all of the seals individually or just buy a kit like this: http://www.ebay.com/itm/like/381298990548?lpid=82&chn=ps

That link has 9 of the seals, where others have 5, or 7 or 8....so I figured I'd go with the highest one...ha! Also, here's my cart on bike bandit currently (I would take out the seals and buy the kit if the consensus is that it's a good idea)

Looks like the hard part is going to be making sure I've got the correct washers between things as they aren't marked of course.... :-\
 

Attachments

  • 20150622_081746-1.jpg
    20150622_081746-1.jpg
    203.6 KB · Views: 192
One thing I didn't realize is that the two crank seals aren't just a press fit, they have a lip on them that catches in the cases. Now the NEW seals don't seem to have this lip. Is that going to be an issue? I had a CB500 whole engine oil seal kit, since I was going to fix a few leaky seals on my 71 cb. Turns out they use pretty much the same stuff. So the part numbers match up, but they don't have that lip. Do you just use a good sealer (hondabond or such?) and it will be OK?

EDIT: just after looking through the bag and on CMSNL, the Honda number calls out 13.8x24x5 and the kit came with a 14x24x5 as well as it's listed ALSO on CMSNL as an alternative. I'm assuming that .2mm doesn't matter that much? I would think it does though....

I ended up ordering 2 new Seals for the crank on each side, they both had the lip pictured and are listed as OEM Honda parts. That should calm my nerves about putting a non-lip seal in there. What are people's thoughts on Cam chains? Has to be Tsubaki? 4Into1 sells http://4into1.com/d-i-d-cam-chain-219t-x-88l-14401-362-003-honda-xl175-cb500k-cb550/ and http://4into1.com/ek-cam-chain-219h-x-88l-14401-362-003-honda-xl175-cb500-cb550/ which means I do NOT have to rivet the master myself. One less failure point on my part if you ask me!
 

Attachments

  • 20150701_091401.jpg
    20150701_091401.jpg
    325 KB · Views: 173
VERY happy I decided not to use the "cheap kit" seals for the crank. These are Honda OEM and have the correct lip, and the one even has a metal ring molded into it (assuming for strength) Also got my brand new cam chain in and one more of the oddball seals (that 13.8x24x5 seal) from 4into1.com

I think with these two and the cam chain I can get the crank back in the top case. But just remembered I still have the magneto on there, as he didn't get that off. I don't mind having the proper tool since I work on so many of the old Hondas. But it looks like a 16x1.5mm Bolt eh?

I'll fit the large drive chain onto the transmission and see how sloppy it is. Those aren't as easily found.
 

Attachments

  • 20150707_081925.jpg
    20150707_081925.jpg
    738.7 KB · Views: 178
  • 20150707_115928.jpg
    20150707_115928.jpg
    688.5 KB · Views: 175
I'm still in the process of building my cb550 engine but it's stalled since we had a baby. But let me know if you have any specific questions. I basically replaced every bolt, washer, nut, bearing, etc. that I could find a replacement for as I reassembled it. So it's still somewhat fresh in my mind. Also, I have a bunch of left over stuff that I could send your way if you need it. I have all of the old pistons (actually 2 sets), used cranked bearings that may work for you...lots of random stuff.

Here's some photos of my motor....
 

Attachments

  • 20141028_211201.jpg
    20141028_211201.jpg
    1.5 MB · Views: 202
  • 20141112_230248.jpg
    20141112_230248.jpg
    1.4 MB · Views: 184
  • 20141112_214322.jpg
    20141112_214322.jpg
    1.5 MB · Views: 188
  • 20141026_203726.jpg
    20141026_203726.jpg
    1.7 MB · Views: 186
  • 20141021_191753.jpg
    20141021_191753.jpg
    1.4 MB · Views: 206
  • 20141021_191744.jpg
    20141021_191744.jpg
    1.4 MB · Views: 176
That is fantastic! I'll try to take pictures and explain each part so I have a build log if someone else finds this thread and needs help. I'll definitely be asking questions! Thanks!!!! I think I only need one piston as of currently unless I decide to swap for 1st oversize and bore etc... Crank bearings look great, no nicks/scratches etc. Did you end up replacing the larger Tsubaki Drive chain? And did you paint the cases before hand (at least it looks like you did?)
 
I ended up reusing the primary chain since there wasnt much slack. I did get a new timing chain though.

I painted the cases separately.

Let me know if there is something you need. If I get a moment this weekend, I'll IM you a list of some of the stuff that I have left over.
 
integra7 said:
I ended up reusing the primary chain since there wasnt much slack. I did get a new timing chain though.

I painted the cases separately.

Let me know if there is something you need. If I get a moment this weekend, I'll IM you a list of some of the stuff that I have left over.

Thanks. I think that's my current situation. I've already bought a new cam chain, but the primary seems like it's going to stay. I finally got my puller in the other day so I can get the magneto off and the crank in. I have the proper seals and such. Are you supposed to use HondaBond (or yamabond) to seal those oil seals in the case? Or is there a "special" case sealer I don't know about?
 
I used the Three Bond 1194 to seal the cases. I believe it's the same product as hondabond or yamabond. You shouldn't need to apply any of the hondabond to the oil seals.

The Three Bond liquid gasket starts to get tacky pretty quick. I would say you have about 10-15 minutes to get the case together once you apply the liquid gasket, maybe up to 30 minutes to torque everything down. Just triple check everything before you seal the case cause its messy if you need to redo it. Also, put something in place to keep the rods pointed straight up before you start. And maybe run through the process once or twice before you apply the liquid gasket.
 
Ok, dry fitted things up. (little grease on the seals as they slipped over the crank) Brand new endless Cam chain too!

Looks about right! Now on to the transmission...let the fun begin. What do I look for next? Or what bolts in next. I'll have a look at the manual on this one too.

EDIT: It appears that we keep the crank in the lower end of the engine case and put the top ON (which truly makes sense...) so I'll be pulling this out and getting the bottom crank case ready for putting all of the necessary parts.
 

Attachments

  • 6.jpg
    6.jpg
    498.8 KB · Views: 246
  • 7.jpg
    7.jpg
    452.6 KB · Views: 197
  • 8.jpg
    8.jpg
    458.3 KB · Views: 173
  • 9.jpg
    9.jpg
    344.7 KB · Views: 194
.
yup, everything goes in the top of the case then the bottom goes on . . this way tranny repairs can be done without removing the top end also.
 
Looking good!
As mentioned above, I'd definitely recommend doing a dry run or two assembling without sealant first. I'd suggest finding another way to prop the engine up so it's not sitting on the studs.

From memory, I froze the primary shaft with bearing attached. Once the transmission shafts were in, and the primary gear sitting inside the chain and the cases together, it was just a matter of lining up the needle bearings inside the primary gear, and sliding it into place before it thawed up too much.
 
Bootsey said:
Looking good!
As mentioned above, I'd definitely recommend doing a dry run or two assembling without sealant first. I'd suggest finding another way to prop the engine up so it's not sitting on the studs.

From memory, I froze the primary shaft with bearing attached. Once the transmission shafts were in, and the primary gear sitting inside the chain and the cases together, it was just a matter of lining up the needle bearings inside the primary gear, and sliding it into place before it thawed up too much.

I'm not quite sure what you mean about this, but I'll ask when I run into a snag I'm sure. Also Barnett said everything goes in the top case as I have, But the pictures in the manual are telling me otherwise, am I missing something here? (also. yes I will get the weight off the studs, I assumed they could handle just the crank in there but it's better to not load them up with side force I suppose!) Thanks Bootsey
 
Yeah assemble everything in the top case, otherwise I don't know how you'd line up the shift forks.

I probably didn't explain it very well, but you'll figure it out once you get it all together - the primary shaft fits into the bottom case half, so you have to sit the starter clutch & primary drive in the top case half, before you fit the lower case on, then the primary shaft can go through once the cases are together.

Make sure you've got the half circle bearing retainers & the case dowels fitted too.

Did you check the clearances on the rod & crank bearings?
 
Bootsey said:
Yeah assemble everything in the top case, otherwise I don't know how you'd line up the shift forks.

I probably didn't explain it very well, but you'll figure it out once you get it all together - the primary shaft fits into the bottom case half, so you have to sit the starter clutch & primary drive in the top case half, before you fit the lower case on, then the primary shaft can go through once the cases are together.

Make sure you've got the half circle bearing retainers & the case dowels fitted too.

Did you check the clearances on the rod & crank bearings?


Please forgive me for going against what you guys are saying, but it appears through the manual and other people's splitting of the CB550 engine, that you put it all in the lower end, and the shift forks stay in the upper end. I think I finally understand what you are saying as far as the primary shaft, but the manual is saying to put that in with the crank in the bottom half. Which brings me to a new point, there's nothing in the lower half that the primary would sit on. Looking for that next. I think theres a bearing there (that I bought new from Honda). Check out this link for some pics to see what I am saying. And again, really sorry if I'm wrong and just not understanding due to the manual. http://forums.sohc4.net/index.php/topic,85698.125.html and at the almost very bottom of the second link you can see he's got the lower end all together http://forums.sohc4.net/index.php/topic,85698.150.html
 
Back
Top Bottom