bananas
Been Around the Block
Update:
Time to make the undertray/electronics box. Have never worked with fiberglass before so hopefully this first attempt is also the last. I've been checking up on it and so far it seems to be curing quite nicely. Used a combination of mat and cloth, however in the future I'll probably be using mostly cloth because it's soooo much easier to work with.
For anyone interested materials needed are:
-Epoxy Resin, 1 Med-Size Jug
-Epoxy Hardener (Came with the resin)
-Fibreglass mat - 1 pack
-Fibreglass cloth - 1 pack
-Mold release agent (I'm using a regular good quality car wax so I didn't have to buy anything proprietary)
-Cheap paint brush
-Metal Roller
-Good pair of scissors
-3M Breather mask
-Nitrile or rubber gloves
-Lots of plastic bags
-Plastic beer cups and shot-glasses (for measuring)
-Boxcutter for air bubbles (if you get any)
-Heater to assist curing because Vancouver is beginning to get cold
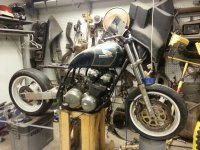
Mockup of the to be welded-on frame gussets. They're designed to completely hide the under-seat electronics box. A very sad blown up '79 Kawasaki KZ200 hibernates in the background

Making sure everything fits. Forgot about the solenoid so I guess the RR will be mounted underneath instead. A little wind should be good for heat dissipation anyways.

Kept the tank on underneath the plastic sheets for part 2 of fibreglassing -- building the seat pan & foam mockup on top of the battery box.

First 2 layers of mat down + a bit of corner reinforcement. This still is awful to work with!! It got everywhere!!! The only good thing about this stuff is that it doesn't have any problems with air bubbles. Was pretty annoying to deal with strands of it getting stuck all over the brushes and roller while applying resin. I'm thinking I should've waited longer between coats?

Fibreglass cloth as the third layer. This stuff was great. No complaints.. Cut out a basic pattern and used a metal roller to get out air bubbles.

Edit: Checked up on the curing a couple of times. its 90% dry now. Two smaller air bubbles formed next to the upswept compound curve, cut 'em open with a boxcutter. Will probably need a bit of sanding all around and maybe a finishing layer. Also realized I forgot to impregnate the overpriced washers i picked up this morning. Damnit.
Next update hopefully coming soon 8)
Time to make the undertray/electronics box. Have never worked with fiberglass before so hopefully this first attempt is also the last. I've been checking up on it and so far it seems to be curing quite nicely. Used a combination of mat and cloth, however in the future I'll probably be using mostly cloth because it's soooo much easier to work with.
For anyone interested materials needed are:
-Epoxy Resin, 1 Med-Size Jug
-Epoxy Hardener (Came with the resin)
-Fibreglass mat - 1 pack
-Fibreglass cloth - 1 pack
-Mold release agent (I'm using a regular good quality car wax so I didn't have to buy anything proprietary)
-Cheap paint brush
-Metal Roller
-Good pair of scissors
-3M Breather mask
-Nitrile or rubber gloves
-Lots of plastic bags
-Plastic beer cups and shot-glasses (for measuring)
-Boxcutter for air bubbles (if you get any)
-Heater to assist curing because Vancouver is beginning to get cold
Mockup of the to be welded-on frame gussets. They're designed to completely hide the under-seat electronics box. A very sad blown up '79 Kawasaki KZ200 hibernates in the background
Making sure everything fits. Forgot about the solenoid so I guess the RR will be mounted underneath instead. A little wind should be good for heat dissipation anyways.
Kept the tank on underneath the plastic sheets for part 2 of fibreglassing -- building the seat pan & foam mockup on top of the battery box.
First 2 layers of mat down + a bit of corner reinforcement. This still is awful to work with!! It got everywhere!!! The only good thing about this stuff is that it doesn't have any problems with air bubbles. Was pretty annoying to deal with strands of it getting stuck all over the brushes and roller while applying resin. I'm thinking I should've waited longer between coats?
Fibreglass cloth as the third layer. This stuff was great. No complaints.. Cut out a basic pattern and used a metal roller to get out air bubbles.
Edit: Checked up on the curing a couple of times. its 90% dry now. Two smaller air bubbles formed next to the upswept compound curve, cut 'em open with a boxcutter. Will probably need a bit of sanding all around and maybe a finishing layer. Also realized I forgot to impregnate the overpriced washers i picked up this morning. Damnit.
Next update hopefully coming soon 8)