
We noticed you are blocking ads. DO THE TON only works with community supporters. Most are active members of the site with small businesses. Please consider disabling your ad blocking tool and checking out the businesses that help keep our site up and free.
You are using an out of date browser. It may not display this or other websites correctly.
You should upgrade or use an alternative browser.
You should upgrade or use an alternative browser.
1979 Moto Guzzi V50 II Cafe
- Thread starter Dale
- Start date
Dale
Coast to Coast
Re: Moto Guzzi V50 II Cafe Build **(MOCK-UP BEGINS!)**
Ha Ha, Youre not being biased are you? I mean your handle isnt BlackPlastic right? Thanks for the opinion man. I hear all the +red+ comments - it's just, well, the V50 really isnt the most collectible or desirable Guzzi out there, so that does give a certain amount of license to not be too purist about it...
PEARLS OF WISDOM! Thems is a flowin'
Yup, I have to say that sounds about right.
Motorcycles as a hobby in general is keeping me broke though - so guess I'm screwed (or not)... ???
RedPlastic said:Red all the way, its like the red ferrari vs the black one type deal.
Ha Ha, Youre not being biased are you? I mean your handle isnt BlackPlastic right?
Thanks for the opinion man. I hear all the +red+ comments - it's just, well, the V50 really isnt the most collectible or desirable Guzzi out there, so that does give a certain amount of license to not be too purist about it...dewjantim said:I would say that green attracts the most women
PEARLS OF WISDOM! Thems is a flowin'
Yup, I have to say that sounds about right.
Motorcycles as a hobby in general is keeping me broke though - so guess I'm screwed (or not)... ???
50gary
Under the Limelight
Re: Moto Guzzi V50 II Cafe Build **(MOCK-UP BEGINS!)**
I guess I'm a natural born contrary, I love your project and the bike is great. I think however it's almost silly to ask for opinions about the color. It's your bike, your money, your sweat equity and to throw up the finishing touch to the crew is puzzling?
I make my own choices and so should you, my only advise is not about the actual color but only to be bold, it's your bike. * I say this in a brotherly advice sort of way not a bossy pri@ky sort of way.
Cheers, 50gary
Dale
Coast to Coast
Re: Moto Guzzi V50 II Cafe Build **(MOCK-UP BEGINS!)**
Hey 50gary, I definitely take your comment in the brotherly fashion as opposed to the pri@cky sort of way!
I certainly would not do my bike in red if I really wanted it black and vice versa just because that was the general consensus! I was (and still am to a degree) genuinly on the fence on the issue, and thought it would be great to see the motivation and reasoning from other people that I may not have come up with myself for the two colour choices I had narrowed things down to... Its merely a point of discussion, nothing more.
But thanks for the concern, and the advice. I hear you!
Dale
dewjantim
duc in the park.....
Re: Moto Guzzi V50 II Cafe Build **(MOCK-UP BEGINS!)**
Dale said:Ha Ha, Youre not being biased are you? I mean your handle isnt BlackPlastic right?
PEARLS OF WISDOM! Thems is a flowin'
Yup, I have to say that sounds about right.
Motorcycles as a hobby in general is keeping me broke though - so guess I'm screwed (or not)... ??? ...................................................... Well, I am on the " not " side right now also......... and will probably remain that way once my wifey finds out about the Cobra Mustang and the grand worth of carbon I bought for it :-X :-X :-X ........hehehehehe.... I am always in trouble.
Hoosier Daddy
Earache my eye...
Re: Moto Guzzi V50 II Cafe Build **(MOCK-UP BEGINS!)**
Green, White and Red..
Bold horizontal stripes..
Red on bottom to tie into the red fender.

Green, White and Red..
Bold horizontal stripes..
Red on bottom to tie into the red fender.
Dale
Coast to Coast
Re: Moto Guzzi V50 II Cafe Build **(MOCK-UP BEGINS!)**
Hoosier Daddy - Tricolore! Will definitely have those kind of details in there somewhere for sure.
Right. Ive had fairly limited internet access of late, and well I've also been kinda busy, as you can see:
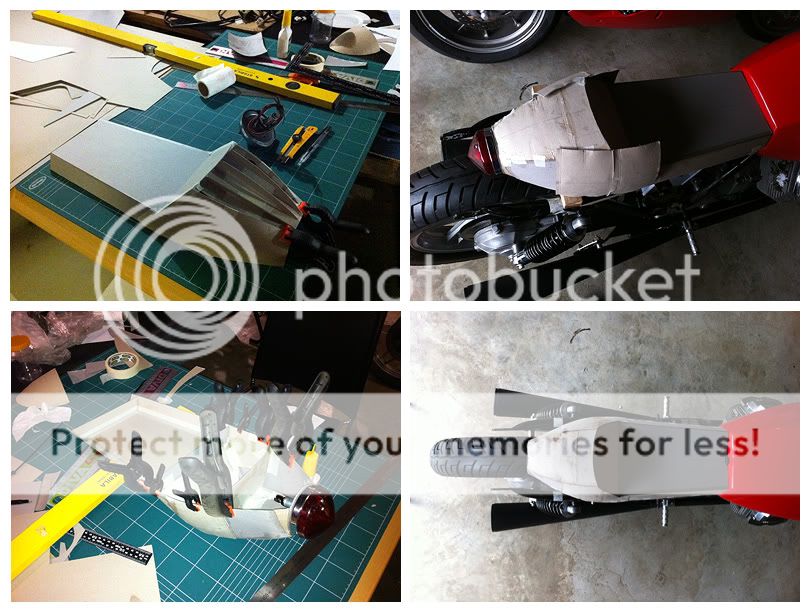
SEAT AND TAILPIECE Part 01
(DESIGN)
For this part of the process, my objective was to create a 1:1 mockup of the tailpiece and seat taking into account the shape and functionality of the unit. From there I will be making up the final unit from fibreglass, wood and aluminium. Parts of the mockup will be used to create the unique shape from using fibreglass, but other areas, like the seat base and electrical equipment housing, a new part will be made up from a wooden frame and aluminium plating, using the model as a 3D object to take dimensions off.
The process Ive used works for me, and Ive always done it this way, Its probably not the most practical, but I like it because it allows me a lot of control, and I can build a symmetrical shape by working out and making one side, and then using that as a template for the other side.
It also allows me to break down a 3D object into 2D shapes which are easier to understand by making multiple profiles. The use of card, also allows me to quickly make tweaks and changes, and not be precious about anything because of the rapid way you can make up 2D shapes. This way, I tend to not compromise because of invested time.
----
01. Tailight
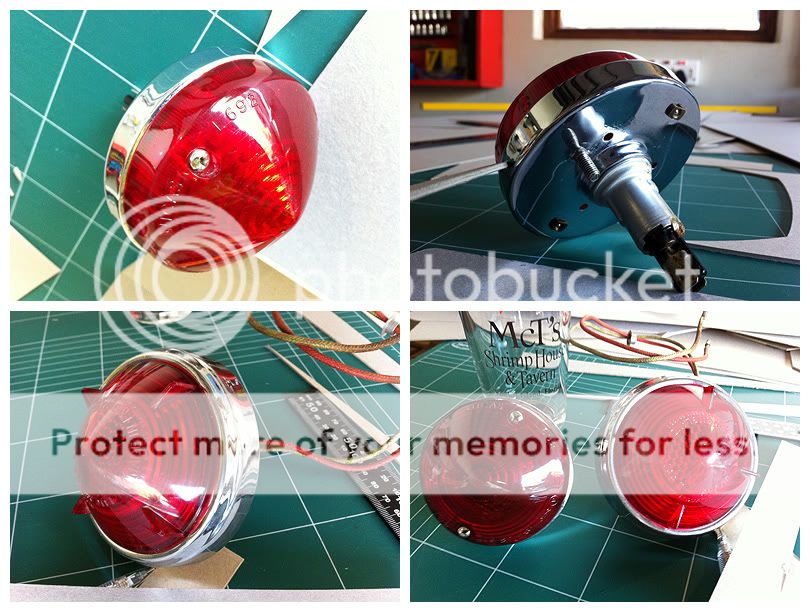
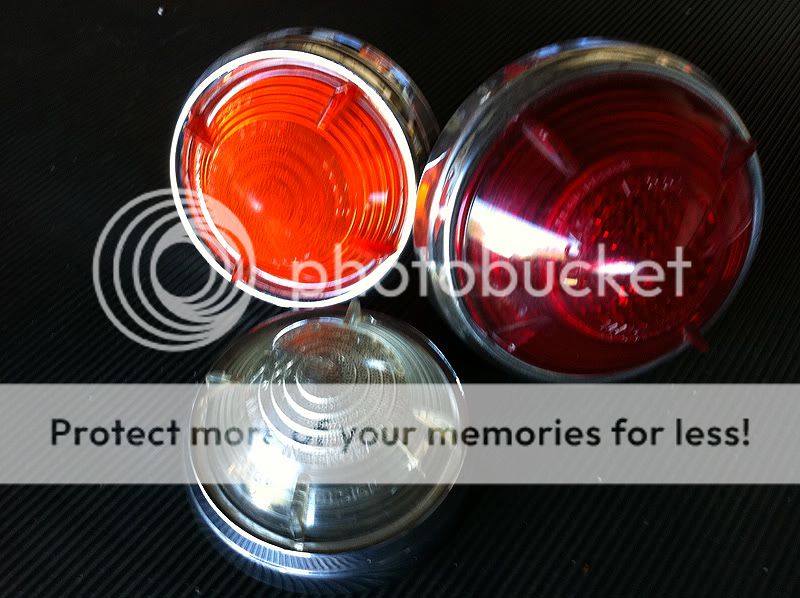
So to start out, I asked my dad if he had any smallish round rear lights in his stash of parts. The last few years of his restoring life was made up mainly of British cars. He produced these two Lucas lights out of a box of NOS and restored lights! The unit I ended up using is from a 50's MG Magnette. Originally I like the finned light because of the sharper profile, but it's diameter is 10mm larger than the other unit, meaning that it would be closer to the wheel, and my design is on the limits with regards clearances.
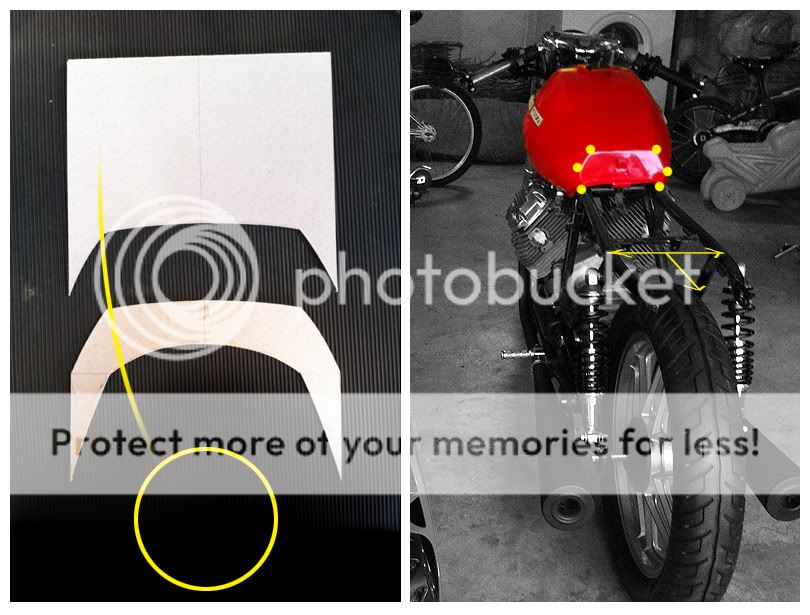
02. Profile and tailpiece shape
I wanted the seat to follow visually from the tank. The tank design has definitive creases mixed with smooth curves. I took some profiles off the tank, (which I used throughout the design phase of the seat).
My challenge was working within the following parameters:
a. I had to get the tank profile into a round (light) profile within a fairly short distance. (I had a specific length I wanted to achieve as per the original concept art which gives the bike a definitive look).
b. I had to get the width of the tailpiece flush with the frame width, and then taper it into the round profile in a fairly short distance.
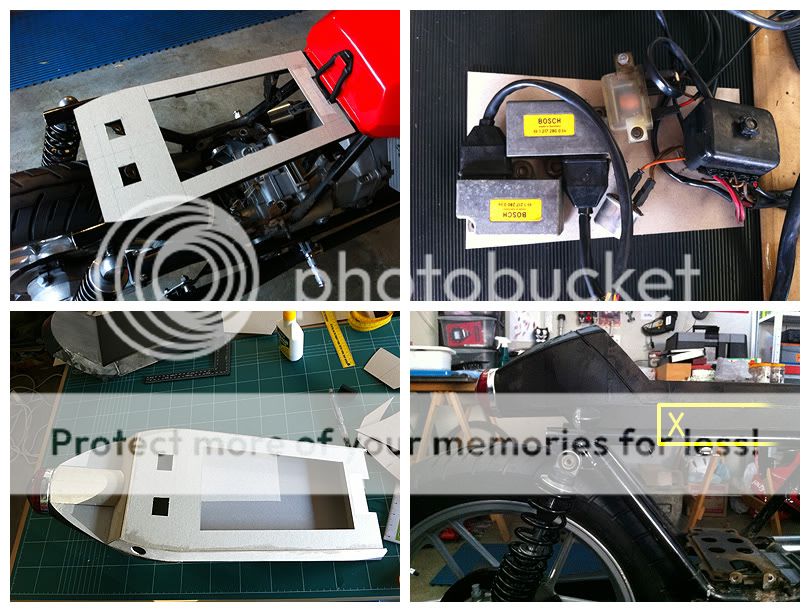
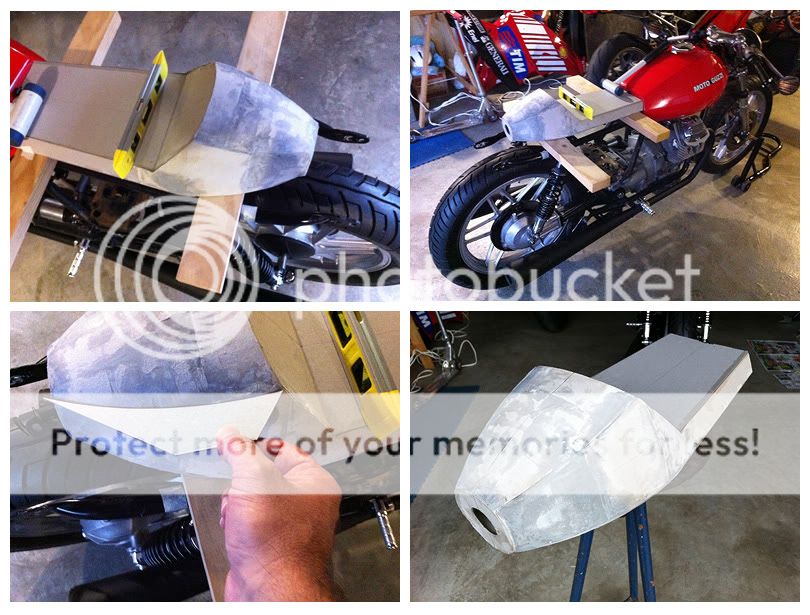
03. Electrical components
The electrical parts hidden behind the side covers all need to be moved out of sight.
Its a squeeze for the five parts, and I'm leaving plenty of ventilation.
I've managed to steal some space by using the width of the frame tube to help hide things.
I wanted there to be a specific height to the seat base, which lined up with one of the tank creases, as well as giving a more streamlined look.
04. Seat and Tail Design
Took me quite a while to get the profile right. Originally it was as per the concept art, but I ended up building it up 12mm higher for more support with regards acceleration etc. It also feels more balanced with the tank height.
More curves! At this point, I was starting to get pretty happy with the shape.
Fine tuning the shape.
Used some cellulose spot putty to fill in and sand.
Making sure everything is symmetrical and true.
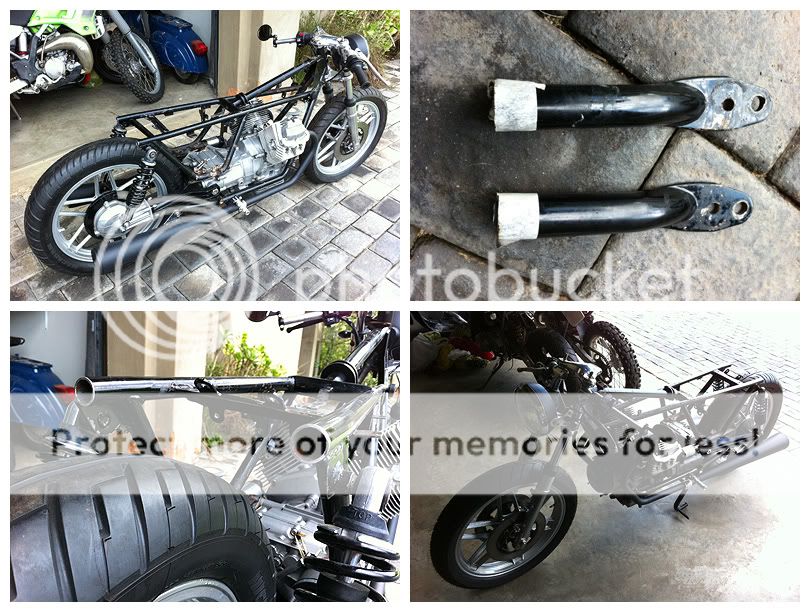
05. Cutting the Frame
The frame will be losing some brackets in the side panel area. I won't be taking anything off until I'm absolutely certain. I knew this was necessary, so just got in there and cut 'em off.
You always second guess at this point. But I made this decision before I bought the bike. I don't want a stocker. This little V50 is shedding some steel.
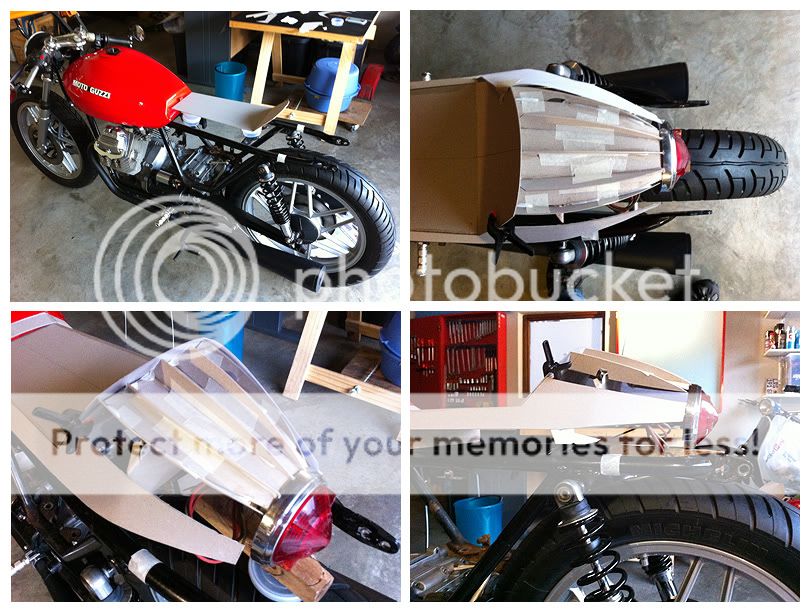
06. Padded area
Now I wanted the padded seat area to be completely flush and seamless with the whole tailpiece, so I made it up as a singular piece. I then sliced the "padded" area off.
Just a note at this point - all the angles on the seat follow the frame angle precisely.
The original bike had a 50mm clearance on the rear fender, and I've made sure to keep that same clearance.
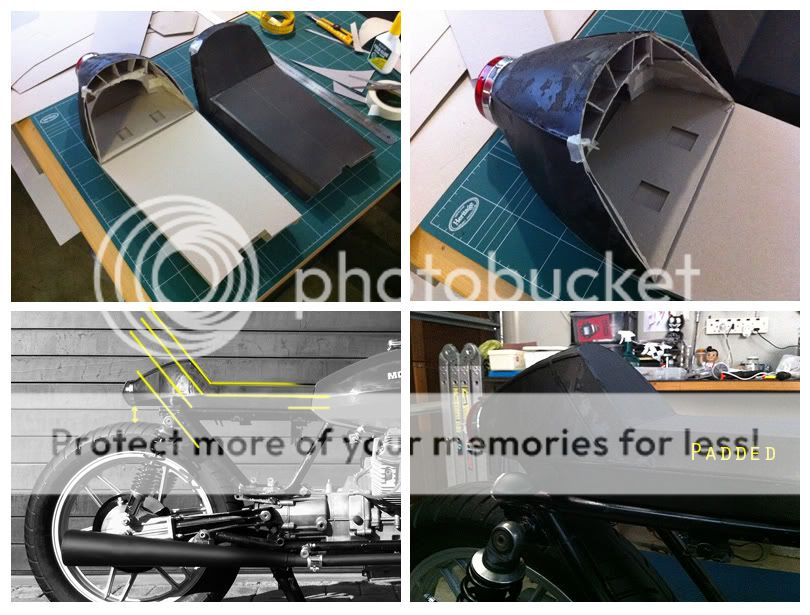
The final "hard" section shape. I gave it a spray to unify the colour so that I could clearly see the shape on the bike. Black recedes as a colour, and I intend for this entire unit to be covered in a black material, so it just helps visualize the end product more accurately.
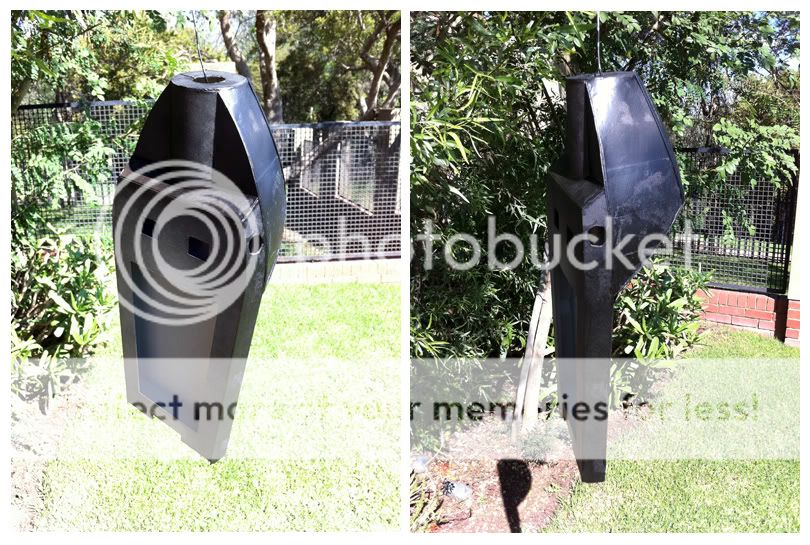
And this is what it looks like so far:
(So imagine that entire tailpiece and seat covered in a black leather with double stitching along the hard creases etc).
Dale
Hoosier Daddy - Tricolore! Will definitely have those kind of details in there somewhere for sure.
Right. Ive had fairly limited internet access of late, and well I've also been kinda busy, as you can see:
SEAT AND TAILPIECE Part 01
(DESIGN)
For this part of the process, my objective was to create a 1:1 mockup of the tailpiece and seat taking into account the shape and functionality of the unit. From there I will be making up the final unit from fibreglass, wood and aluminium. Parts of the mockup will be used to create the unique shape from using fibreglass, but other areas, like the seat base and electrical equipment housing, a new part will be made up from a wooden frame and aluminium plating, using the model as a 3D object to take dimensions off.
The process Ive used works for me, and Ive always done it this way, Its probably not the most practical, but I like it because it allows me a lot of control, and I can build a symmetrical shape by working out and making one side, and then using that as a template for the other side.
It also allows me to break down a 3D object into 2D shapes which are easier to understand by making multiple profiles. The use of card, also allows me to quickly make tweaks and changes, and not be precious about anything because of the rapid way you can make up 2D shapes. This way, I tend to not compromise because of invested time.
----
01. Tailight
So to start out, I asked my dad if he had any smallish round rear lights in his stash of parts. The last few years of his restoring life was made up mainly of British cars. He produced these two Lucas lights out of a box of NOS and restored lights! The unit I ended up using is from a 50's MG Magnette. Originally I like the finned light because of the sharper profile, but it's diameter is 10mm larger than the other unit, meaning that it would be closer to the wheel, and my design is on the limits with regards clearances.
02. Profile and tailpiece shape
I wanted the seat to follow visually from the tank. The tank design has definitive creases mixed with smooth curves. I took some profiles off the tank, (which I used throughout the design phase of the seat).
My challenge was working within the following parameters:
a. I had to get the tank profile into a round (light) profile within a fairly short distance. (I had a specific length I wanted to achieve as per the original concept art which gives the bike a definitive look).
b. I had to get the width of the tailpiece flush with the frame width, and then taper it into the round profile in a fairly short distance.
03. Electrical components
The electrical parts hidden behind the side covers all need to be moved out of sight.
Its a squeeze for the five parts, and I'm leaving plenty of ventilation.
I've managed to steal some space by using the width of the frame tube to help hide things.
I wanted there to be a specific height to the seat base, which lined up with one of the tank creases, as well as giving a more streamlined look.
04. Seat and Tail Design
Took me quite a while to get the profile right. Originally it was as per the concept art, but I ended up building it up 12mm higher for more support with regards acceleration etc. It also feels more balanced with the tank height.
More curves! At this point, I was starting to get pretty happy with the shape.
Fine tuning the shape.
Used some cellulose spot putty to fill in and sand.
Making sure everything is symmetrical and true.
05. Cutting the Frame
The frame will be losing some brackets in the side panel area. I won't be taking anything off until I'm absolutely certain. I knew this was necessary, so just got in there and cut 'em off.
You always second guess at this point. But I made this decision before I bought the bike. I don't want a stocker. This little V50 is shedding some steel.
06. Padded area
Now I wanted the padded seat area to be completely flush and seamless with the whole tailpiece, so I made it up as a singular piece. I then sliced the "padded" area off.
Just a note at this point - all the angles on the seat follow the frame angle precisely.
The original bike had a 50mm clearance on the rear fender, and I've made sure to keep that same clearance.
The final "hard" section shape. I gave it a spray to unify the colour so that I could clearly see the shape on the bike. Black recedes as a colour, and I intend for this entire unit to be covered in a black material, so it just helps visualize the end product more accurately.
And this is what it looks like so far:
(So imagine that entire tailpiece and seat covered in a black leather with double stitching along the hard creases etc).
Dale
Hoosier Daddy
Earache my eye...
Re: Moto Guzzi V50 II Cafe Build **(SEAT AND TAILPIECE DESIGN!)**
AWESOME!
Love your attention to detail, flows so nice with the angles on the tank.
AWESOME!
Love your attention to detail, flows so nice with the angles on the tank.
Erskine
Over 1,000 Posts
Re: Moto Guzzi V50 II Cafe Build **(SEAT AND TAILPIECE DESIGN!)**
+1
Maritime said:Perfect flow from tank to seat, you nailed it.
+1
johngofast
Over 1,000 Posts
Re: Moto Guzzi V50 II Cafe Build **(SEAT AND TAILPIECE DESIGN!)**
Love it, that whole seat would look great wrapped. Can't wait to see that complete.
Love it, that whole seat would look great wrapped. Can't wait to see that complete.
RedPlastic
make it rain bitches
Re: Moto Guzzi V50 II Cafe Build **(SEAT AND TAILPIECE DESIGN!)**
love it...but...there's always a but isnt there?...about that tail light. It looks like an afterthought, kinda like rudolphs big red nose sticking out like a sore thumb... but...there's that but again! Thats my opinion, either way its still an amazing build, and I appreciate the work thats gone into it
love it...but...there's always a but isnt there?...about that tail light. It looks like an afterthought, kinda like rudolphs big red nose sticking out like a sore thumb... but...there's that but again! Thats my opinion, either way its still an amazing build, and I appreciate the work thats gone into it
Dale
Coast to Coast
Re: Moto Guzzi V50 II Cafe Build **(SEAT AND TAILPIECE DESIGN!)**
Definitely not an afterthought - it was the *starting point*! Read the first point I make with regards getting the tank profile into a round profile - And also on page 1 of this build thread - the concept has been up there since day 1. It's got a definitive look and very much intentional. Im super happy with the look and knowing my motorcycle is unique is what matters in this regard.
Definitely not an afterthought - it was the *starting point*! Read the first point I make with regards getting the tank profile into a round profile - And also on page 1 of this build thread - the concept has been up there since day 1. It's got a definitive look and very much intentional. Im super happy with the look and knowing my motorcycle is unique is what matters in this regard.
Re: Moto Guzzi V50 II Cafe Build **(SEAT AND TAILPIECE DESIGN!)**
I agree to disagree, I think it flows very well, especially witht he tail section getting a coat of leather on it, it will blend nicely.
BUT yes, you could name the bike "Rudy" and people will get it! ;D
RedPlastic said:love it...but...there's always a but isnt there?...about that tail light. It looks like an afterthought, kinda like rudolphs big red nose sticking out like a sore thumb... but...there's that but again! Thats my opinion, either way its still an amazing build, and I appreciate the work thats gone into it
I agree to disagree, I think it flows very well, especially witht he tail section getting a coat of leather on it, it will blend nicely.
BUT yes, you could name the bike "Rudy" and people will get it! ;D
50gary
Under the Limelight
Re: Moto Guzzi V50 II Cafe Build **(SEAT AND TAILPIECE DESIGN!)**
Dale, outstanding design and build good eye. I would like to see a pure profile shot. Jut a suggestion here, I used "Alcantara" in "New" Black on my cafe seat. It's the interior fabric of most current Ferrari and Lamborghini's and luxury Yachts . Not cheap but very nice. There's only one importer (from Italy of course) and he's in Florida. There is an ebay source as well from England he only offer three colors black, Grey, Tan. It's worth checking out for a distinctive look. I used light sand colored thread in French stitching (double row) I also put "thigh cuts" on each side of the seat flat. I would Have used the second taillight with the fins, so stylish but yet subtle. I'll buy it if you want to sell it? My current Cafe project bike is a CX500 which Honda brought out to directly compete with your bike so that makes it great fun watching the build.
Cheers, 50gary
Dale
Coast to Coast
Re: Moto Guzzi V50 II Cafe Build **(SEAT AND TAILPIECE DESIGN!)**
Hey guys, thanks for all the feedback and comments! Greatly appreciated. All the hours you spend in the garage in isolation is rewarding in itself, but its also cool having people that know what youre doing and 'get it' see the work.
50gary, I love the CX500. It has a unique feel of its own. I actually came across one the other day for sale, and was pretty tempted, but it had no papers! The Alcantara sounds great - Ill look it up. Thanks for the pointer! Your seat sounds very nice!
With regards the second tailight with the fins - it was actually the 'first' tailight - but as I mentioned earlier it has a 100mm diameter and is just too big for this bike. I do have an amber and two clear lenses in the same set which are actually 80mm in diamterer. The shape definitley does flow better. I seem to recall a red gel paint somewhere along the line that you can paint lenses with - perhaps its worth investigating - another option would be to put a red LED light into the white lens? Could be cool, dunno. I only have one of the larger red lenses, and would be happy to give you one if I had a double, but Im sure I will be using it on another build. For your reference, its a LUCAS L551. Not sure what its off - but its definitley early Cold War era - rockets and all! If you dont manage to find one, PM me.
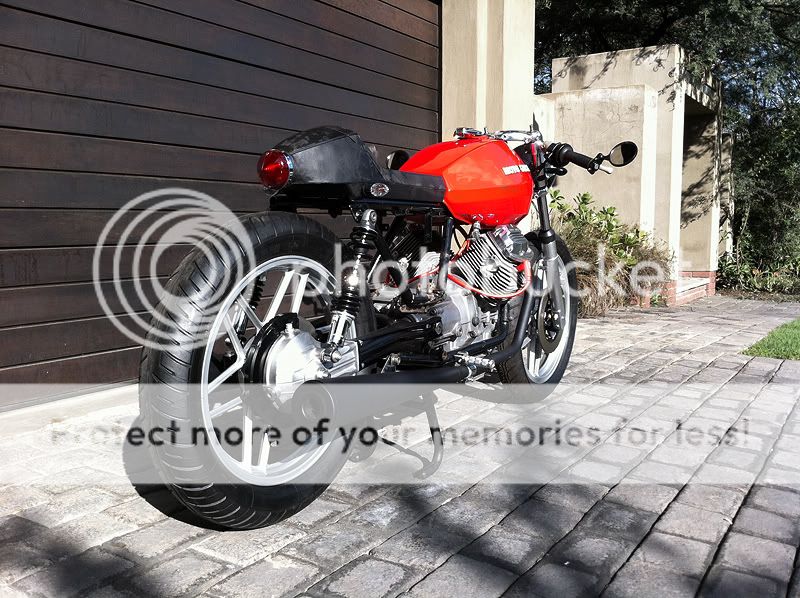
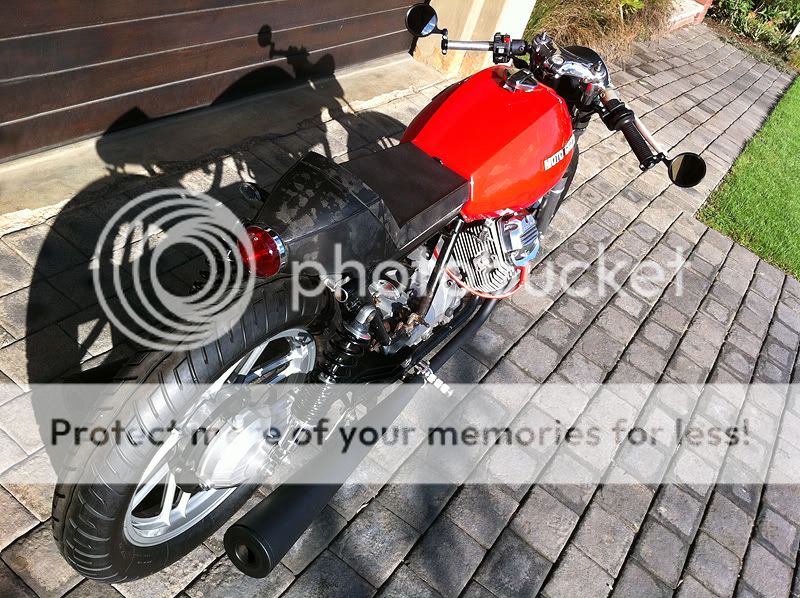
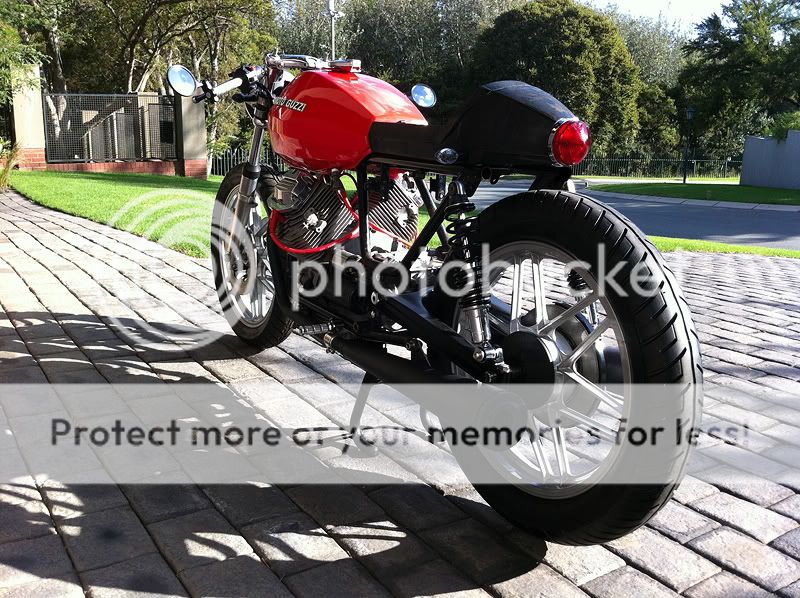
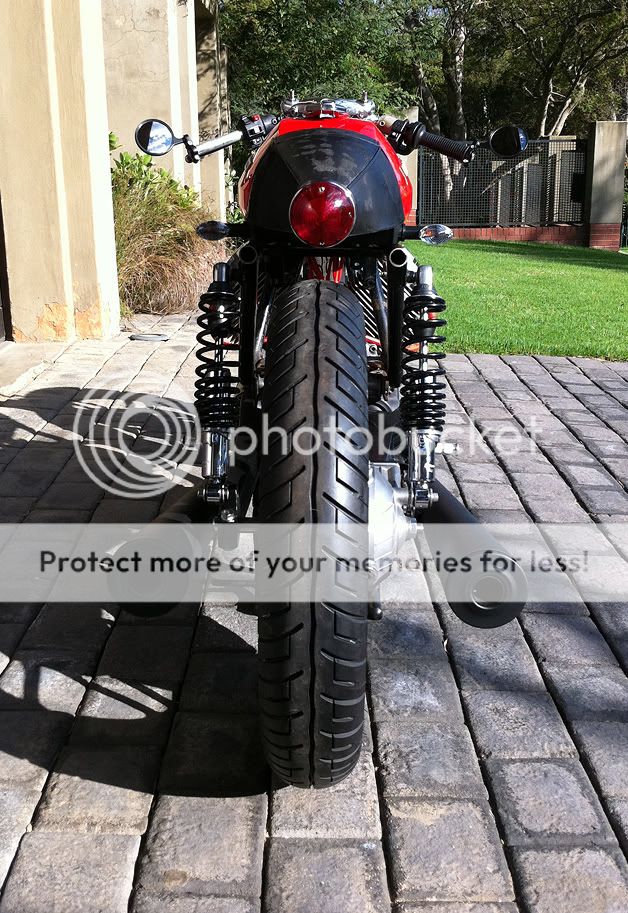
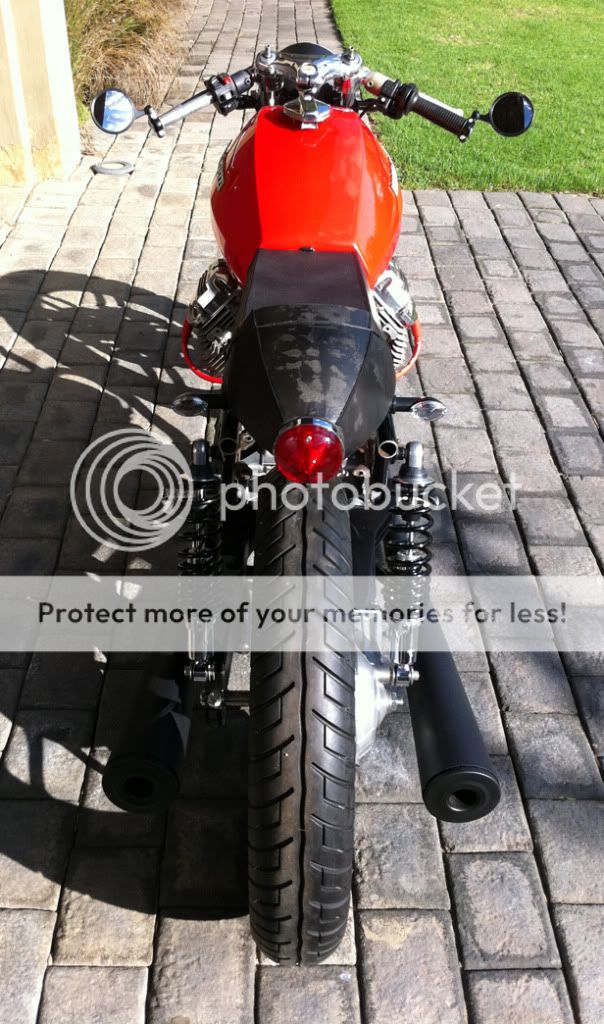
And here's the profile shot you asked for.
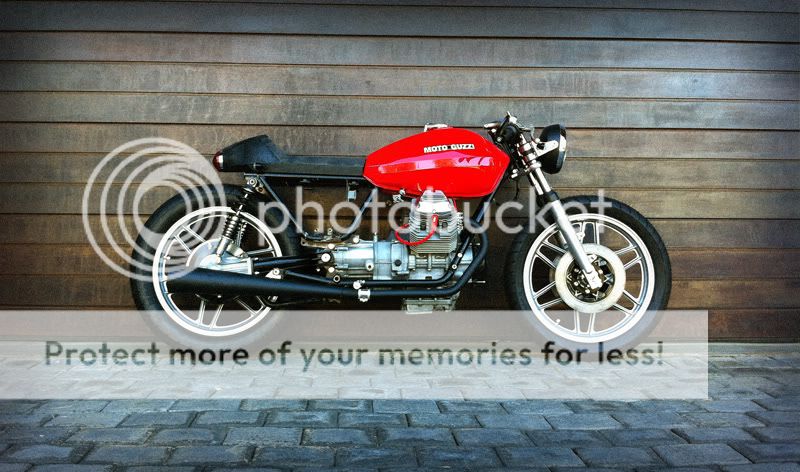
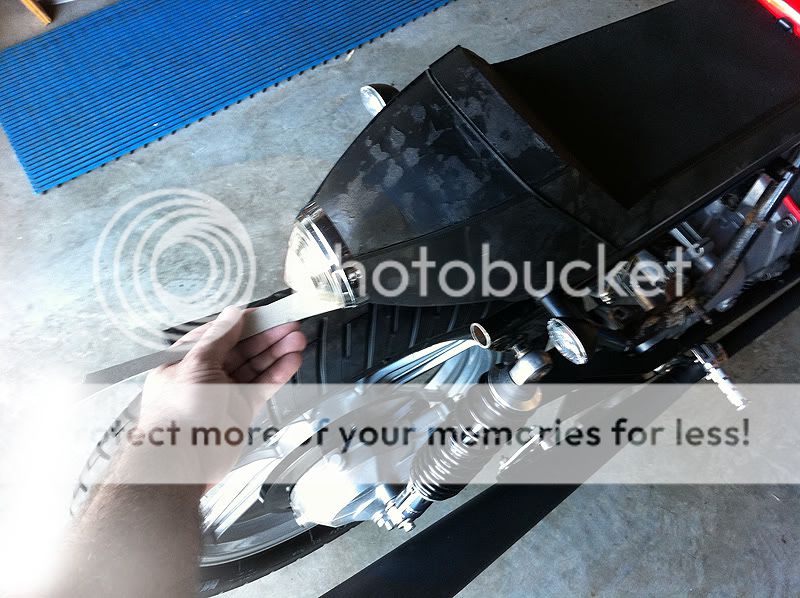
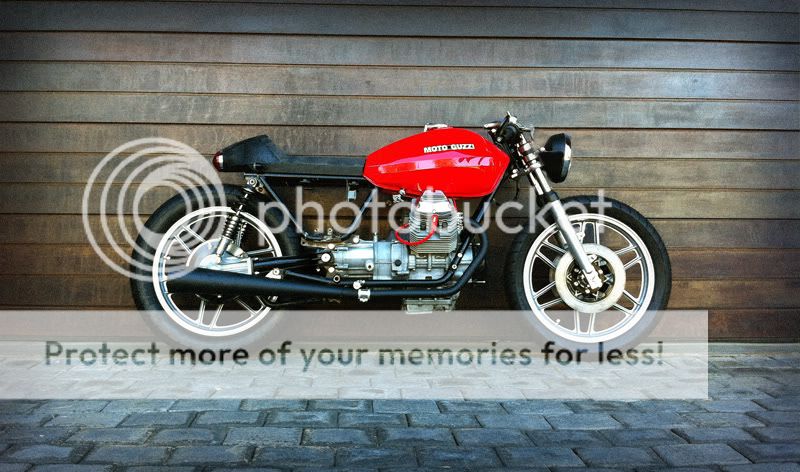
And a quick photoshop of the headlight lowered. Its curently just got a standard Tomaselli bracket on - I will be making up a specific one to get the light exatly where I want it. Probably make the bracket black as well.
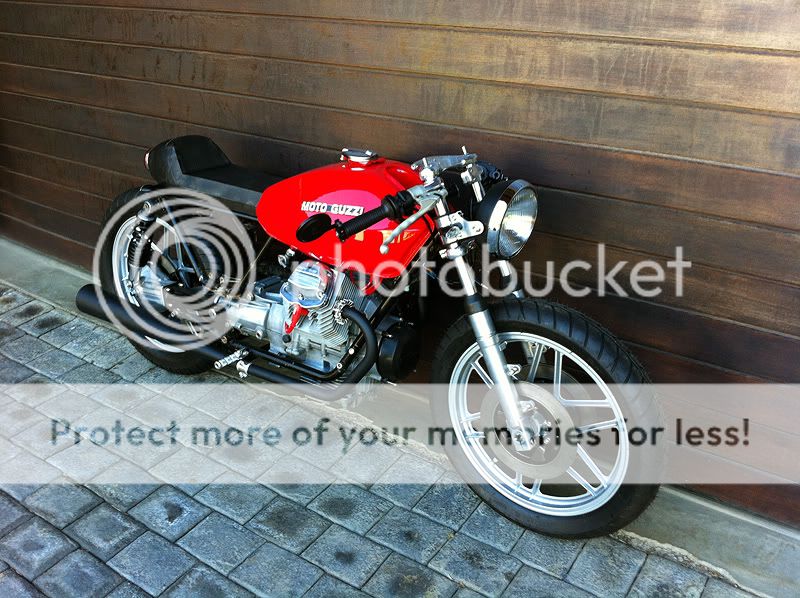
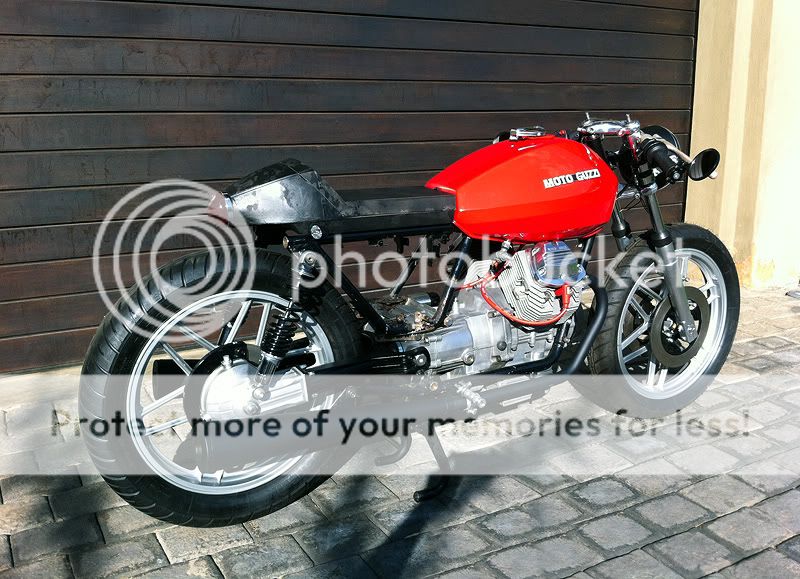
Some more shots.
Hey guys, thanks for all the feedback and comments! Greatly appreciated. All the hours you spend in the garage in isolation is rewarding in itself, but its also cool having people that know what youre doing and 'get it' see the work.
50gary, I love the CX500. It has a unique feel of its own. I actually came across one the other day for sale, and was pretty tempted, but it had no papers! The Alcantara sounds great - Ill look it up. Thanks for the pointer!
Your seat sounds very nice!With regards the second tailight with the fins - it was actually the 'first' tailight - but as I mentioned earlier it has a 100mm diameter and is just too big for this bike. I do have an amber and two clear lenses in the same set which are actually 80mm in diamterer. The shape definitley does flow better. I seem to recall a red gel paint somewhere along the line that you can paint lenses with - perhaps its worth investigating - another option would be to put a red LED light into the white lens? Could be cool, dunno. I only have one of the larger red lenses, and would be happy to give you one if I had a double, but Im sure I will be using it on another build. For your reference, its a LUCAS L551. Not sure what its off - but its definitley early Cold War era - rockets and all! If you dont manage to find one, PM me.
And here's the profile shot you asked for.
And a quick photoshop of the headlight lowered. Its curently just got a standard Tomaselli bracket on - I will be making up a specific one to get the light exatly where I want it. Probably make the bracket black as well.
Some more shots.


