Follow along with the video below to see how to install our site as a web app on your home screen.
Note: This feature currently requires accessing the site using the built-in Safari browser.
We noticed you are blocking ads. DO THE TON only works with community supporters. Most are active members of the site with small businesses. Please consider disabling your ad blocking tool and checking out the businesses that help keep our site up and free.
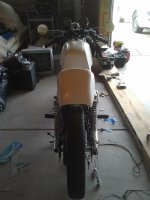
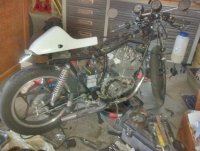
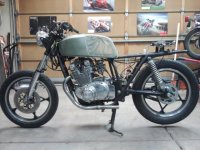
So... here is my 1980 Suzuki GS450 ET cafe racer build. I picked this up from a guy in Fort Collins Colorado and took it back to Parker Colorado. I guess this was about a year ago to the day.
I pretty much got the frame, engine, tank, forks, wheels, etc. that you see in the pictures. These pictures were taken in his (Chris) garage; the day I picked up the bike. I got the bike for $500 with an extra parts engine and 5 crates of spare parts. At the time I thought I had enough parts for 2 complete bikes, minus 1 frame and set of wheels. As I went through the build, I found that I had just enough parts for 1 solid build ...sort of.
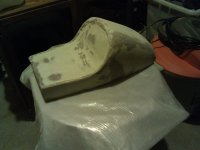
Chris had the tank primered and ready to paint. The sides of the tank where striped with a brushed metal look. He taped over the the knee portion of the tank and planed to leave that clear, so as to show the metal. I thought it looked ridiculous. The brushed metal stripes weren't even straight--and the OCD in me would have none of that.
I later went with white. I have another plan, but I will explain that later on when I tell you how I am going to redo the seat.
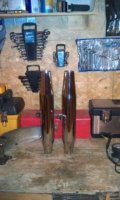
I decided to go with clip-on handlebars. I found this 33mm set for dirt cheap on some random site. I think I paid about $40 bucks for them and they were shipped directly from China. They took forever to get here. They are not bad. I wouldn't say they are awesome, and I will probably replace them, but they are not bad.
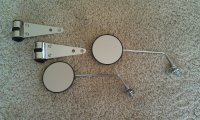
I also went with another set of headlight brackets. Again, these are ok but I will probably replace them. I got them on Amazon for like $13. I am an Amazon Prime addict.
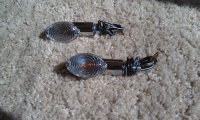
I bought the flashers from Dime City Cycles. They were cheap and they were cheap. I later put LED bulbs in and replaced the standard bulb. Even Still later, like last week or so, I replaced the flashes with an identical flasher from Amazon. The flashers on Amazon were 41 cents for 2; so I bought 8. The flashers on Amazon, although identical, seem better built. Still cheap, but sturdier and better wiring. They were also brighter. Sorry DCC.
The old handlebars I cut off with a hack saw and cleaned up with a rotary tool. I stuff my insurance and registration stuffed in the piece I kept between the fasteners. I am eventually going to mill down the head and repaint it. I thought it might leave it to structurally weak, but I have seen it done and it seems to be pretty solid still. I would love to find an aftermarket bolt on, but I am sure that is a dream.
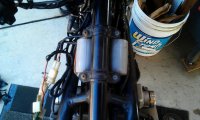
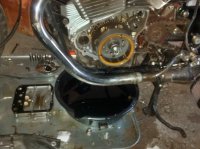
Chris had cut off the stock exhaust before he sold me the bike. He did give me this HD exhaust system. I had to order some adapter to fit the stock pipes. I also took some steel and a torch and made my own exhaust brackets/hangers. I am not even going to lie--it looks janky! I plan to replace these in the near future with the Mac 2-into-1. I have decided to go with the chrome exhaust and black pipe.
People really compliment me on the exhaust, but I can't stand it. It really drives me nuts. I also think it was added to all the tuning problems I had with the carburetors. I will be happy to see them go.
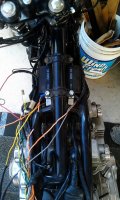
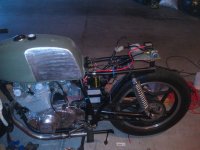
My nightmare begins--with wiring. Chris had already set the electronics to be moved directly under the seat cowl. I really liked this idea and already had the same plan. I began to unwrap all the wires, check all the connections and make repairs. I reran all the wires to where they needed to go.
I bought a battery and charger from Autozone. Not bad, battery is still going despite the charging problems I initially had. About a month after I got the bike going... it really wouldn't hold a charge for more than 3 days of riding. Not a huge problem, I just kept it on the charger when I wasn't riding it and I never worried about it. I later fixed the problem.
I also mounted the chain. To a tire so bald I was insane for riding the bike like that.
Comes with everything you need to make sure it doesn't overcharge or over-discharge already built into the batter. The specs are way higher than the OEM battery, it is warranted with a full replacement for 2 full years, not prorated. You can also use any charger on it.
The battery is tiny so I plan to stick that up under the seat as well.
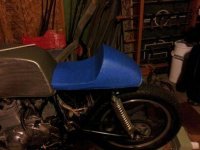
I built a fiberglass seat cowl. I was inspired by Herm's video tutorial from Dime City Cycles. In retrospect, I really wish I would have just bought one. It took for-freaking-ever. It was a ton of work, and I am still not satisfied with it.
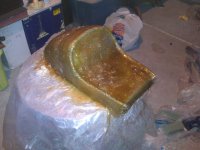
I cut the back end off of a GS450L tank and used that for the back of the cowl. I used fake plant foam and molded the rest of the seat with that; cutting off bits and using sand paper to get it right where I wanted it. I used spray adhesive to keep the foam blocks together and mashed them into the tank cut-off. Then used a hack saw to cut off the excess and sand paper to smooth the mold out. I used duct-tape over the mold to make a good surface. I waxed the duct-tape surface with turtlewax as a release agent. I used fiberglass sheets over that and painted them with resin. No joke.... That stuff hardens and dries fast yo!
I probably should mention, for whatever it means, that I did chop that back off the frame. i cut it off with a hacksaw and cleaned it up with a rotary tool. The bike looks a lot more compact and the riding position is awesome. My family, all of which ride motorcycles have all said how well the riding position feels. "You could probably take it across country if it wasn't for the wind in your chest." I plan to make a closed loop when I redo the seat.
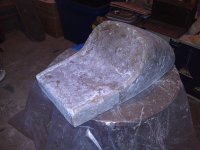
It was my first attempt. I used way too much resin. I went over it with way too many coats. I had to sand forever and fill over and over again. But I finally got what I wanted ...sort of.
I have recently decided I am going to build a new seat. I have an amazing idea that I have never seen before--anywhere! I will use the old seat as somewhat of a mold but the new seat will be entirely different. Be prepared! Again, that is in the future.
Pictures of the wiring all cleaned up and those mirrors installed. I have since changed the wiring like 4 times.
I ordered some bar-end mirrors last Friday. They should be here in the next couple of days. These mirrors, although kind of have that vintage appeal, look ridiculous. I will post pictures of the new mirrors after I install them.
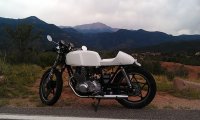
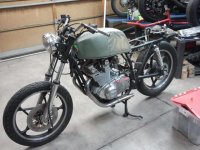
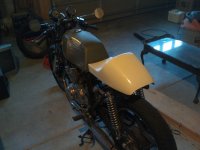
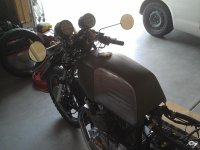
I decided to paint the bike white. I was going to later paint a red stripe. I figured, the bike is Japanese. Why not do it in the colors of the Japanese flag. I ended up using red reflective tape. Which looks awesome at night and definitely increases my visibility.
In this picture I was installing the rear flashers. I mounted them directly into the seat cowl. They look good. Like I said, I later replace them with some that looked exactly the same. You can also see that bald tire in this picture.
I have changed my mind about the color scheme. You will have to wait and see what I do with that seat before I reveal the new color scheme.
So after all of that, the GS450 could be driven... but it was driving a park bench. I need to finish the seat pad and get it on there. I finally gathered all the materials, but I am thinking of changing it.
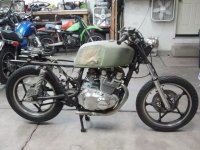
So here is what the bike looked like at this point. Still not as clean as I wanted it. I need to move that battery and clean up those lines. Next payday I should have the new, smaller battery to put under the seat.
I will have the new bar-end mirrors on tomorrow. I also plan on swapping out the speedo-drive and popping on some new brake pads tomorrow as well.
So after driving it around for a little bit, I noticed that it felt horribly sluggish. I also would get occasional backfire out of the left carb too. One day after driving around for a bit. I got off the bike and looked at that carb. I had already rejetted, cleaned them, bench synced, adjusted the mixture screw, and vacuum synced. They bike was not running right.
So anyway, I got off the bike and was poking around that carb. I touched the exhaust pipe for a moment with a leather glove on and noticed it was cold to the touch. After the amount of riding I did, it should have been hot.
I pulled the spark plug and turned the bike over a few times. I had spark and not bad spark at that. The coils weren't cracked and seems to be in good shape. swapped plug wired and got that cylinder to fire.
I decided to upgrade the S/G, R/R, and Ignitor. I researched and realized I was going to have to spend some bucks. I found a post from PeteGS and decided I was going to use the kit for the GS500 and adapt it.
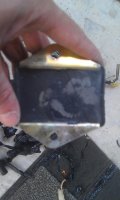
I bought the kit and broke down the parts. While doing so I found the R/R was cracked underneath. The signal generator also tested bad.
I replaced it all with the Dynatek kit. I had to get a non-magnetic spacer to go over the end of the magnetic rotor. I also had to pick up spark plug wires and cut them to fit. The kit comes with coils but no wires. I installed the new kit, which loses the Ignitor. That made me happy because it was one less thing under the seat, allowing me to finally plan on moving that battery under there.
I also put in some new spark plugs for good measure and the bike fired right up! It ran so well. I couldn't believe the low-end torque!
Later on I decided to tackle that charging issue. It hasn't been a big issue because a full charge would last me about 3 or 4 days. So I would just keep in on the charger when I wasn't riding it and I never had to worry about it.
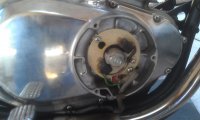
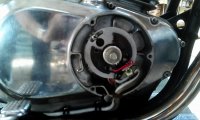
I had an oil leak that I wanted to get rid of. I decided to replace the stator and R/R at the same time. I was pretty sure my leak was coming from that side cover anyway. I was a tutorial from Darwin, on youtube, about replacing the shift seal without removing the clutch. Boy, was that an exercise in futility. That thing was not going to come out of there without removing the clutch and the shift seal. I battled that thing for 2 days before I yanked the clutch. I didn't need a new clutch but I replaced it and that side cover gasket while I was in there. I also replaced the sump cover seal. I said hey... as long as I am in there then I might as well.
I ordered a clutch disc set from BikeBandit.com and a set of EBC clutch springs. Picked up all the gaskets and seals from there and Partzilla.com as well. The stator and R/R were from ElectroSport. Hands down a better quality than the OEM Stator and R/R. Insulation is better. R/R is 3 phase, so the wiring diagram went out the window--amazingly easy to connect. Initially I had to have ElectroSport exchange the stator. They mistakenly sent me the ESG10--which doesn't have the rubber grommet on the wires. The oil would just spill out w/o it. They sent me the ESG14 and it worked perfectly.
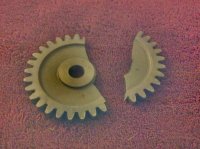
I should also mention the oil pump gear that sits behind the clutch housing broke on me. I have no idea how that happened. There wasn't any pressure on it or anything. I got a used one with the pump (which I didn't need, but am keeping as a backup) off of eBay for $20. Also another note, I don't have the tool for the clutch basket. So I left the chain on... put it in gear and used a u-shaped bike lock and went through the rear hub around the swing arm. Kept it in place and worked perfectly for loosening the retaining nut. The bike lock is rubberized so it didn't do any damage to the hub at all.
I also removed the old tail light. I mounted a new tail light on a vertical mount license plate I had. i wired all of it up with those LED license plate bolts I got off of Amazon. Just a reference--2 of those bolts are sufficient to light up that license plate. I used 4 and I think it blinds drivers behind me. I will include some night time pictures of the lights tomorrow. In the meanwhile--here are these:
This site uses cookies to help personalise content, tailor your experience and to keep you logged in if you register.
By continuing to use this site, you are consenting to our use of cookies.


")