1980 Suzuki GS450 ET Colorado Cafe Build

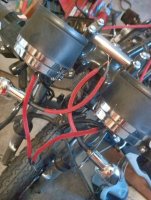
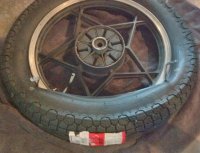
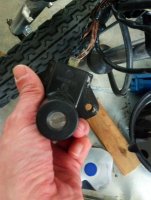
Here is a picture of that license place. Also, is another picture of the carbs after I rebuilt them last. I have found the o-ring kit, hex bolt kit, float needle/seat, main jet, pilot jet, air jet, floats, choke it, and everything else needed to properly rebuild these. It took forever to track everything down but I finally did it. I dipped them, soda blasted them, and reassembled them.

Here are some links for some of the kits used:

http://cycleorings.com/450.html

http://carb-motor-screw-kit.com/contents/en-us/d256.html

http://www.pjmotorsports.com/mikuni-jets.html#pilot/slow%20jets

http://www.siriusconinc.com/pro-detail.php?pid=&product_id=2679 (Choke gasket and needle/seat were used from this kit--still cheaper than buying the needle/seat separately)

I have some more links somewhere else. The only thing I haven't found was a new (adjustable) jet needle. I just dipped mine and reused them. I have a good resource for identifying a replacement but I haven't measured the OEM and dug up a replacement yet. Check this out if you are interested in doing the leg work:

http://jetsrus.com/a_jets_by_carburetor_type/needle_mikuni.htm

That bolt kit link is from Patrick in France. The kit is legit. Only 3 bolts wouldn't work for me. The three on the far right clutch adjustment cover were too small. I think his kit was meant for European models. I ended up going to Ace Hardware and grabbing those hex bolts that I needed (at $3 a piece). Definitely a lot cheaper to go with Patrick's kit than buying them separately. I can't say how much better the engine and carbs look with that bolt kit. Not to mention I don't strip screw heads anymore. You have to be really careful about torque specs when using these.
 

Attachments

  • hdr_00056_1.jpg
    hdr_00056_1.jpg
    1.8 MB · Views: 217
  • 425098_4573266179116_1767003745_n.jpg
    425098_4573266179116_1767003745_n.jpg
    49.6 KB · Views: 225
I replaced the back tire a couple of weeks ago. I went with an IRC all-weather tire from Amazon. Dirt Cheap. I could not be happier! The thing tracks so well. It absolutely hugs the road. I put on over a 1000 miles since I mounted and installed it. The only wear I notice is the nubs wearing off. I would definitely recommend this tire. I had an all-weather on the front already that was practically new. So this complimented that one very well. I also went with a 4.00 tire for the rear and a 3.50 for the front. I know this is .50 bigger on both tires, but it rides really really well. I am considering going even wider on the back tire next time.

Here is link to that tire:

http://www.amazon.com/gp/product/B005UGETZQ/ref=oh_details_o01_s00_i00?ie=UTF8&psc=1
 

Attachments

  • 625446_4625894534792_688564526_n.jpg
    625446_4625894534792_688564526_n.jpg
    162.6 KB · Views: 1,133
  • 525283_4625759131407_522754509_n.jpg
    525283_4625759131407_522754509_n.jpg
    172.1 KB · Views: 239
Replaced the front pads with new pads (semi-metallic/kevlar). I also removed the old mirrors and mounted the new bar-end mirrors today. I am much happier with these. My step-father said that he preferred the other mirrors. I think we have to agree to disagree.

Didn't get a chance to test out the new brake pads yet. It was raining pretty steady all day today. I should have the new brake shoes for the rear tomorrow. I will probably mount those as well. I think I am just about at my wear limit with that set anyway. Hopefully tomorrow I will get a test ride in.

Here is a picture of the new mirrors. You can also switch these up and come directly off the end with the mirror stem. I liked it better coming off the bottom.
 

Attachments

  • hdr_00071_1.jpg
    hdr_00071_1.jpg
    1.7 MB · Views: 251
Ignition fried all the way up to the switch. Think I had something rubbing between the tank and frame that caused it to ground out. I pulled off the switch and saw nothing but copper exposed. I will have to pull everything apart and see how much rewiring I am going to have to do. Hopefully it didn't go all the way to the R/R. "Wrench, ride, and repeat." lol
 
Here is a shot of the damage. The insulation on the wires is completely gone; there is nothing but copper remaining. I probably won't get to it until Monday. I will strip it down and see how far the damage goes. Pretty bummed out about this. I am just about wrapped up with the seat pad. It looks great. I was hoping to be done with this bike and riding this week. I guess it goes with the territory. =(
 

Attachments

  • hdr_00073_0-1.jpg
    hdr_00073_0-1.jpg
    132.1 KB · Views: 233
Thanks Matt! I placed an order for the wire. I had some I could use, but figured I would do it right and get the colors I needed.

I stripped the seat and tank off. The damage appears to only run up to the steering head. I don't think I will have to replace too much. I actually breathed a sigh of relief that it didn't go all the way to the R/R.

It will take a bit for everything to get here. I'll keep you updated.

On a brighter note.... the seat pad is almost done. I should have that done and on about the same time. :)
 
I have been really busy at work, that and it took a while to get the connectors I ordered in.

I finally stripped all the bad wiring off and found that the damage actually went straight to the new horn. It would appear the horn had a short somewhere in it. In any case, I have removed it and all of the bad wiring. It was pretty much the entire wiring harness.

I have simplified the wiring harness considerably. I decided to finally move the battery underneath the seat cowl. I also bought a new kill switch and the starter button to mount underneath the seat. The plan being to eventually replace the twist throttle and lose the right set of controls, plus make it more difficult to start the bike if you weren't familiar with it. I am shortening most of the lines in the harness. The amount of grounds will be reduced and shortened as well. I started with the front of the bike and am moving my way back.

Here are some pictures of the ignition switch rewired and the red braided tubing I am using to dress up the wiring harness.
 

Attachments

  • 995311_4892371596552_2071295945_n.jpg
    995311_4892371596552_2071295945_n.jpg
    59.2 KB · Views: 948
  • 935915_4892371556551_2120903424_n.jpg
    935915_4892371556551_2120903424_n.jpg
    109.6 KB · Views: 901
  • hdr_00089_1.jpg
    hdr_00089_1.jpg
    1.4 MB · Views: 256
Back
Top Bottom