
We noticed you are blocking ads. DO THE TON only works with community supporters. Most are active members of the site with small businesses. Please consider disabling your ad blocking tool and checking out the businesses that help keep our site up and free.
You are using an out of date browser. It may not display this or other websites correctly.
You should upgrade or use an alternative browser.
You should upgrade or use an alternative browser.
1981 KZ750e
- Thread starter nivagc
- Start date
MotorbikeBruno
Over 1,000 Posts
You doing this in Aluminum? I'm liking the look so far, I haven't really seen too many bikes that have a rear end that even resembles yours. What/where are you thinking of putting a tail light? Or lights in general in the back?
Edit: I think I noticed some surface rust on the pan so I'm assuming its just really clean sheet metal on that tail! haha
Edit: I think I noticed some surface rust on the pan so I'm assuming its just really clean sheet metal on that tail! haha
Hay Bruno
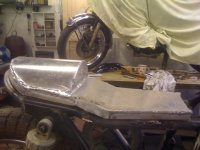
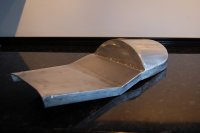
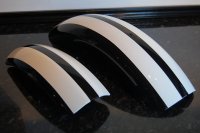
Yes the seat is Aluminum, I just treated myself to a new ACDC tig welder!
I've flashed over it tonight with a flapper pad. (pic below)
Just got back from my mum's.....with her sewing machine, this should be fun!
I've got some black vinyl and I'm going to make a start with the cover, I'll let you know if I stitch my shirt sleeve to it!
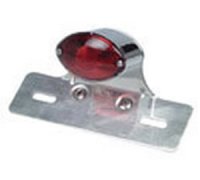
Second pic is the rear light I've just got of Fleebay, hoping it should be here before the weekend, going to mount it on the mudguard.
Yes the seat is Aluminum, I just treated myself to a new ACDC tig welder!
I've flashed over it tonight with a flapper pad. (pic below)
Just got back from my mum's.....with her sewing machine, this should be fun!
I've got some black vinyl and I'm going to make a start with the cover, I'll let you know if I stitch my shirt sleeve to it!
Second pic is the rear light I've just got of Fleebay, hoping it should be here before the weekend, going to mount it on the mudguard.
Attachments
MotorbikeBruno
Over 1,000 Posts
Not too shabby! I just bought all the stuff I need to allow my MIG welder to weld aluminum. Waiting on one more piece before I can give it a try!
You going to use some of that black high-density foam stuff you gave me for the seat? Or have something else in mind? Light should look good too. Thought of any colors for paint?
You going to use some of that black high-density foam stuff you gave me for the seat? Or have something else in mind? Light should look good too. Thought of any colors for paint?
Hay Guys and Girls
Here is my update of the build so far.
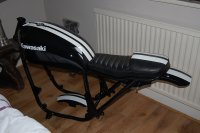
Frame and swinging arm powder coated, and as you can see the last coat of lacquer went on the tank and mudguards tonight.
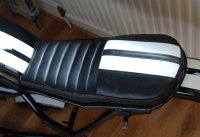
Bruno yes the foam is on the seat and a good frend of mine is covering it for me, it should be done before the end of next week. As for the paint work see below!!!
Wheels next, I've treated myself to some stainless steel spokes. Pics and rebuild to follow.
Here is my update of the build so far.
Frame and swinging arm powder coated, and as you can see the last coat of lacquer went on the tank and mudguards tonight.
Bruno yes the foam is on the seat and a good frend of mine is covering it for me, it should be done before the end of next week. As for the paint work see below!!!
Wheels next, I've treated myself to some stainless steel spokes. Pics and rebuild to follow.
Attachments

Hi Nivagc,
Nice build you have going on here.
As for posting pics if you set up a photobucket account (free) you then upload your photos to that site and then copy the image address to your posts. Allows you to put as many as you want that way.
Look forward to more updates.
Nice build you have going on here.
As for posting pics if you set up a photobucket account (free) you then upload your photos to that site and then copy the image address to your posts. Allows you to put as many as you want that way.
Look forward to more updates.
MotorbikeBruno
Over 1,000 Posts
Wow. Paint looks great man!
valvesprung
Over 1,000 Posts
Damn, that looks great! Really nice work on the pan build and paint, the upholstery jsut really sets it off. Can't wait to see her as a roller!
MotorbikeBruno
Over 1,000 Posts
It's Rubbish! I mean that looks great Gav! haha. I like the idea of the leather coats....seat pan/upholstery and everything came out really well!
Got on not to well this weekend! don't work just get in the way.
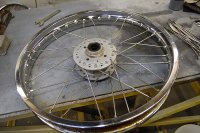
Still made a start on the wheels, I got the back one done then thourght I better get some running shots of the front one being attacked!
Pic 1
MMMMMmmmm angle grinder work.
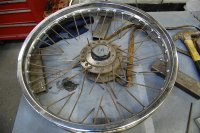
Pic 2
A sorry looking hub.
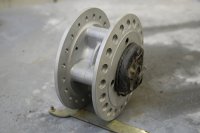
Pic 3
Hub shot blasted
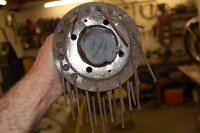
Pic 4
Inner spokes
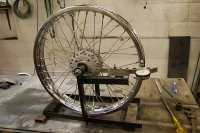
Pic 5
My specially made metal thing with a dial gauage (which i found at a car boot sale for £3.00, Bargin!!)
Still made a start on the wheels, I got the back one done then thourght I better get some running shots of the front one being attacked!
Pic 1
MMMMMmmmm angle grinder work.
Pic 2
A sorry looking hub.
Pic 3
Hub shot blasted
Pic 4
Inner spokes
Pic 5
My specially made metal thing with a dial gauage (which i found at a car boot sale for £3.00, Bargin!!)
Attachments
MotorbikeBruno
Over 1,000 Posts
Nice setup on that wheel thing. Wish I would have had that. Guess I'm off to make one of my own. Wheel's looking good!
CB350f Cafe
Been Around the Block
Usually people start a project with one bike, but with 8?? Hell keep it up.
Hay Ton'ers!
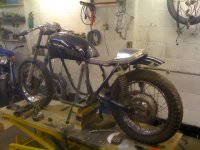
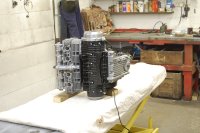
Most of the components together.......now the build up!!
Pic 1. Engine on it's side ready for the frame to be placed over, a lot easier than putting the engine in the frame.
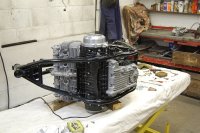
Pic 2. Frame and engine in perfect harmony.
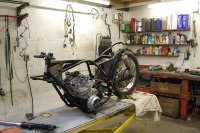
Pic 3. Swinging arm in with rear wheel.
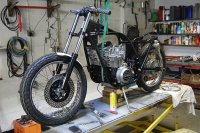
Pic 4. Front end in.
So happy to see it sat on it boots after so long of being in bits all over the garage.
As you can see, new boots, Dunlop roadmaster TT's 3.60x19 on the front and 4.10x18 on the back
Rear shocks as you can see are close to being in the scrap bin, so keeping my eye out for a set on fleebay.
Next.... wiring, tank, seat and lights
Laters dudes and dudeets!
Most of the components together.......now the build up!!
Pic 1. Engine on it's side ready for the frame to be placed over, a lot easier than putting the engine in the frame.
Pic 2. Frame and engine in perfect harmony.
Pic 3. Swinging arm in with rear wheel.
Pic 4. Front end in.
So happy to see it sat on it boots after so long of being in bits all over the garage.
As you can see, new boots, Dunlop roadmaster TT's 3.60x19 on the front and 4.10x18 on the back
Rear shocks as you can see are close to being in the scrap bin, so keeping my eye out for a set on fleebay.
Next.... wiring, tank, seat and lights
Laters dudes and dudeets!
Attachments
valvesprung
Over 1,000 Posts
Oh man...so close it's killing me! I just got a set of Monza shocks from MikesXS for my KZ400 and couldn't be happier. For $83 the're well worth it. I say grab a set of those and roll with it!
")


