1981 Virago XV-920: First Time Build

bryanjoh

New Member
Hello all,

I've been creeping silently on the forums here for about a year now and figured it was finally time to start posting. I wanted somewhere to detail the progress of my first ever bike build.

Some background, I'm new to working on bikes, but been on top of them ever since I was tall enough to get a leg over a Honda Z-50. I've owned several Harley's and old Japanese bikes before in various states of modification, none of which was ever done by myself though. So, what better way to learn than by buying a cheap bike and learning everything the hard way.

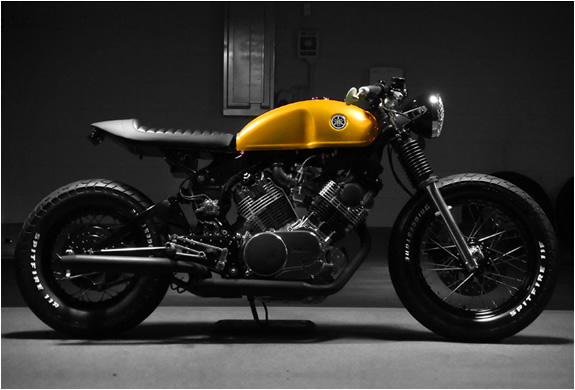
The build: the idea for the project is the Hageman/Doc's Chops Virago. Is this build played out, yes. Am I concerned, not at all. It's a first time build and the resources for this similar project are plentiful. The idea is the classic DCC cafe seat, stock tank and wheels (keep it cheap), stock front end, clip-ons, rearsets, gut the unneccessarys, clean it all up, frame/engine/tank paint, put it all back together.

img_docs_chops_yamaha_virago.jpg


The Bike:
A stock, 1981 Yamaha Virago XV-920 shaft drive. Picked up off Kijiji with a clean title for $1000.

Photo%202014-07-26%203%2002%2004%20PM%202_zpsbbemxbh4.jpg


Photo%202014-07-26%203%2002%2049%20PM_zpspqp8qcx4.jpg


I've been making slow progress on this now for about 6 months in my free time in the evenings. I've got a fair bit of progress to upload, so I will start posting it all up over the next couple days/weeks.

Cheers,
Bryan
 
Initially, the bike seems to be in alright shape, I rode it for about 20 minutes before taking it out of commission. My first impression was something along the lines of "oh my god what is wrong with this starter? It sounds like a paint can full of old bolts in a paintshaker!"

Some googling would quickly inform me that this is the norm for every Virago ever... Really, Yamaha? More on this later....

Could use a carb tune-up, but it runs alright, gears shift just fine, fires up within a second or two.

Onto Step 1: The Teardown, pretty sure I know how to do this step, lefty-loosey right?

Photo%202014-08-08%2010%2016%2029%20PM_zpslcyg2nuf.jpg


Bike is seeming to be in fairly good shape underneath, minimal missing bolts, but clearly somebody has been at this wiring harness before me.

Photo%202014-08-08%2010%2016%2022%20PM_zpscwianvfv.jpg
 
The teardown continues....

So as I was doing this, I was placing all loose nuts and bolts into baggies with a list in each baggy of what belongs where, I'm pretty confident in my taking things apart ability, it's the reassembly that I am slightly more worried about.

I took pictures all along the way, but now that I am currently beginning reassembly, I'm realizing these pictures should have been a lot more specific when I was taking them.

Photo%202014-08-08%2010%2035%2006%20PM_zpsomvcbygv.jpg


Photo%202014-08-09%205%2018%2007%20PM_zpso8krukuu.jpg


Photo%202014-08-09%206%2025%2010%20PM_zpszqvxgbhh.jpg


Photo%202014-08-10%207%2011%2028%20PM_zpsi0pjz5wo.jpg


Photo%202014-08-11%206%2053%2038%20PM_zpsvwjccqai.jpg


Pretty well all pulled apart, so.... now what?
 
So I decide I should pull the case open to figure out just what is wrong with this starter that sounds like absolute death.

How the Virago starter system works is simple. But in this case, simple is not a good thing. (See 3rd photo below) The starter motor spins the gear on the left, which drives the idler gear #1 (back right) which in turn drives a helical bendix gear. When this gear spins the centrifugal force on the idler gear #2 (smaller one on right) overcomes the spring pressure and gets sent flying outwards towards the large crank gear.

Now the problem here is that there is nothing in place to ensure that the starter idler gear #2 teeth will mesh with the crank gear when it goes flying outwards. So instead, the starter gear just spins and grinds against the crank gear until it gets lucky and falls into the teeth of the crank gear.

The system is terrible and Yamaha's engineers clearly knew about this because they installed a magnet right beneath the gear interface to catch the shards as the gear ground itself to pieces.

Photo%202014-09-28%201%2051%2028%20PM_zps2ufhllu7.jpg


Photo%202014-09-28%201%2051%2035%20PM_zps919kexqw.jpg


Photo%202014-09-28%203%2056%2031%20PM_zpsldam0hsg.jpg


Now, there are some people that have claimed to have a fix for the Virago starter issues, installing shims and whatnot. These parts are hard to track down, so the solution (not really a solution at all) that I went with, was to order a new starter gear from Partzilla to replace the current starter gear with very worn out teeth.
 
Fast forward a month or so because it was Christmas time and buying bike parts was not high on my priority list.

New starter idler gear has arrived! Time to put this back together. This was a major pain to do, this gear arrangement sits on a little shaft that gets supported at the engine side, and at the crank side. Meaning I need to install the gear arrangement in this very small tight spot without bumping it at all with my fingers, then put liquid gasket around the case seal (wouldn't recommend), and then install the case cover again all without bumping the extremely delicate gear shaft out of place at all. I did a couple practice fits with this first before applying the liquid gasket and going for the final install.

Photos below, new starter gear vs old. Check out the difference in wear. Assuming the one on the right was the stock part, I should be good for another 30 years before we get back to this problem.

Photo%202015-01-26%206%2003%2034%20PM_zpsrkjfb065.jpg


Photo%202015-01-26%206%2003%2048%20PM_zpspsrbysx7.jpg


Sneak peak.... I actually painted the engine whilst waiting for the starter gear to show up

Photo%202015-01-26%207%2001%2015%20PM_zps4otuum2l.jpg


The new starter gear in it's new home.

Photo%202015-01-26%209%2029%2020%20PM_zpshucvj19m.jpg


The clearance is pretty tight, I'm hoping this will mean the gear spends a whole lot less time spinning now before meshing with the crank gear.

Photo%202015-01-26%209%2029%2008%20PM_zps72cfooev.jpg
 
Nice! Subscribed. Got myselt a twin shock virago and thinking of converting it to a monoshock. Good luck with the build
 
After a lot of time spent with a bottle of degreaser and an old toothbrush it was time for paint. Now, if there is one thing I have learned from watching 7 seasons of Dexter, it is how to turn my garage into a pretty nice paint booth.

The engine got a prime and paint coat of VHT's Flameproof high temp paint and the frame I went with Duplicolor Hi-Build. All of these were picked up at Canadian Tire for about $12 a can. The Hi-Build I would very much recommend, it came out as a very high gloss finish (no clear coat) and is rock hard, it seems very difficult to slip with a wrench and put a scratch in this frame. The VHT on the other hand seems very delicate, in that if I bump it now with a wrench or anything, it leaves a little mark through the paint and down to the primer where I bumped it. This may be because this paint has instructions on the can to cure it by running the engine and heating it up.... Having a bike that is not running makes that difficult.

The plastic sheeting was picked up also at Canadian Tire for something like $4 for twice as much as was used here, affordable.

Photo%202015-01-24%2010%2002%2000%20PM%201_zpsqk3jtlaw.jpg


Photo%202015-01-14%208%2044%2019%20PM_zpsziz0fcof.jpg


Photo%202015-01-19%209%2042%2030%20PM_zpst9o4k5e4.jpg


Photo%202015-01-21%207%2041%2032%20PM_zpswxi8roos.jpg


Photo%202015-01-24%2011%2014%2018%20AM%201_zpsyqc8kphs.jpg


Photo%202015-01-24%2011%2014%2024%20AM%201_zpswyvkvbag.jpg


Photo%202015-01-24%2011%2031%2021%20AM_zpsr9qrdyfx.jpg


Photo%202015-01-24%204%2014%2040%20PM_zpsyf2vy62s.jpg


Photo%202015-01-24%207%2039%2025%20PM_zps9o8ye3jq.jpg


Photo%202015-01-24%209%2050%2057%20PM%201_zps1wrdb1rk.jpg


Photo%202015-01-24%209%2053%2034%20PM%201_zpsrxzvezax.jpg


Photo%202015-01-24%209%2054%2046%20PM_zps0agwwnic.jpg
 
Next step was to polish up the unpainted covers on the engine.

Now, I'm aware that this could be done a LOT better than i did it here. But I do not own a polishing wheel, or any motor powered polishing tools, nor did I use any buffing compound. What I did have however was varying grits of sandpaper and a whole lotta elbow grease. Basically I just wet sanded the covers with 400>600>800>1000>2000 grit sandpaper. They are by no means a mirror polish, but they look a whole lot better than they did before. Here's a comparison of before (right) and after (left).

Photo%202015-01-25%202%2036%2053%20PM%201_zpsfmec0gxq.jpg


Photo%202015-01-26%209%2012%2002%20PM_zpsdla300un.jpg


Photo%202015-01-26%209%2054%2048%20PM_zpso3oeljki.jpg


Photo%202015-02-08%207%2050%2019%20PM_zpsezqg1rp7.jpg


After a couple evenings of polishing, it was time to start some reassembly. At this point I haven't done anything performance-wise with the carbs, but I am putting them back in for now until it gets up and running again and then I may pull them out again at a later date to fiddle with them a bit.

Re-install of Carbs and front cylinder frame mounting bracket.

Photo%202015-02-15%201%2038%2022%20PM_zps1axff5dg.jpg


My god, this frame is hard to get back on. The frame bolts onto the motor with two horizontal bolts at the front cylinder, two vertical bolts at the rear, and has another four holes that need to line up at the back for later (but don't require bolts right now thankfully). The trick here seemed to be to install one of the front bolts and then use the center stand as a pulling point for leverage to get the rear holes to line up.

Many an expletive-combination was yelled during this process. Sorry, neighbors.

Photo%202015-02-15%202%2016%2037%20PM_zpsznflrvg1.jpg


Rear Shock back in it's home.

Photo%202015-02-21%203%2040%2028%20PM_zps8mvqyx0f.jpg


But hey, look what came in the mail during all this yelling!

Photo%202015-02-20%204%2019%2046%20PM_zpstmnxx0wu.jpg


Photo%202015-02-20%204%2030%2038%20PM%201_zpsodw7cjre.jpg
 
Now the fun part starts, putting on the new parts!

My order from Dime City consisted of clip-on bars, grips, gaiters, signal lights, seat, rearsets (no linkage), bar end mirrors, and sidemount plate bracket/tailight combo. The grand total was something like $600 USD, but with the exchange rate being low right now in Canada, I got dinged pretty hard here.

Time to get some wheels back on this thing. I've seen a lot of people paint these wheels, and honestly, I didn't want to do anything with them. I thought that painting them black along with the mostly-black engine and black frame would take away from the contrast, so they remain totally as they were.

Now for the fun set of pictures, the first mock up.....


Photo%202015-02-21%203%2040%2048%20PM_zps8dlqkhwg.jpg


Photo%202015-02-23%209%2035%2023%20PM_zpsimpwiky1.jpg


Photo%202015-02-23%209%2035%2056%20PM_zpstycztvcv.jpg


Photo%202015-02-23%209%2036%2037%20PM_zpsq5i3xie3.jpg


Seems to be sitting real low, I like this....


Photo%202015-02-23%209%2046%2005%20PM_zps4mfvjlxa.jpg


Photo%202015-02-23%209%2047%2014%20PM_zpsemfodsmo.jpg


Photo%202015-02-23%209%2036%2044%20PM_zpsdygp8do9.jpg


Photo%202015-02-23%209%2045%2024%20PM_zpsx0j3yovc.jpg


Photo%202015-02-23%2010%2003%2058%20PM_zpslfallcwd.jpg


Progress Comparison! (Before image was flipped, hence the backwardness)

Photo%202015-02-23%2010%2027%2033%20PM%201_zpslnhlcqfp.jpg
 
I'm a fan!how did you change the tank seat line so strongly?seat and tank have a nice straight line in comparison to the stock look.
 
Thanks Ryan.

In the mock up picks above here, the seat is actually not mounted just yet.

So if you look in the first couple tear down pictures, you'll see that the Viragos have a main spine frame, and then a small bolt on subframe that holds the seat/fender/electricals. This subframe sits real low and cruiser-y, so you unbolt that and toss it in the junk pile. For these builds you need to fabricate or track down a new flat cafe style subframe.

Me being a guy with no welding rig, or really any skills to operate one, had the choice of either trying to find somebody in town here to fab up a subframe for me, or biting the bullet and buying one of these frames from Hageman MC/Docs Chops that occasionally show up on Ebay for about $600 USD (more than I would've liked to spend, especially after exchange rate).

I ended up going down the easy and expensive route and buying the pre-fabbed bolt on frame/tank lift off ebay. I'll upload some more on this later today hopefully.

_57_zpsaabrhosa.jpg
 
So the previous owner of the bike had attempted to paint the tank/sidecovers. From what I can tell he didn't even take the parts off the bike to do this, and I imagine about the same amount of effort was spent prepping for the spray.

The silver paint that was on it was so un-adhered that you could swipe a finger across the tank and your finger would come out silver and shining. So this paint needs to go.

Before Pic:

Photo%202015-03-02%206%2057%2028%20PM_zpssfwdlvih.jpg


Enter paint stripper. I used a product called "Super Remover" from Canadian Tire, was a brush on paint/glue stripper. It worked alright, but required several coats, scrapes, coats, scrapes and cleans to get it all down to the bare metal.

Photo%202015-03-02%207%2006%2053%20PM_zpsjq457vm1.jpg


Photo%202015-03-02%207%2049%2047%20PM_zpssb9lbvtw.jpg


Photo%202015-03-02%208%2056%2054%20PM_zpsauzq82df.jpg


Then started sanding off the paint remnants. Discovered during this that the bike has been painted what looked to be three times before. And judging by the scratches and bondo work that I discovered, that is because this bike has been sliding on its side more than once before in it's life. The tank had some notable gouges and dents, and somebody has removed the old badges and bondo-glassed over the mounts. I ended up screwing up the bondo in my sanding process, so now its back to the store and time for me to learn how to use bondo.

Photo%202015-03-04%209%2025%2011%20PM_zpsgvgnskp9.jpg


Photo%202015-03-05%207%2058%2027%20PM_zps1hxptune.jpg


Photo%202015-03-05%207%2058%2044%20PM_zpskpztcdog.jpg


The bondo came out pretty smooth once I sanded it all down. There are a couple small pits that aren't visible in the pictures, but I am hoping that these should fill in with primer and paint.
 
go back to crappy tire and pick up a tube of glazing putty for the small pits etc. They will actually amplify with primer, you may get lucky with filler primer if they are really tiny but the glazing putty is cheap and will fill the pinholes etc. Nice job so far.
 
Now to address the subframe problem which was my main concern coming into this build.

As I had mentioned earlier, I am really no metalworker, I have very very limited welding skill and I currently don't have any metalworking tools at my disposal. So I have two options for the subframe, find a fabricator in town here, or buck up and buy the Hageman/Docs Chops subframe from Ebay.

The Hageman frame is pretty pricy for what is essentially a steel triangle, $650 USD and a bad Can-US exchange rate means one of his frames would cost me close to $900 CAD shipped.

So I got looking for a fabricator to do this frame for me in Calgary here and was planning to hand them photos from one of HollywoodMX's build threads for reference. He's done a handful of similar Virago's. Then I get looking at his profile and whatdya'know he's in Calgary too. Maybe he can build me a frame!

At this point I also emailed Doc's Chops asking how many frames he had available. The answer, one, and there won't be any more for months.

Now also, I am currently driving a car with no means to transport a bike to and from a fabricator to get this frame built, making the cheaper fabricator option a lot more difficult for me. So, I decide to bite the bullet and order the pricy Doc's frame and save myself the headaches. Thankfully I should still end up within my budget despite this.

A week later and the frame shows up! All hardware included, bolt it on, done! So easy!

Photo%202015-03-05%208%2003%2002%20PM_zpsddtwbgvi.jpg


Photo%202015-03-05%208%2003%2012%20PM_zpsdc6ane0o.jpg


Photo%202015-03-05%208%2028%2021%20PM_zpsxlovgdht.jpg


Photo%202015-03-05%208%2029%2030%20PM_zps51jjvjf3.jpg


Photo%202015-03-05%208%2033%2024%20PM_zps9ndqezn5.jpg


Photo%202015-03-05%208%2035%2024%20PM_zpsobkgpolm.jpg


Photo%202015-03-05%208%2038%2048%20PM_zps693k2js1.jpg


Photo%202015-03-05%208%2039%2018%20PM%201_zpsn59db9nr.jpg


Photo%202015-03-05%208%2049%2047%20PM_zpsuhmnsafo.jpg
 
I hear you on the exchange. I am 15 min from Maine and is used to be a no-brainer everything was cheaper over there, but when you need to add around 30% it starts getting pricey, still deals but not like 6-8 months ago. That frame does look good on the bike though.
 
Oh absolutely, price aside and just looking at the frame itself, I'm very happy with how it looks and the quality of the build. It feels rock solid and the hassle-free approach of being able to bolt it on and fit my seat to it in 10 minutes was a huge relief.
 
yep, sometimes you got to pay to play, LOL. Still hurts but I would have to do the same at the moment as I cannot weld and have no welding gear. I hate having to pay someone else to do something instead of learning it myself but takes years of practice to get good enough to weld something structural like that and not have it snap off, so worth the $$ I think.
 
Last week, my evenings were all spent cleaning up parts for the next round of paint. Hopefully all within the next week here I should be able to paint a handful of miscellaneous parts again with the Duplicolor Hi-Build black, the pipes with Duplicolor Engine Enamel (because I'm not super happy with how the VHT turned out last time on the engine), and the tank with Duplicolor Metal Specks Retro Red.

The exhaust pipes were pretty beat up when I got them pulled off -super corroded, and again, they've clearly spent some time sliding across pavement. But they cleaned up better than I had expected. Here's the before and after from just going at them with degreaser, scuffing pad, and sandpaper.

Photo%202015-03-05%209%2043%2032%20PM_zpshfroxeaf.jpg


Photo%202015-03-05%209%2043%2050%20PM_zpskbgxhcmy.jpg


Then I got setting up my makeshift $5 paint booth again...


Photo%202015-03-09%207%2059%2017%20PM_zpskvz4hvti.jpg


And then went in with a round of parts for gloss black. Gas cap, tank connecting plate, rear foot braces, kickstand, subframe, tank lift.

Photo%202015-03-09%208%2045%2020%20PM_zpsmozeko6g.jpg


Photo%202015-03-09%208%2045%2042%20PM_zps7axnmrjn.jpg


Photo%202015-03-10%209%2059%2043%20PM_zpsahaipqyw.jpg


I've decided on Duplicolor Metal Specks Retro Red for tank paint. Here's what it SHOULD come out looking like.

Note: Not my tank


RedTank1_zpskuf1ge4o.jpg


Now this thread is up to date and can only be updated in real time. So updates will be slower from here forward. But hopefully in the next few days I should have some more paint pictures to add.
 
Nice. I have used the metal specks both retro red and burnt copper. Love it. Works well on small stuff like tanks etc without issues but it takes prep and technique to get larger stuff to look good. I did half my civic with it before the floors let go and I gave up on it. I had to re-do a few of the larger panels as I could see variances (Hood). Never had a problem on smaller stuff like fenders though. I will be doing the same thing this weekend. only my booth has some PVC pipe so I can seal it completely from the garage as it is in the basement and the smells get in the house. I found the duplicolor high heat better than the VHT as well. I used both and the duplicolor laid better and seems to be lasting better than the VHT I did.
 
Back
Top Bottom