1981 Yamaha XS 650 Special

cretin75xs said:
But can someone give me a heads up on why the front area has a hole repaired? Was their something there originally?
100_0091.jpg


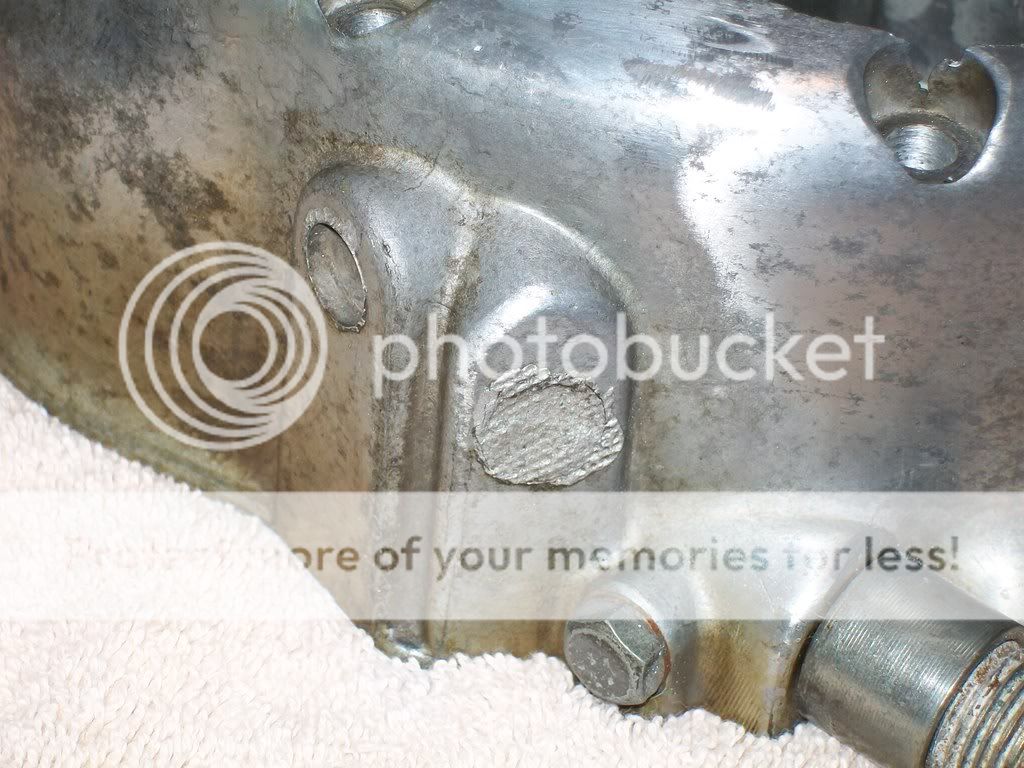
If You look on the inside of the casing, you will notice that there are internal channels where the oil pump pushes engine oil through to the filter housing on the side case. These internal channels are drilled out in straight directions and then the drill holes are plugged which allows the channel to make a 90 degree turn inside the casing.. If you wish to mount an external oil cooler, these are the holes to unplug and tap the lines into.

Cheers, avhelipilot
 
cretin75xs said:
Can not find anything in my service manual.

This comes from a thread on " xs650 garage usa " check it out.


[/quoRemove the case from the engine for the following!

Technically, you don't have to "drill" the case. The holes are already there leading to the oil pump outlet. Just use a drill bit the same size as the existing hole and drill out the "plug". Using the existing hole size as a reference, buy a matching tap that also matches whatever elbow is available. Use brass elbows because they are softer than the aluminum alloy case and cover, so any thread wear will be on the replaceable fittings.
It's been 8 years since I did this mod, but I seem to recall that you only have to drill out one of the holes. So, pick the one you want to use for the fitting and take a look before drilling the other.


Here's a little schematic of the oil flow.....


te]

Check this one out too, since the schematic did not come through
http://www.xs650.org.au/tech3.html
 
All the hard work on polishing the right side engine cover has paid off. Man it looks great. Thanks to JRK for the tip. I will be removing the left side cover on Monday for polishing and stripping the fuel tank. It is work but having fun doing it. Can't wait to get the clubman bars. Does anyone know if I will have to get new cables? If so, where can I order the sizes I need.
BEFORE:
100_0090.jpg

AFTER:
100_0094.jpg

100_0092.jpg
 
;)Before you start polishing that other cover hit it with the aircraft stripper you already have to get the old clear coat off. It'll make your life much easier. Let it sit for about 20 minutes,and lightly brush it off with a old toothbrush. Also, if you cut a old 2 litre bottle up,you can get all kinds of curved scrapers in various widths to really get into the corners. Later-John
 
nice and clean. I also vote to keep the tank as is-different than the usual flat black/silver/bare metal fo sho.
 
Here is an update to my build, I installed a new ignition. I had lost the original ignition's key last week. My bad.... I removed and polished the left side engine cover, not bad if I say so myself for a rookie. I installed a new fuse box, the one that came with the motorcycle was some homemade job. I removed the carbs which I will be checking and cleaning. The fuel tank was stripped and is awaiting a fine cleaning before paint. Any thoughts of a color? I continue to clean the motor and other components as I removed parts. I am thinking of removing the front forks so I can paint the lowers and wheel black. I'm trying to stay within my $1000 build budget so I will see if the finances hold out. More to come, enjoy.

100_0095.jpg

100_0101.jpg


lftsidecover.jpg
newsidecover.jpg


oldfusebox.jpg

newfusebox.jpg

carbsremoved.jpg
 
NOOOOOOOO! man i would have sent you a tank for that one man... DANG! i love those old 80's paint jobs and they are so so SO rare!
when you do your lowers use black appliance epoxy, sand them down to 400 grit, same with the wheels... on the wheels it may be easier to use a etching or even a wire wheel... best paint to use for that sort of thing
 
side cases came out great! man now that you have the polishing down...why not do the same on the tank?! would be sick! then just use a good clear over it and you are done... what look are you going for? you going to cafe it out, or daily rider?
 
I got my clubman bars and assorted part to complete the build. But Mike's XS forgot to send me the gasket kit. Now I'm at a stand still. Painted the frt lowers and will do the fender and tank in flat black for now. Cut off the reflector mounts on the frame. Will have some pics of my progress. Thanks for looking...
 
Cret.... what kind of paint did you use on the lowers, what was your process? i only ask cause if you used regular rattle can you will be better off redoing them before re assembling... just want to make sure so you dont have to put it all togheter and then take it all back down later... do not want to sound like i am insulting yo man, just know it is your first build, i hope you dont take this ? the wrong way...
 
Here are some updates on my build, I put the front wheel and caliper back on with a fork brace. The fork brace came from a used Sportster fender, I cut the rivets off and took the fender mount pc. Had to open the holes to accomodate the forks. It took me about an hour to get the front brake bled. Tried to suck it out with a vaccum style tool but could not. Did it by hand and is working now. I installed the Clubman bars and what a difference. Re-routed all the cables, brake line, and other electrical lines. I bead blasted the top cylinder covers, what do you think? I'm thinking of keeping that way but will I have to clear coat to protect? Installed the right side cover with the bolt heads painted black. Will install an oil cooler-oil filter cover sold by MikesXS. I have the fuel tank primed and have not decided on a paint scheme. I would have just polished it but after stripping it, it must have been damaged because there was body putty on the left side. Here are some pics of my progress and I am not doing it as a showcase bike but as a daily rider. (When I don't feel like riding my Harley...). So any suggestions are welcome. Thanks for looking....
100_0103-1.jpg

100_0147.jpg

100_0146.jpg

100_0149.jpg

100_0152.jpg

100_0145.jpg
 
cretin75xs said:
So any suggestions are welcome. Thanks for looking....

Builds looking good. What you've done so far mirrors what I've been doing with my buddy on his '81 XS, right down to the brake lever scratching up the right case cover :D

I'd ditch the YAMAHA cover over the lower triple tree. Measure the length of brake line you'd need for a stainless line going straight from the master cylinder to the caliper and ditch that brake line junction on the lower triple. Better brake feel (do you really want to be driving around with 27 year old spongy rubber brake lines :eek:

A buffing wheel on the rim lips took off the water stains and restored the lustre of the polished aluminum.

ditch the airbox and run pods. (Go one size up on the pilots and a couple up on the main jet...)

get rid of that "accessory tool box" thing on the right side under the side covers.

Dump that nasty old fork oil and refill with a 10 or 15wt. fork oil

Cut the reflectors off the rear shocks, and flip the shocks so the reflector brackets face inwards.
 
Thanks Matt, that is exactly what I was thinking. I removed the reflectors and cleaned the shocks, now I will turn them as you suggested. I am in the process of taking the wheels off and bead blasting them and will leave them silver. I've taken the rear fender and chain guard off, blasted them, and painted them flat then put clear on them. The turn signals are gone and not sure I what kind of signals to mount. I like JRK's idea, use HD turn signals. I have the pod air filters but can not mount my carbs back on due to the rubber back mount is split. I will try to get it at a local dealer. I will post pics later this week. Thanks for checking out my thread and keep the ideas coming...
 
Back
Top Bottom