
We noticed you are blocking ads. DO THE TON only works with community supporters. Most are active members of the site with small businesses. Please consider disabling your ad blocking tool and checking out the businesses that help keep our site up and free.
You are using an out of date browser. It may not display this or other websites correctly.
You should upgrade or use an alternative browser.
You should upgrade or use an alternative browser.
360 Timing challenge for a sensei!
- Thread starter renslow
- Start date
raptormeat
Been Around the Block
first off, those points plate screws should be updated, i cant imagine youre getting them down that tight looking that stripped. let me go check my orientation.
raptormeat
Been Around the Block
also, as ive learned, its good policy to isolate the blue and yellow wires mounting solder either with some high heat tape or just bending them to ensure they dont ground out on the cover casing/points plate.
frogman
'74 CB360, '71 CB450, '75 CB550SS
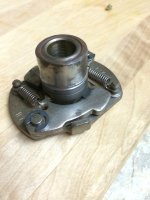
I wish I could say you have it right, but that thing is so corroded that even if it was right your timing will not be correct. It looks like its stuck about 1/4 advanced as it is, so first thing to do is to take the thing apart amd clean it really well. In your hand the cam should rotate freely and snap back once released.
Doesn't look like you have the same unit I do. Maybe a later or earlier.
Doesn't look like you have the same unit I do. Maybe a later or earlier.
raptormeat
Been Around the Block
haha yup, that thing is stuck. i think that might be a part of your problem. its advanced at idle.
i have a good Denso 312 version if you want.
i have a good Denso 312 version if you want.
Okay well thats shitty news and good news! Perhaps I'll just start fresh with one thats in better condition. well..im sorry this bike is a POS.
Yeaaaahh about that little screw..i've been using a flat head to torque that sucker down. I promise thats the only screw thats like that. :-*
I'm really not 100% sure on how the advancer unit works so i may do some research just to gain some knowledge before buying a new one. I was looking for a picture of reference on how its correctly mounted and I couldnt come up with anything.
But I figured if i knew some knowledge about it then I wont necessarily need one.
What is the Denso 312 version? As far as comparison etc from oem..raptormeat i appreciate your input..p.s that RD you have looks absolutely wicked")
The blue and yellow wires dont ground out on the plate, i've used a multimeter to check both of them once its mounted and its fine.
I've had that problem before where the blue or yellow wire grounds out when you put the points cover on so i'm aware of that issue.
Yeaaaahh about that little screw..i've been using a flat head to torque that sucker down. I promise thats the only screw thats like that. :-*
I'm really not 100% sure on how the advancer unit works so i may do some research just to gain some knowledge before buying a new one. I was looking for a picture of reference on how its correctly mounted and I couldnt come up with anything.
But I figured if i knew some knowledge about it then I wont necessarily need one.
What is the Denso 312 version? As far as comparison etc from oem..raptormeat i appreciate your input..p.s that RD you have looks absolutely wicked
The blue and yellow wires dont ground out on the plate, i've used a multimeter to check both of them once its mounted and its fine.
I've had that problem before where the blue or yellow wire grounds out when you put the points cover on so i'm aware of that issue.
Okaay so it definitely does NOT look right..like you said it looks like it's already a tad bit advanced just by looking at the springs.
So...Maybe explain to me like i'm five how this advancer unit works. How does it work? The faster it spins the more it advances the timing? Whats the relation to this piece and the points? I thought that the points opening and closing at that position was all you needed for correct timing? throughout the entire rpm?(OBVIOUSLY much more to it but thats where i'm coming from)
So...Maybe explain to me like i'm five how this advancer unit works. How does it work? The faster it spins the more it advances the timing? Whats the relation to this piece and the points? I thought that the points opening and closing at that position was all you needed for correct timing? throughout the entire rpm?(OBVIOUSLY much more to it but thats where i'm coming from)
raptormeat
Been Around the Block
oh, i have no idea HOW it works. : i bought an electronic ignition lol.
idk necessarily how it can even be 180 off considering theres only 1 key notch to fit into the cam notch. the Denso one is just like the OEM and i think was used on other Honda models. it just has different springs i believe, so the advance curve is a little later or earlier, not sure which.
http://www.ebay.com/itm/1974-HONDA-CB360T-CB-360-T-HM662-TIMING-ADVANCE-/351000987042?pt=Motorcycles_Parts_Accessories&hash=item51b94a05a2&vxp=mtr
idk if yours is actually stuck or not, a rebuild would help though. plugs wet? this bike neeeeds to start.
i bought an electronic ignition lol.idk necessarily how it can even be 180 off considering theres only 1 key notch to fit into the cam notch. the Denso one is just like the OEM and i think was used on other Honda models. it just has different springs i believe, so the advance curve is a little later or earlier, not sure which.
http://www.ebay.com/itm/1974-HONDA-CB360T-CB-360-T-HM662-TIMING-ADVANCE-/351000987042?pt=Motorcycles_Parts_Accessories&hash=item51b94a05a2&vxp=mtr
idk if yours is actually stuck or not, a rebuild would help though. plugs wet? this bike neeeeds to start.
Yeah it's such a simple mechanical piece but i'm pretty lost when I try to read up on it.
Seriously debating about just saving some money these next couple weeks to get an electronic issue. For under 200 that seems like it could save me a lot of worry later down the road. But then again I need to make sure I can understand all the issues prior to even getting it running first before I jump into something like that.
I'm just going to try and clean up everything as best as I can and then i'll be back with results
plugs were dry when I tried to kick it a couple days ago. i already have the carbs off the bike all cleaned up so that wont be an issue anymore.
frogman
'74 CB360, '71 CB450, '75 CB550SS
The way it works is simple. At an idle the springs hold weights tight to the cam, which sets it at no advance. On the ends of the weights right at the pivot points is a tooth that sticks out and slots into a grove on the cam. As the RPMs go up centrifugal force will cause the weights to swing away from the cam. As the weights move out they spin the cam clockwise until the weights hit their stop.
I believe that unit raptor linked is the same one I have. I know that 360s had at least 2 maybe 3 versions of advance units, as did the 350 and the 450s.
I believe that unit raptor linked is the same one I have. I know that 360s had at least 2 maybe 3 versions of advance units, as did the 350 and the 450s.
frogman thanks for the info - I have that saved in my notes now.
So I got the advancer cleaned up and it feels exactly how it should. It doesnt drag or get stuck in one position anymore : It was completely stuck open, full advanced when it was sitting on the bike. Would the advancer being stuck open cause it to not run at all?
So I got the advancer cleaned up and it feels exactly how it should. It doesnt drag or get stuck in one position anymore :
It was completely stuck open, full advanced when it was sitting on the bike. Would the advancer being stuck open cause it to not run at all?Attachments
raptormeat
Been Around the Block
there is only one way to find out...
Okay SO I am well aware of the big warning in red letters about the 30 day old post but I have some excellent news.
With the advancer fixed, the condenser GROUNDED correctly the bike fired up in 2-3 kicks. Hmm yeah so a bit embarrassing but now I have this thing running like a champ.
So I'm hoping this thread can help other honda twin owners find their problems because their was a lot of process of elimination here.
Some new questions for ya'll.
Sparckmoto my friend I was looking at the rec/regulator combo and was wondering what the benefits would be running that on a stock harness. I really want to run the smallest battery possible (around 4-6amps minimum correct?) would this combo make it a bit easier doing something like that?
If it's unrelated i apologize - I dont know much about electronics on motorcycles
Stock unit doesn't usually begin charging until at least 3,000 RPM (and usually closer to 4,000 RPM). Ours kicks in much earlier, so you're running off the battery for less time.
Additionally, the stock unit specs were something like 15V +/- .5V. This will pretty quickly cook a LI-ION battery and more hearty varieties of battery such as flooded cell will still benefit from a longer life span and lower maintenance interval.
I know I'm sort of blowing my own horn here, but for the money, it's the first upgrade I would consider on any compatible vintage bike.
Aha absolutely not I feel like for the money it'd be a great investment. Well when I purchase a new battery I'll forsure throw you an order! I appreciate the input.
My previous bike I went through two batteries in less than a year just by letting it sit or not having it charge correctly(fixing points and timing and having the battery drain out etc), I hate how sensitive these twins are when the batterys are low on power.
Okay another question that popped up in my head. So the tank that was originally on the bike had some Por-15 sealant in their but it didnt set right so its starting to peel inside. Is there anyway to save it? Some nasty chemicals I can use to break it down and get it all out?


