72 CL100, Piglet

Re: Piglet- 6 to 12v conversion

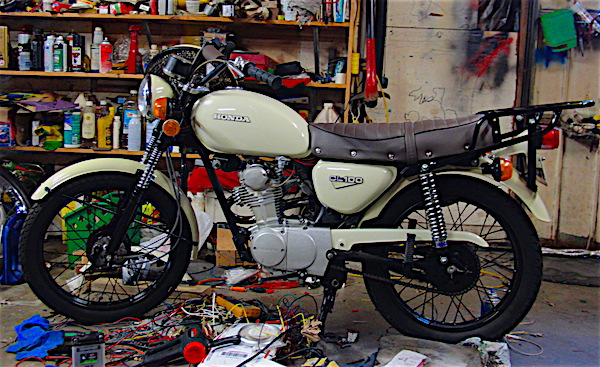
Ok been procrastinating long enough. My buddy snapped me out of that.

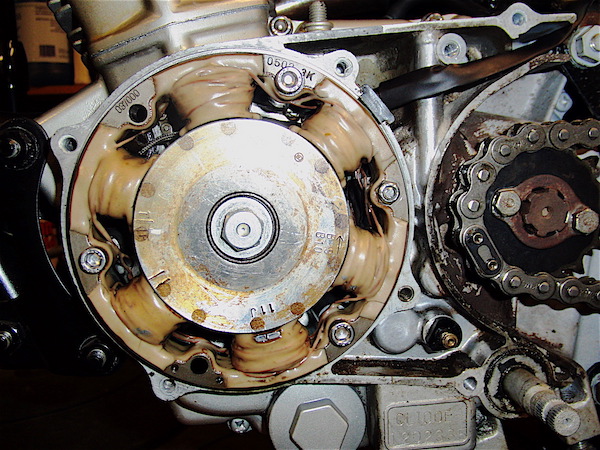
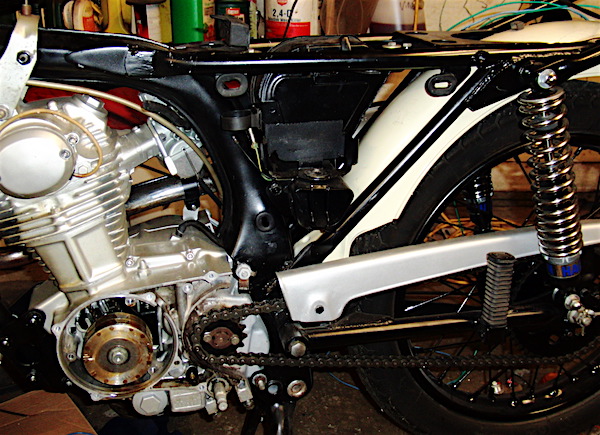
Finished up details on the stator. New bolts, Shrink wrapping wires and all.

11494-280216102539-18402297.jpeg


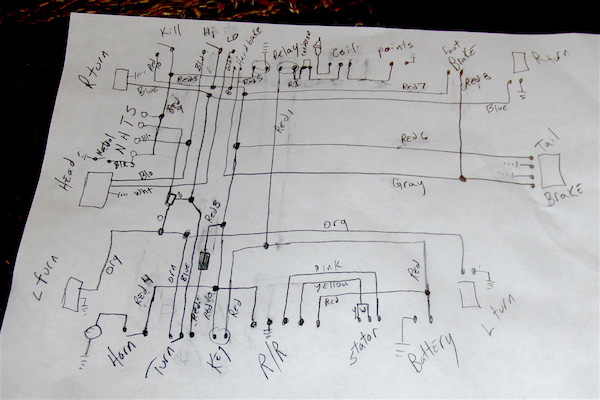
Drew up schematic in pencil.
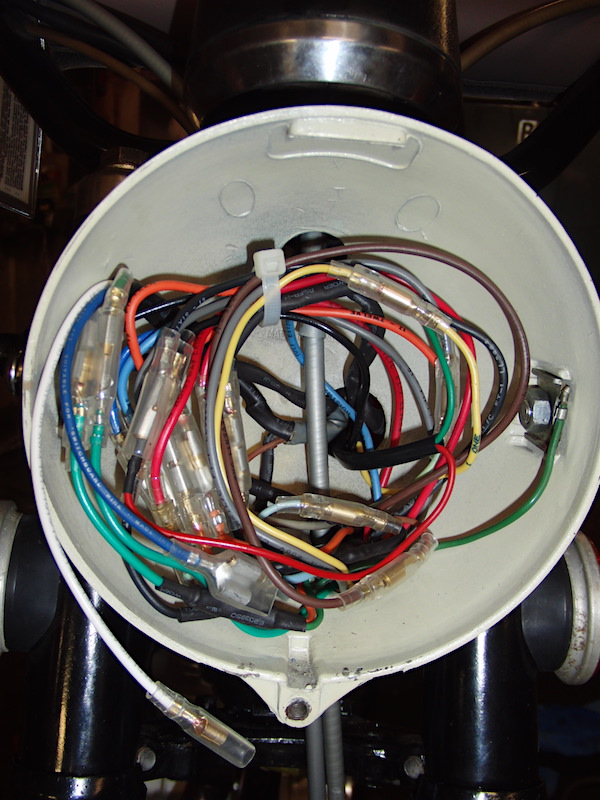
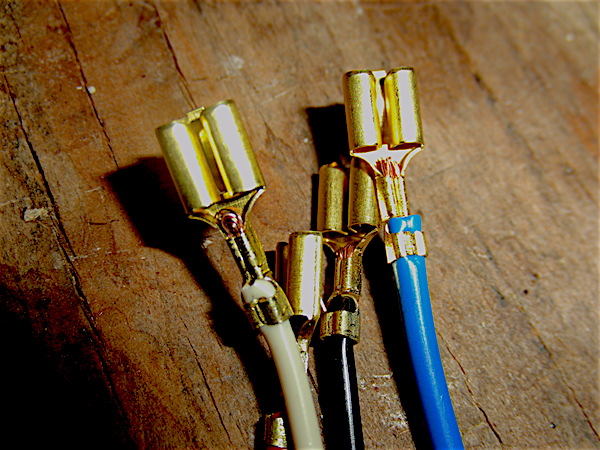
11494-280216102539-19021735.jpeg


Old harness out.

11494-280216102539-19031436.jpeg


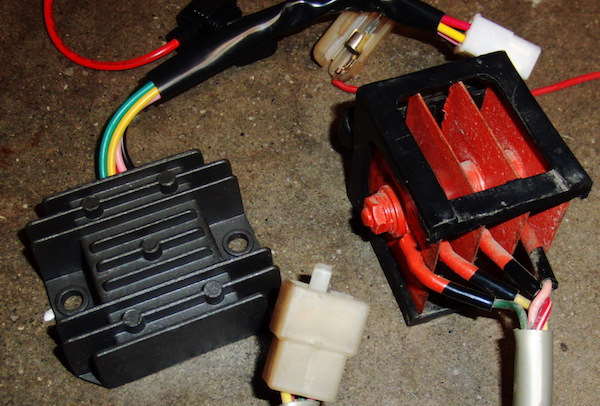
New 12v R/R sparckmoto

11494-280216102539-1904163.jpeg


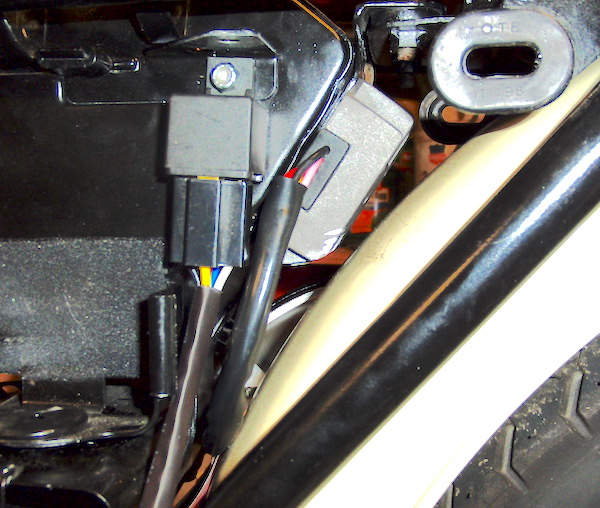
RR and ignition isolation relay installed on airbox.

11494-280216102539-19052177.jpeg


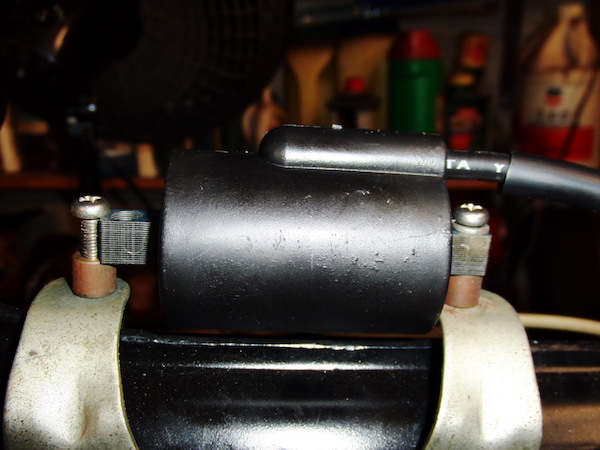
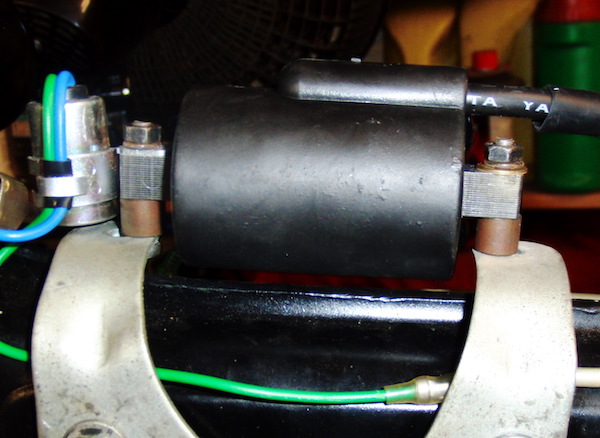
New 12v cb350 coil...Dagnabbit! Missed it by "that" much. Gonna grind the welded nuts off the bottom of bracket and see if theres enough meat to drill and tap new holes.

11494-280216102539-19061246.jpeg
 
Re: Piglet- 6 to 12v conversion

trek97 said:
Dagnabbit! Missed it by "that" much. Gonna grind the welded nuts off the bottom of bracket and see if theres enough meat to drill and tap new holes.

11494-280216102539-19061246.jpeg
Just get a piece of mending plate or a cheap little bracket from Home Depot or Lowes. All you need is something with two holes. Bolt one side to the coil and the other to the stock bolt. Hell, a sheet metal screw through the coil's hole to sheet and another hole for the bolt will work too.
 
Re: Piglet- 6 to 12v conversion

Just enough meat there to slot w dremel and done.

11494-280216123232.jpeg
 
Re: Piglet- 6 to 12v conversion

With my old eyes took a bit of time to get used to crimping these vintage connectors. But finally got a feel for them. Del at vintage connections and matt also gave me some tips. Fold stripped ends over and use 14-16 crimp then re-crimp w 18g die.

11494-100316122751-19351714.jpeg


Before I started any wiring in the headlight. Installed All Balls stem kit.

11494-100316122703-19072302.jpeg


Ball joint breaker made simple work of removing the old stem race. like it was made for it.

11494-100316122703-1928554.jpeg


out w the old.
11494-100316122703-19291864.jpeg


These are matched pairs of 2 sizes so ensure you got the proper bearings and races where they need to be. It would suck to swap races in the neck and have to pull em and do over.

warmed the new up w HF heat gun. Just to get a puff of smoke out of the grease. Slipped halfway on by hand. Then tapped her home on the race w a wood stick and mallet. Be sure, Dont hit the bearing itself. And ensure its not still hot when seating it against the new rubber dust seal.

11494-100316122703-19311438.jpeg


Cooled the new races in the freezer for a moment, used a 5/8 rod w flat washers that fit inside the tube to" press" in and seat the races. So I didnt have to use a tool to tap them into position. They slipped in pretty easy yet snugly and straight.

11494-100316122703-1932226.jpeg


11494-100316122703-19302132.jpeg


11494-100316122703-19331124.jpeg


11494-100316122703-19342242.jpeg


Packed new w grease.

11494-100316122703-19302132.jpeg


Got everything reassembled tightened and torqued.

So, ready to wire inside headlight and get her buttoned up.
 
Re: Piglet- 6 to 12v conversion

Before I started any wiring in the headlight. Installed All Balls stem kit.

11494-100316122703-19072302.jpeg


Ball joint breaker made simple work of removing the old stem race. like it was made for it.

11494-100316122703-1928554.jpeg


out w the old.
11494-100316122703-19291864.jpeg


These are matched pairs of 2 sizes so ensure you got the proper bearings and races where they need to be. It would suck to swap races in the neck and have to pull em and do over.

warmed the new up w HF heat gun. Just to get a puff of smoke out of the grease. Slipped halfway on by hand. Then tapped her home on the race w a wood stick and mallet. Be sure, Dont hit the bearing itself. And ensure its not still hot when seating it against the new rubber dust seal.

11494-100316122703-19311438.jpeg


Packed new w grease.

Got everything reassembled tightened and torqued.

So, ready to wire inside headlight and get her buttoned up.
[/quote]

So which bearing set did you use?

The set I got didn't quite take that much pounding to install the bearing onto the neck.

In fact, it purdy much slid right on.

I've got it all assembled and it feels smooth and firm. Guess I got lucky with the install.

Yours is looking lots better than mine though.

I still have to split the cases to replace the kicker shaft.

Then maybe, just maybe I can scoot around on it.
 
Re: Piglet- 6 to 12v conversion

budlite282 said:
So which bearing set did you use?

The set I got didn't quite take that much pounding to install the bearing onto the neck.

In fact, it purdy much slid right on.

I've got it all assembled and it feels smooth and firm. Guess I got lucky with the install.

Yours is looking lots better than mine though.

I still have to split the cases to replace the kicker shaft.

Then maybe, just maybe I can scoot around on it.

All balls AB22-1002
They fit real nice. Im sure they didnt really require putting races in the freezer. As I didnt try to fit them before hand. However, I did slide the lower bearing onto the neck and it was pretty tight. But after a couple minutes w HF heat gun it slid halfway onto the neck by hand, then tapped home w a wooden dowel and rubber mallet.

Deviant said he had a similar experience as yours, just dropped them in and tapped them home.

As DOHC pointed out. I did use "RACE GREASE" and because of that mine are RACE READY!!! ha ::) So thats probably the difference. ;D
 
Re: Piglet- 6 to 12v conversion

trek97 said:
All balls AB22-1002
They fit real nice. Im sure they didnt really require putting races in the freezer. As I didnt try to fit them before hand. However, I did slide the lower bearing onto the neck and it was pretty tight. But after a couple minutes w HF heat gun it slid halfway onto the neck by hand, then tapped home w a wooden dowel and rubber mallet.

Deviant said he had a similar experience as yours, just dropped them in and tapped them home.

As DOHC pointed out. I did use "RACE GREASE" and because of that mine are RACE READY!!! ha ::) So thats probably the difference. ;D

Ok, same set as the ones I used.

Yea, with Eric's experience, it must be an Augusta thing we have here.

Should hit the circuit then............:)

Thank for the response.
 
Re: Piglet- 6 to 12v, ITS ALIVE!!!

Everything working.

https://www.youtube.com/watch?v=qvyO--TDncU&feature=youtu.be
 
Re: Piglet- 6 to 12v, ITS ALIVE!!!

trek97 said:
Everything working.

dayyyyyyyum.........that's nice.

Would love to get mine like that.

You do good work, sir.
 
Re: Piglet- 6 to 12v, ITS ALIVE!!!

Sweet. So is it easier to see the gauge lights in broad daylight now when the gauge is at a slight angle? Combined with a 45 year-old mushy winker switch, I find the dim 6v lamps kind of hazardous.
 
Re: Piglet- 6 to 12v, ITS ALIVE!!!

Thanks guys, :) The bucket is the hardest part to make pretty. But this is as good as I could get it, doing my best to keep room for the LED headlight.

I also got a couple rolls of the non-adhesive harness wrap on its way. So stripping the harness off and wrapping it up, then it will be done...
Well, that and painting the "new to me" full size CB front fender. and the new re-pop side cover to replace the one I broke trying to remove....grrrrr. Then one day the ole lady will have to start thinking about the custom seat cover.

Then it will be done. ;)

11494-180316171353.jpeg


11494-180316172654.png
 
Re: Piglet- 6 to 12v, ITS ALIVE!!!

iatethepeach said:
Sweet. So is it easier to see the gauge lights in broad daylight now when the gauge is at a slight angle? Combined with a 45 year-old mushy winker switch, I find the dim 6v lamps kind of hazardous.

You can hear the wifes reaction to the brightness of the Tail light and turns at the end of the vid. But thats in the garage. Next bright sunny day I will roll her out in the full sun and get a vid for ya. But, yes the gauge leds from sparckmoto are super bright compared w the old lame lights.
 
Re: Piglet- 6 to 12v, ITS ALIVE!!!

This morning the sweet smell of rattle cans.

Painting fender and new side cover.

11494-190316054429.jpeg
 
Re: Piglet- 6 to 12v, ITS ALIVE!!!

Im certainly liking the classic styling of the full CB style fender better than the shorter CL fender. I like the chain guard painted to match. Thats the broke sidecover I just snapped on to get the full effect. The paint on the new ones not quite ready for man handling the badge on it just yet.

New fender VS old fender

11494-190316165248-1948697.jpeg


11494-190316165248-1944699.jpeg


11494-180715201538-14172225.jpeg
 
Back
Top Bottom