Follow along with the video below to see how to install our site as a web app on your home screen.
Note: This feature currently requires accessing the site using the built-in Safari browser.
We noticed you are blocking ads. DO THE TON only works with community supporters. Most are active members of the site with small businesses. Please consider disabling your ad blocking tool and checking out the businesses that help keep our site up and free.
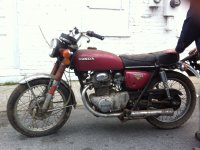
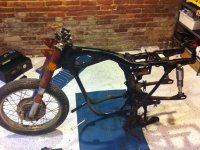
Thought I would finally start this... ill throw some pics up and update a bit later. Basically just doing a tear down.. rebuild the engine so its fresh and tight. And Do a cafe build.. the inspiration is my Father's first bike a 1958 XLR Sporster, which I will post a pic of once I find it.
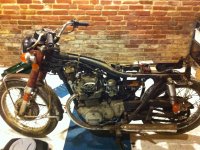
After a few hours of meticulous tear down... I made sure I labeled all of the wiring harness leads as they were disconnected from their components or grounds. and decided to use old egg cartons to hold hardware for specific parts.. try to keep the tear down as organized and controlled as possible
Cant wait to see the pic of your dads bike! And looks like a solid base to start from! Im a Yamaha man myself (other than the name) but I am starting to really like the smaller Hondas!
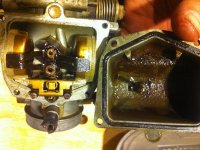
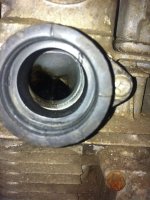
This is the left carb... it was really gunked up... the float needle wouldnt move.. you can tell the difference.... so I decided to take some pics of the valve chambers on each side to get an idea of what caused it.... those are to follow.
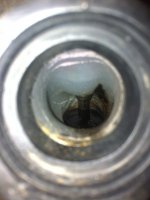
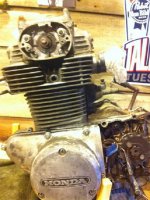
also.. compression on L cylinder was like 115-125.. compression on R cylinder was 155... both plugs looked a bit dark. and the oil was actually pretty clean... no metal shavings etc.
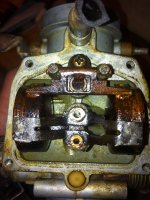
This is what the L cylinder intake valve looked like... pretty dark and gunked up, I kindof expected it due to the condition of the L carb... but Im not sure what exactly caused it.....
.. My thoughts are, carb just wasnt tuned and running rich-- or -- valve clearances were not to spec -- or-- the coils were going bad and the L cylinder wasnt getting good spark -- OR -- there is a leak in the L cylinder gasket ? which would also explain the compression issue?
.. kind of looking for some input/guidance on these things... dont want the answers handed to me, I want to improve my understanding and troubleshooting ability so any sound advice or guidance would be great.
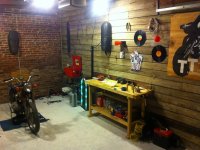
This is a pic of my humble shop that I built... Cool TT poster painting was done by my Wife.. if interested in similar garage art for your shops let me know she works by commission and is really talented
Good start on a crusty bike. OK so compression was low on the left and the valve looks filthy. That suggests a few possibilities such as a valve that's slightly leaking and the motor is blowing back. At this stage, I'd check valve clearances just to see what they are set at. It may indicate a potential issue. Then I'd remove the head and test all valves for leaks. The easy way is to turn the head upside down and pour kerosene into the combustion chambers and see if any leaks out of the inlet or exhaust ports.
Cam chain tensioner sprocket pretty much had no teeth left on it... however, the Tensioner mechanism itself seemed to work well so Ill probably reuse it
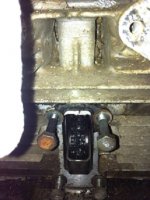
Pic of the engine... Big problem I actually need help on.... 6 of the 8 phillips head bolts that hold the timing 'cases' on the side of the head on are stript so badly its rediculous... was like that when I found it... I need to figure out a way to get them out without dmging the head... open to suggestions ... but it pretty much has my engine tear down stalled out lol
Good start on a crusty bike. OK so compression was low on the left and the valve looks filthy. That suggests a few possibilities such as a valve that's slightly leaking and the motor is blowing back. At this stage, I'd check valve clearances just to see what they are set at. It may indicate a potential issue. Then I'd remove the head and test all valves for leaks. The easy way is to turn the head upside down and pour kerosene into the combustion chambers and see if any leaks out of the inlet or exhaust ports.
Rich,
Sounds good man.... See my last post... I cant get the head off because of the stript bolts holding the timing 'cases' on the side of the head... open to suggestions
On the stripped screws on my RD350 I used a little electric impact with the biggest sharpest bit I could find. It got them turning just fine. But It only had to "hit" or "impact" 2 or 3 times till it broke free. If It would have taken much more then that it would have probable just strip them out more.
I second the impact driver, mine is the little Makita. I used a sharp Philips #3 bit. The impact got all but 2 or 3 of my 40 year old soft Honda Phillips screws out. For the more stubborn ones, I let them soak in some PB Blaster and broke the screw free with needlenose vice grips. For one that was completetly stripped and wouldn't allow the vice grips to fit (I was getting ready to drill it out *eek*), I had luck by taking a star socket and hammered it into the head of the screw and was luckilly able to back it out with the impact driver. The head of the screw was soft enough that the star socket got enough tooth in it to move it.
Those screws are a pain for sure. Good luck with them.
This site uses cookies to help personalise content, tailor your experience and to keep you logged in if you register.
By continuing to use this site, you are consenting to our use of cookies.