Follow along with the video below to see how to install our site as a web app on your home screen.
Note: This feature currently requires accessing the site using the built-in Safari browser.
We noticed you are blocking ads. DO THE TON only works with community supporters. Most are active members of the site with small businesses. Please consider disabling your ad blocking tool and checking out the businesses that help keep our site up and free.
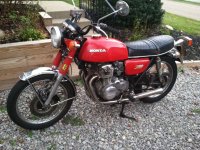
Ok, so a little background on this build real quick. I bought this bike at the end of October with the intention of getting it running right and then be done and satisfied. I had paid a little more than I wanted to to, but it was the bike I had been looking for, so I was ok with it.
I had intentions of rebuilding the leaky carbs and throwing some lower bars on and boom, I would have a cool little rider. Well, as we all know after the carbs and bars I could not stop there.
It actually ran ok the when I bought it beside a pretty rough idle. The throttle was extremely sticky and like to stick wide open sometimes which was pretty sweet. So I knew I was going to need some throttle cables and a carb rebuild kit at the very least. I ordered up a set of bike master super bike bars and got those fitted up too.
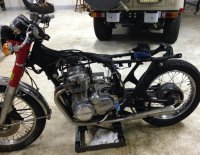
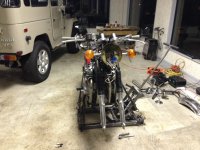
Here she is with the bars on. The carb kits took a while to come in so all I had done at that point was an inspection of the carbs.
I mistakenly thought that swapping bars would be a pretty simple task. What I didn't realize was that because the wiring was routed through the bars, that over time the wire coating would basically glue itself to the bars. So that was a job all in itself because I didn't want to destroy the stockers either, so I had to be gentle. I also had an extra bar end mirror laying around from another bike. I love how much just swapping bars can alter the look of the bike.
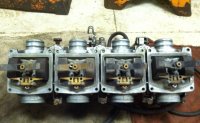
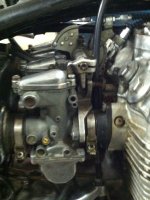
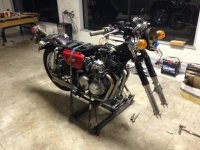
The carb kit finally came in and that was nice because it didn't require a complete overhaul. All the hardware was in very good shape just really clogged up, so I was able to get away with just replacing the all the o-rings and gaskets. At this point I was not very deep into it money-wise, mostly labor. You can see below the carbs were not in too bad of shape.
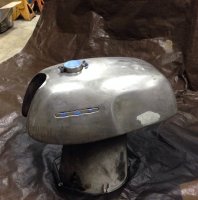
I took it out one chilly night night to fill it with fresh gas so I could tune it properly. Be fore this the paint seemed solid, but i knew it was not original. I wasn't going to mess with it because it seemed ok. It turns out it was a crapy paint job because I dripped some fuel on it and the paint immediately got gummy and pulled up. So this is when I decided I was going to go a little deeper into this project.
So I started to tear it down back to front just cleaning and wire wheeling everything that had rust. After I hit it on the wheel I would shoot the parts with clear coat to avoid further rusting.
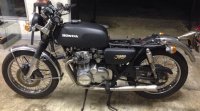
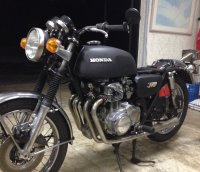
Oh god don't I know it! I'm actually pretty much done with this build, but didn't have all the photos compiled. I know it is not how you do a build thread, but I did not get around to making it until the bike was pretty much done.
They are just bikemaster super bike bars. They did not come notched I did that with a dremel. It did not turn out perfect but the holes worked and they are hidden so I am cool with how it turned out.
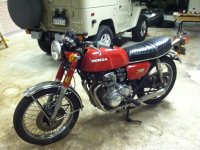
While I had it up on the lift I decided to knock out some little stuff before I got to the front end. One day while I was running it up on the lift for a little bit it sprung a full blown geyser from the shift shaft seal. That incident prompted me to go through and change some other seals that we're weeping. Ah I also had to drop the oil pan to extract a rounded off drain plug and leaky crush washer. Unfortunately I didn't take any pictures of this because I was pretty much covered in oil the entire time. More pics to come from the front end and paint.
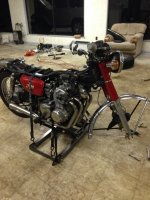
When I got to the front end I did basically the same as the rear end. Pulled everything off and either cleaned, polished, or painted most everything. When I pulled the headlight bucket off I went through and hit all the connectors with some steel wool and gave them a dab of electrical grease. Here it is up on the lift before I tore into it.
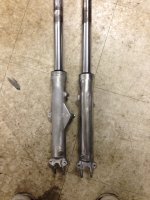
After I pulled the forks off I discovered they were in dire need of some new seals. I put the new seals in and polished them up. In the picture below you can see a before and after of them.
^ dude.....your workspace is commercial front of structure? Or you have huge windows on your garage. At any rate I'm jelly of your space and your Fj40.
Ha thanks dude I appreciate it. Unfortunately the FJ is my old man's. My work space is actually an old used car dealership, hence the windows in the showroom.
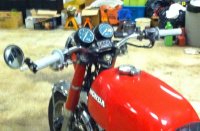
I went crazy cleaning everything on the front end. I did not like the look of the fixed brake line although it functioned fine. So I stripped the caliper and pained it and also replaced the bottom brake line. I soaked and cleaned all the other pieces as well. I debated whether or not to ditch the stock fork guards for gaitors. I really like the look of the bigger cb's so I decided to go with after market headlight brackets and gaitors.
As you can see in the pictures I also painted the headlight housing and relocated the blinkers to the side of it. I was pretty pumped that worked out because I was not thrilled about drilling into my brand new headlight ears. The gauges, gauge housings, and the brackets all got re sprayed as well.
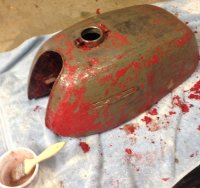
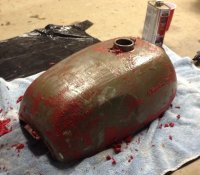
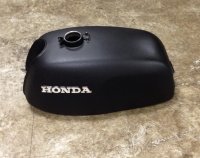
I decided I wanted to go ahead and paint it. I had been debating getting all the tins done professionally , but got too many quotes that were more than what I paid for the bike. I watched a few videos online of people rattle-canning tins with pretty good results but I also decided against that. I may take some crap for it, but it wasn't original paint, so I went with spray on bed liner. Easy, durable, looks cool (IMO) and most importantly cheap. So I went to work.
Beginning to end on the tank. Pretty much the same process on the side covers minus the paint stripping. A light sanding did the trick on the plastic. I also just cleaned the badges with some wd 40 because they have a cool worn look to them.
Finished product sans the seat which is still at the upholstery shop. After this photo was taken I ended up ripping the rear wheel and brake set up off to do a little more cleaning cuz I was bored.
This site uses cookies to help personalise content, tailor your experience and to keep you logged in if you register.
By continuing to use this site, you are consenting to our use of cookies.