
We noticed you are blocking ads. DO THE TON only works with community supporters. Most are active members of the site with small businesses. Please consider disabling your ad blocking tool and checking out the businesses that help keep our site up and free.
You are using an out of date browser. It may not display this or other websites correctly.
You should upgrade or use an alternative browser.
You should upgrade or use an alternative browser.
'74 cb350f chop FOR SALE pg.12
- Thread starter davis
- Start date
valvesprung
Over 1,000 Posts
Re: '74 cb350f quasi-bratstyle trashterpiece (updated: paint job; page 9)
Holy shit...most awesome paint job ever...
Holy shit...most awesome paint job ever...
davis
Active Member
Re: '74 cb350f quasi-bratstyle trashterpiece (updated: paint job; page 9)
well in classic form i changed my mind again about the paint and decided to try my hand at some painting with rattle cans. The process went as follows:
1. shaved/relocated petcock(s)
2. shaved the front of the tunnel because i want the tank to sit higher
3. made a new mount for the front of the tank
4. bondo/bodywork
5. primer


6. layer of generic silver paint
7. a few layers of walmart 'spray glitter'
8. sprinkling of actual craft glitter
9. few layers of clear

10. wetsand
11. tape off graphics
12. stretch lace and dust with black paint
13. layer of yellow "candy" (duplicolor metalcast)

14. layer of red "candy" (Krylon x-metals)

15. bury it all in clear and let it cure for a few days


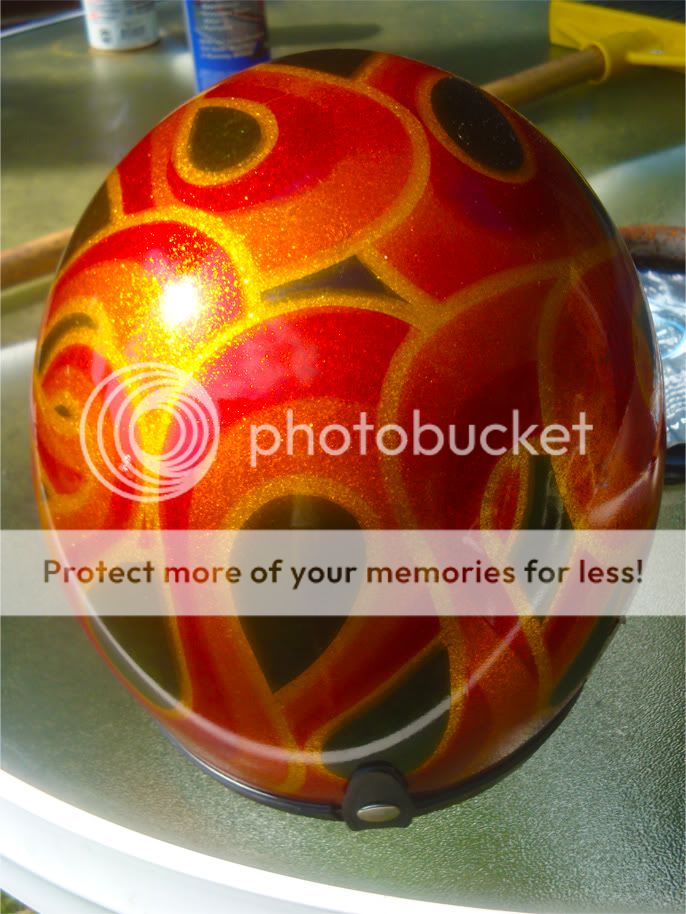
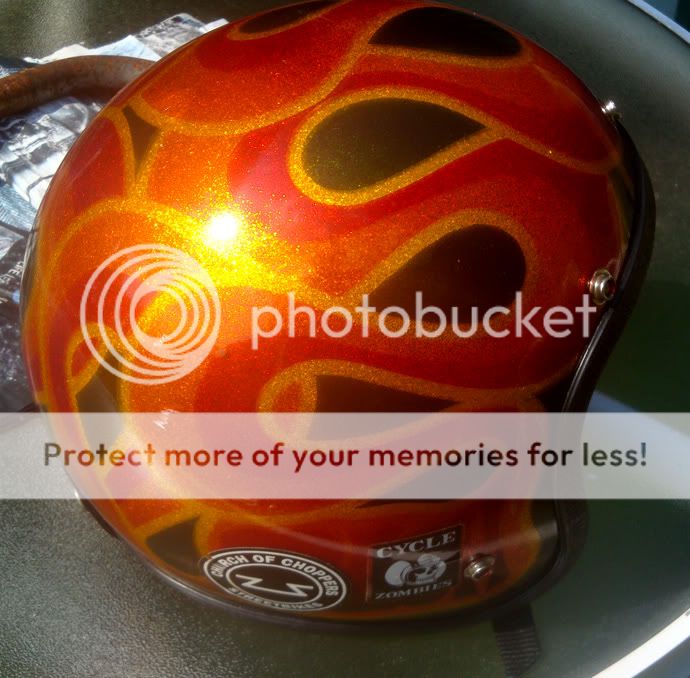
oh yea and I also did a little somethin to my vintage 3/4 bucket:

well in classic form i changed my mind again about the paint and decided to try my hand at some painting with rattle cans. The process went as follows:
1. shaved/relocated petcock(s)
2. shaved the front of the tunnel because i want the tank to sit higher
3. made a new mount for the front of the tank
4. bondo/bodywork
5. primer
6. layer of generic silver paint
7. a few layers of walmart 'spray glitter'
8. sprinkling of actual craft glitter
9. few layers of clear
10. wetsand
11. tape off graphics
12. stretch lace and dust with black paint
13. layer of yellow "candy" (duplicolor metalcast)
14. layer of red "candy" (Krylon x-metals)
15. bury it all in clear and let it cure for a few days
oh yea and I also did a little somethin to my vintage 3/4 bucket:
Dirty Dan
Tasty waves and a cool buzz.
Re: '74 cb350f bratstyle (update: rattlecan metalflake/lace/candy; page 11)
Ahaha, hell yeah craft glitter. You pretty much used all the same steps I did when I painted some RC car bodies and a bigass tool box a few years back... handfuls of glitter and all! You can never have enough flake...ever.
Lookin' good. and SPARKLY
You still gonna have your buddy throw some poly. clear on em?
davis
Active Member
Re: '74 cb350f bratstyle (update: rattlecan metalflake/lace/candy; page 11)
yea the plan is for now to allow the acrylic enamel clear thats on there to fully cure (be super careful when filling with fuel) and then either get that guy to poly clear it or to buy some of that 2k polyurethane clear in the can and do it myself (its a legit 2 part poly, you push a button on the can and shake it like hell to mix the two parts and the can is only good for 24 hours)..
Of course I know theres always a possibility that i'll be lulled into complacency and just leave it as is; but I would like to finish it for real at some point in the future.
Dirty Dan said:Ahaha, hell yeah craft glitter. You pretty much used all the same steps I did when I painted some RC car bodies and a bigass tool box a few years back... handfuls of glitter and all! You can never have enough flake...ever.
Lookin' good. and SPARKLY
You still gonna have your buddy throw some poly. clear on em?
yea the plan is for now to allow the acrylic enamel clear thats on there to fully cure (be super careful when filling with fuel) and then either get that guy to poly clear it or to buy some of that 2k polyurethane clear in the can and do it myself (its a legit 2 part poly, you push a button on the can and shake it like hell to mix the two parts and the can is only good for 24 hours)..
Of course I know theres always a possibility that i'll be lulled into complacency and just leave it as is; but I would like to finish it for real at some point in the future.
davis
Active Member
Re: '74 cb350f bratstyle (update: rattlecan metalflake/lace/candy; page 11)
Yea I'll borrow my roommate's digital SLR and snap a few glamor shots soon
stik70 said:Outstanding!!! Put the tins back on so we can all enjoy the groovy glory!! Very nice job!
Kev
Yea I'll borrow my roommate's digital SLR and snap a few glamor shots soon
Dirty Dan
Tasty waves and a cool buzz.
Re: '74 cb350f bratstyle (update: rattlecan metalflake/lace/candy; page 11)
Yeah man, I was going to say... Looks damn good as it is.
I'm thinking my bike is going to end up the cafe'd, glittery half breed half brother of your bike... Flake is way too hard to resist. I neeeeeed it.
davis said:yea the plan is for now to allow the acrylic enamel clear thats on there to fully cure (be super careful when filling with fuel) and then either get that guy to poly clear it or to buy some of that 2k polyurethane clear in the can and do it myself (its a legit 2 part poly, you push a button on the can and shake it like hell to mix the two parts and the can is only good for 24 hours)..
Of course I know theres always a possibility that i'll be lulled into complacency and just leave it as is; but I would like to finish it for real at some point in the future.
Yeah man, I was going to say... Looks damn good as it is.
I'm thinking my bike is going to end up the cafe'd, glittery half breed half brother of your bike... Flake is way too hard to resist. I neeeeeed it.
davis
Active Member
Re: '74 cb350f bratstyle (update: rattlecan metalflake/lace/candy; page 11)
flake is always a win because it makes hardcore chopper dudes and cafe purists/wannabe's want to die, which is my ultimate goal.
Dirty Dan said:Yeah man, I was going to say... Looks damn good as it is.
I'm thinking my bike is going to end up the cafe'd, glittery half breed half brother of your bike... Flake is way too hard to resist. I neeeeeed it.
flake is always a win because it makes hardcore chopper dudes and cafe purists/wannabe's want to die, which is my ultimate goal.
morepower4me
New Member
Re: '74 cb350f bratstyle (update: rattlecan metalflake/lace/candy; page 11)
Love the flake!
Yours came out much better (and much less $$$) than the 'flake in a can' products. Well done!
Love the flake!
Yours came out much better (and much less $$$) than the 'flake in a can' products. Well done!
alpinaclone
Been Around the Block
Re: '74 cb350f bratstyle (update: rattlecan metalflake/lace/candy; page 11)
Updates naow....please.
Updates naow....please.
jayfromjay
If it don't hit the ton, well it aint no fun!
Re: '74 cb350f bratstyle (update: rattlecan metalflake/lace/candy; page 11)
dig it!
dig it!
davis
Active Member
Re: '74 cb350f bratstyle (update: rattlecan metalflake/lace/candy; page 11)
Well I apologize for the lack of updates, but here's a fairly big one.
The bike hasn't sold yet, but I just now started putting it up for sale in the forums instead of just craigs list.
The story with the handlebars is my throttle broke so instead of spending money to buy a new one, I had an internal throttle laying around which wouldnt work with the old bars, so I made these out of some tube I found in the yard with some old frame tube left over from when i chopped the ass off of the bike... but I digress, I'll let the pictures do the talking now. In case any of you were interested, its in the for sale section along with the helmet.
[/size]
[/size]Video:
[/size]
[/size]
[/size]Pictures:
[/size]

[/size]

[/size]

[/size]

[/size]

[/size]

[/size]


Well I apologize for the lack of updates, but here's a fairly big one.
The bike hasn't sold yet, but I just now started putting it up for sale in the forums instead of just craigs list.
The story with the handlebars is my throttle broke so instead of spending money to buy a new one, I had an internal throttle laying around which wouldnt work with the old bars, so I made these out of some tube I found in the yard with some old frame tube left over from when i chopped the ass off of the bike... but I digress, I'll let the pictures do the talking now. In case any of you were interested, its in the for sale section along with the helmet.
[/size]
[/size]Video:
[/size]
[/size]
[/size]Pictures:
[/size]
[/size]
[/size]
[/size]
[/size]
[/size]
[/size]


