
We noticed you are blocking ads. DO THE TON only works with community supporters. Most are active members of the site with small businesses. Please consider disabling your ad blocking tool and checking out the businesses that help keep our site up and free.
You are using an out of date browser. It may not display this or other websites correctly.
You should upgrade or use an alternative browser.
You should upgrade or use an alternative browser.
'75 suzuki gt250...Buzzing around the block
- Thread starter joeschuit
- Start date
joeschuit
Been Around the Block
Re: '75 suzuki gt250...Electrical done, onto headers
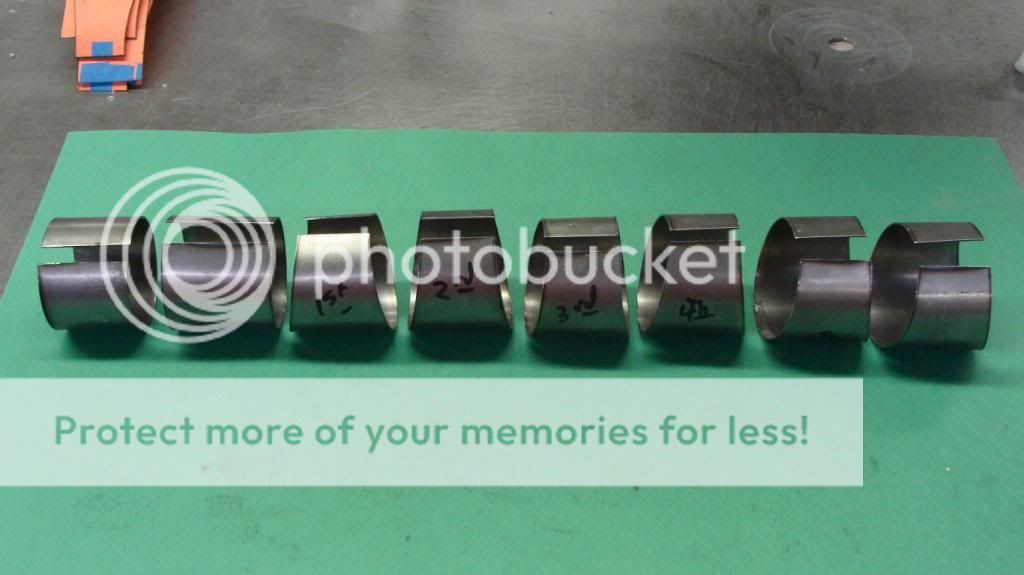
I've been using 22 gauge steel for the exhaust. I wouldn't mind going to 20 gauge for a little easier welding. I got the first set of header pieces cut out and rolled. If everything checks out I'll get the other side rolling along. VonYinzer, you're welcome to the old exhausts, but one pair doesn't have headers or baffles, and the other is also header-less but has baffles. Pm me if you're interested.

I've been using 22 gauge steel for the exhaust. I wouldn't mind going to 20 gauge for a little easier welding. I got the first set of header pieces cut out and rolled. If everything checks out I'll get the other side rolling along. VonYinzer, you're welcome to the old exhausts, but one pair doesn't have headers or baffles, and the other is also header-less but has baffles. Pm me if you're interested.
joeschuit
Been Around the Block
Re: '75 suzuki gt250...Electrical done, onto headers
Its a bit thick for tin snips. I've got a metal bandsaw to do the cutting. I place a piece of thin plywood under the steel so it doesn't curl the edges. I spent some time yesterday and today tacking together the cones and finish welding them. They turned out great and hopefully will be attached to the rest of the expansion pipe by the weekend.

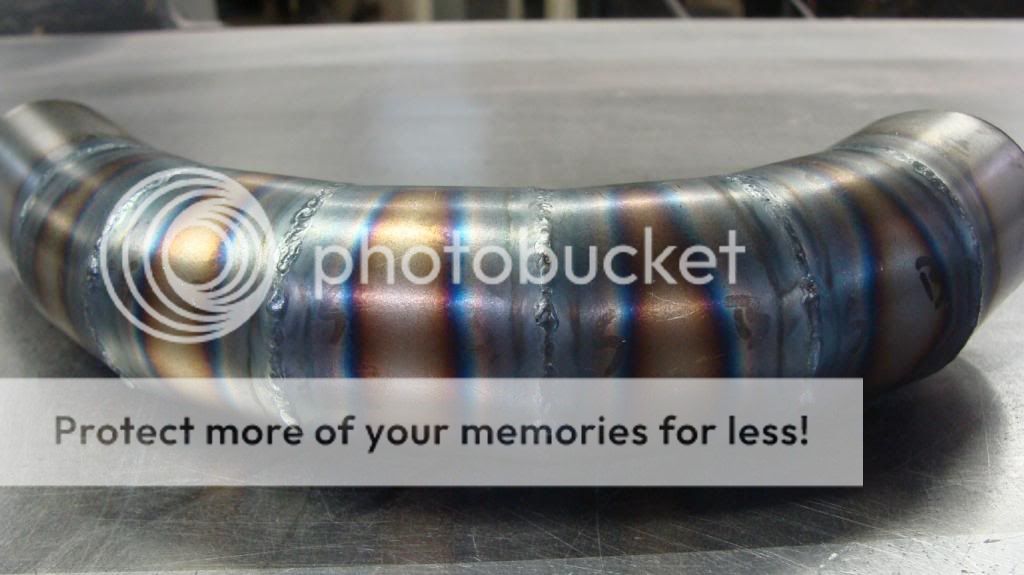
I've also decided to strip the paint off the exhaust and run a torch over the welds. It'll have the same look as it did when first welded and will get a couple layers of mop-n-glo.
Its a bit thick for tin snips. I've got a metal bandsaw to do the cutting. I place a piece of thin plywood under the steel so it doesn't curl the edges. I spent some time yesterday and today tacking together the cones and finish welding them. They turned out great and hopefully will be attached to the rest of the expansion pipe by the weekend.
I've also decided to strip the paint off the exhaust and run a torch over the welds. It'll have the same look as it did when first welded and will get a couple layers of mop-n-glo.
joeschuit
Been Around the Block
Re: '75 suzuki gt250...Electrical done, onto headers
Two steps forward, one step back. I got more work done on the exhaust and fuel lines which I'll document below. I contacted the guy that's fixing the microsquirt considering its been a week since he's received it. I got an email back saying that he never saw it. I checked the tracking number and it shows it was delivered to the correct zipcode. I've already filed a lost package "investigation" and a representative will be contacting me on monday with some information. I've heard horror stories about the usps, but this is the first package that I've had problems with in 5-6 years. I've got high hopes that it's a simple error. Back to the bike:
I got the correct fuel line from a 2003 yamaha r6. I salvaged the two 90 degree fittings, fitting one on the fuel rail:

I plan on machining a similar tube so I can use the other fitting for the return.
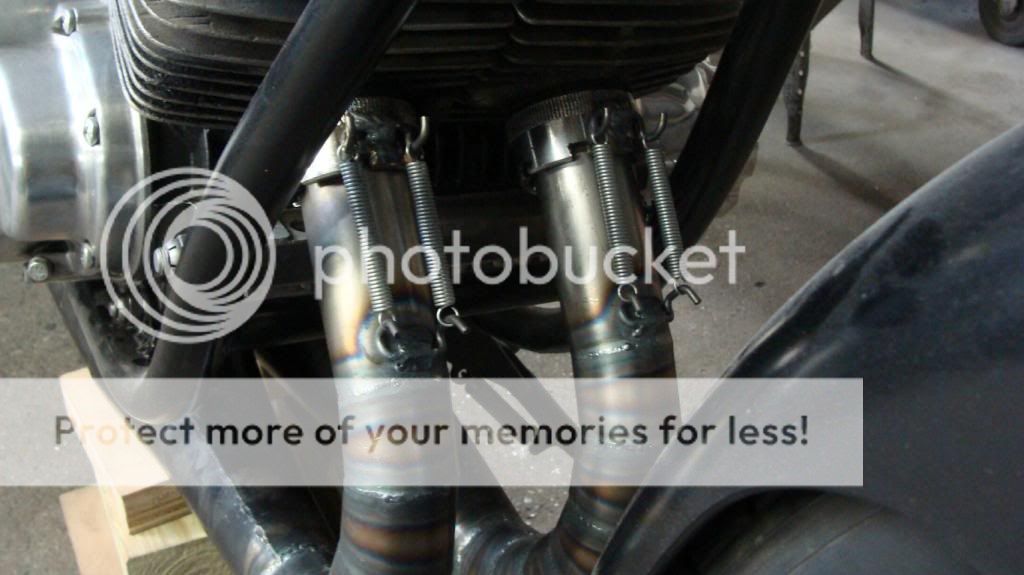
I finished welding up one of the exhausts and tacked up the other header. I may need to reweld the right exhaust to tuck the belly under the bike more, but I'll wait till I get the other finished before modifying.


And of course, the mandatory mop n glo:

Two steps forward, one step back. I got more work done on the exhaust and fuel lines which I'll document below. I contacted the guy that's fixing the microsquirt considering its been a week since he's received it. I got an email back saying that he never saw it. I checked the tracking number and it shows it was delivered to the correct zipcode. I've already filed a lost package "investigation" and a representative will be contacting me on monday with some information. I've heard horror stories about the usps, but this is the first package that I've had problems with in 5-6 years. I've got high hopes that it's a simple error. Back to the bike:
I got the correct fuel line from a 2003 yamaha r6. I salvaged the two 90 degree fittings, fitting one on the fuel rail:
I plan on machining a similar tube so I can use the other fitting for the return.
I finished welding up one of the exhausts and tacked up the other header. I may need to reweld the right exhaust to tuck the belly under the bike more, but I'll wait till I get the other finished before modifying.
And of course, the mandatory mop n glo:
MotorbikeBruno
Over 1,000 Posts
Re: '75 suzuki gt250...Electrical done, onto headers
This thing is heaps of badass! Did you use a template to get the right angles on the pieces you cut out? Or was it trial and error?
This thing is heaps of badass! Did you use a template to get the right angles on the pieces you cut out? Or was it trial and error?
joeschuit
Been Around the Block
Re: '75 suzuki gt250...Electrical done, onto headers
I used basic geometry and a big compass for the main exhaust, but for the headers I used a cone layout program. I still had to scale it correctly, but was more or less trouble free. I finished up welding on both exhausts. I've devised a mount in the back that won't interfere with the rearsets or chain. It'll clamp onto the support bar between the frame. Two rods will extend to each exhaust with another piece to cradle them. I'll use a spring to retain them like I've done before.

Other than welding on hooks for the header, I'll be able to check it off the list:


And heres a comparasion, before and after:


Good news on the microsquirt. The guy found the package and determined that the board was faulty. I've got a new board that'll be in my hands on friday. After the exhaust is wrapped up, It'll be a quick fitting on the gas tank for the return and it'll be ready to start. Other than trans oil and 2 stroke oil. The oil pump is already primed and I'll be running 40:1 premix as well. I've got 2 extra fuel injectors in case they don't like the extra oil. If it all works out I'll end up plugging off the cylinder ports and run premix only, leaving the pump for the bearings. I've got a few things on my wishlist before I can call it "done", involving a new front tire and a new gold oring chain, and somewhere a new gold paint job.
I used basic geometry and a big compass for the main exhaust, but for the headers I used a cone layout program. I still had to scale it correctly, but was more or less trouble free. I finished up welding on both exhausts. I've devised a mount in the back that won't interfere with the rearsets or chain. It'll clamp onto the support bar between the frame. Two rods will extend to each exhaust with another piece to cradle them. I'll use a spring to retain them like I've done before.
Other than welding on hooks for the header, I'll be able to check it off the list:
And heres a comparasion, before and after:
Good news on the microsquirt. The guy found the package and determined that the board was faulty. I've got a new board that'll be in my hands on friday. After the exhaust is wrapped up, It'll be a quick fitting on the gas tank for the return and it'll be ready to start. Other than trans oil and 2 stroke oil. The oil pump is already primed and I'll be running 40:1 premix as well. I've got 2 extra fuel injectors in case they don't like the extra oil. If it all works out I'll end up plugging off the cylinder ports and run premix only, leaving the pump for the bearings. I've got a few things on my wishlist before I can call it "done", involving a new front tire and a new gold oring chain, and somewhere a new gold paint job.
crazypj
Split personality, I fake being smart
Re: '75 suzuki gt250...Electrical done, onto headers
I was going to say don't be too hasty to blame USPS, it wouldn't be the first time I've had someone lie about receiving stuff (or maybe just 'misplace' it, if I'm being kind)
joeschuit said:Good news on the microsquirt. The guy found the package
I was going to say don't be too hasty to blame USPS, it wouldn't be the first time I've had someone lie about receiving stuff (or maybe just 'misplace' it, if I'm being kind)
deepwaterimports
Over 1,000 Posts
Re: '75 suzuki gt250...Electrical done, onto headers
that after pic is killer man she looks great
that after pic is killer man she looks great
MotorbikeBruno
Over 1,000 Posts
Re: '75 suzuki gt250...Electrical done, onto headers
Hell yeah! And thanks for the info regarding how you made the exhaust pieces Joe. This thing only gets better as you go along!
deepwaterimports said:that after pic is killer man she looks great
Hell yeah! And thanks for the info regarding how you made the exhaust pieces Joe. This thing only gets better as you go along!
joeschuit
Been Around the Block
Re: '75 suzuki gt250...Electrical done, onto headers
I received the new microsquirt. After some communication troubleshooting I got the new unit working. I've gone through all the sensors and with the lathe acting as my rpm input, I've got the fuel pump running and injectors clicking. I've also got some work done on the exhaust mount. I started with the bracket that'll clamp onto the crossbar:

I used my slip-roll machine to bend up some 1/4" steel rod into a 4" diameter circle:

Here's what I've got so far:

And how it looks on the bike:


I'll finish up the welds and get some hooks on the ends for the springs. I still need to get the return line ran but that should be it. Maybe running by this weekend?
I received the new microsquirt. After some communication troubleshooting I got the new unit working. I've gone through all the sensors and with the lathe acting as my rpm input, I've got the fuel pump running and injectors clicking. I've also got some work done on the exhaust mount. I started with the bracket that'll clamp onto the crossbar:
I used my slip-roll machine to bend up some 1/4" steel rod into a 4" diameter circle:
Here's what I've got so far:
And how it looks on the bike:
I'll finish up the welds and get some hooks on the ends for the springs. I still need to get the return line ran but that should be it. Maybe running by this weekend?
")
MotorbikeBruno
Over 1,000 Posts
Re: '75 suzuki gt250...buttoning up the exhaust and efi
Very clever, and cool man. Nice job.
Very clever, and cool man. Nice job.
Re: '75 suzuki gt250...buttoning up the exhaust and efi
Kart guys have used a saddle and spring mount for a long time, but theirs are far less elegant. The exhaust really needs to be able to move a little as it grows and vibrates in use. On our race bikes we use a simple metalastic mount between the pipe and rear set mounts.
Kart guys have used a saddle and spring mount for a long time, but theirs are far less elegant. The exhaust really needs to be able to move a little as it grows and vibrates in use. On our race bikes we use a simple metalastic mount between the pipe and rear set mounts.
joeschuit
Been Around the Block
Re: '75 suzuki gt250...buttoning up the exhaust and efi
I'm now moving in the right direction. I finished up the rear exhaust mount. I found some good springs, but I'll need to double up to keep them from wiggling around.

I also made up a new fuel fitting for the 90 degree quick disconnect:


I ran into an issue with the fuel rail leaking around the braze, but that has been fixed. With a few little changes in the ignition settings I got it started. I've got both the oil pump and premix in the tank just to get everything lubed up. I'll drain the existing premix and fill up with straight premium after some more testing. All in all everything is doing its thing and I'm looking forward to this spring for testing and riding.
http://youtu.be/A7fONUsJQD4
I'm now moving in the right direction. I finished up the rear exhaust mount. I found some good springs, but I'll need to double up to keep them from wiggling around.
I also made up a new fuel fitting for the 90 degree quick disconnect:
I ran into an issue with the fuel rail leaking around the braze, but that has been fixed. With a few little changes in the ignition settings I got it started. I've got both the oil pump and premix in the tank just to get everything lubed up. I'll drain the existing premix and fill up with straight premium after some more testing. All in all everything is doing its thing and I'm looking forward to this spring for testing and riding.
http://youtu.be/A7fONUsJQD4


