76 KZ400 Cafe

mudchicken

Active Member
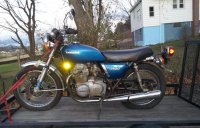
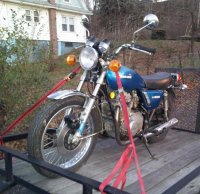
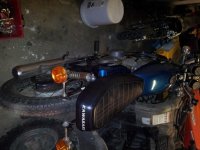
Well after searching high and low a buddy of mine pointed me in the direction of this clean lil KZ400. $350 with a clean title and the guy tells me it runs like a champ. Thats a little issue being it has no keys, but I have a set on order and already in the mail. That was my first issue to overcome. Key sets are like gold for these older bikes. But with that all taken care of I will be trying to do a budget cafe. I would like to keep the total cost between $1000-$1300 (not including paint) because the wife is really cracking down on my spending. My goal is to keep it clean and classy looking not to rat it out but not a show bike. Something that I can ride and looks good as well. Wish me luck!!
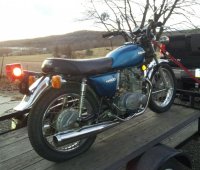
 

Attachments

  • small1.jpg
    small1.jpg
    116.7 KB · Views: 245
  • small2.jpg
    small2.jpg
    95.7 KB · Views: 249
  • small3.jpg
    small3.jpg
    85.2 KB · Views: 246
  • small4.jpg
    small4.jpg
    119 KB · Views: 233
Nice find. A KZ400 is definitely on my 'to-buy' list if I can ever find one around here. Looks to be in pretty good shape, so you're off to a good start. My bikes are always on a budget as well. I find it more enjoyable that way anyway, makes you get creative and practical. You should be able to easily get it done in your budget. I'll be following for sure.
 
You'll love it, I sure do love mine.

Here's my thread on the KZ Twins forum:
http://www.armbell.com/forum/viewtopic.php?t=16198&mforum=kz400

I'm about right at your budget right now (including initial bike cost), though I could have saved quite a bit by not buying things until I needed them (things like wheel bearings - turns out mine had already been replaced recently, steering stem bearings, carb rebuild kits - mine didn't need a new rebuild, just some cleaning and up one main jet size). I could have used some of that money for a new seat or something similar.

If you haven't joined the KZ Twins site yet, make sure you do - tons of info, group knowledge, and a lot of good people specific to Kawasaki twins and a big section on the 400s.
 
Well things are rolling, I got my key set Thursday and it works great. Picked up a new battery as well. I pulled the tank and put a load of bolts screws and washers in her and tossed it around a while. A load of nasty has been removed and it is now sitting holding 3+ gallons of vinegar. I will empty that tomorrow morning and do some more work on that. So I wanted to see if I could get her fired without any carb work but had no luck with that. Filled one carb with gas and the other is blocked wouldnt allow the gas to flow...tried getting it running anyway but no luck..think I need a new petcock too, mine is really rough so I will add that to the list of things needed along with the gold carb rebuild kits....damn things are $40 each, figures that I would get a bike with odd ball carbs and odd ball petcock... ::)...but I will continue to work on her. My bars and mirrors are on the way should be here middle of next week. Hope to have some updated pictures for that. Everyone have a safe and happy new years!! Will post more pics next year... ;D
 

Attachments

  • 2011-12-30 20_17_34.jpg
    2011-12-30 20_17_34.jpg
    48.4 KB · Views: 223
  • yummy good.jpg
    yummy good.jpg
    72.1 KB · Views: 211
In the past 4 bikes ive returned from the dead Ive never bought a carb kit. Just take em apart carefully and clean em!
 
ProSimex said:
In the past 4 bikes ive returned from the dead Ive never bought a carb kit. Just take em apart carefully and clean em!

I agree, don't bother with the carb kit until you've had it apart and see how it looks. Usually the parts are perfectly fine, just need to be cleaned. I usually only buy new jets if I'm changing the exhaust or intake. You may save yourself a bit of cash by investigating them first.
 
Same with the petcock, if it can be dissasembled great, if not just soak it and wiggle it about and blow air through it.
 
mudchicken said:
Yeah guess that would be the smart thing to do. I will pull them and go from there. I worry about the o-rings and gaskets since everything else is hard and rotted from sitting for so long. I will try anything to save from spending $80 for two carb kits that have more stuff than needed. ;)
Well the petcock is pulled apart but all the o-rings and gaskets are shot. Plus the screen is tore up from the PO who must have put a screw driver through it. Dont want a leaker in the garage...I dont mind having to spend some cash on her but dont want to spend on something that I only need an o-ring or gasket. ya know? Carb kit would be useless for most part.
 
Well just drained the vinegar for the first time. Drained it then added screws nuts and bolts again along with about 1/2 gallon of vinegar and shook it up some more. Drained it empty again removed nuts and bolts and refilled it to the top with more vinegar to sit overnight. The results so far are great, should come out really good till its all finished. The only thing im looking for is something to keep it from rusting until im ready to fill her with gas. I was thinking 2 stroke oil but not sure how long that will last. Any ideas??
 

Attachments

  • after.jpg
    after.jpg
    53 KB · Views: 213
  • before.jpg
    before.jpg
    51.9 KB · Views: 231
I had some time tonight and felt motivated enough to get some more work done. I pulled the carbs off to begin tearing them apart and give them a good scrub down. Well the old saying goes you cant judge a book by its cover.....that sure is true. From the outside they dont look that bad, yeah a little grimy but nothing that would scare me. So I decide to tear into them one at a time being this is my first set of Keihin's I have ever worked on (Mikuni seem to always come my way). So the first thing I do is get them into singles and pull the float bowl off. WOW what a mess the right one looked nasty but wasnt scared continued to tear it down. Wanted to pull the floats but had some issues with that so I moved on to save that for last. Well I get 99% of it apart and all that remains is the main jet and needle jet due to the fact that im afraid to try and pull it out. So I go to the float pin and its not moving....not even a little ???... so I get a small punch and try to tap it lightly....nothing. So I go with old reliable Kroil and spray it down to try and lube it up a bit, still nothing. So now im a little angry being I have never in my life worked on a carb that had the float pin seized in place. Most of the time these things just fall out (maybe I have been lucky). So after about 15 min of beating on this thing finally I get it out. I cant see the main jet coming out either due to the same reason. SO now its been a bit of time on this one carb and im getting ready to call it a night but my mind would not rest if I didnt at least peak into the other float bowl. What a mistake that was, that one is even worse it looks like its turning into a fossil. I know the bike is a 76 but hell thats what year I was born and I dont feel that old...damn!! So I have some pictures of how the carbs looked. I also took my petcock apart to show some pictures of that. The screen is cut but the other parts dont seem to be to bad. The gasket/o-ring is a stiff piece of plastic now along with the tank gasket but I may give it a shot. Anyone have any ideas if it will do the job or should I just get a new one? I dont want to fill the tank with gas to only have it leak all over the place. Maybe I test it with the vinegar I have in it now, not sure it that would be a good idea for the gaskets though. Thoughts??
 

Attachments

  • 2012-01-01 21_24_20.jpg
    2012-01-01 21_24_20.jpg
    46.4 KB · Views: 206
  • 2012-01-01 21_24_06.jpg
    2012-01-01 21_24_06.jpg
    42.6 KB · Views: 216
  • 2012-01-01 21_25_34.jpg
    2012-01-01 21_25_34.jpg
    55.6 KB · Views: 221
  • 2012-01-01 21_40_43.jpg
    2012-01-01 21_40_43.jpg
    43.1 KB · Views: 207
Some more pictures...
Also does anyone know how the main air jet and the slow air jet go in? Silly me thought they would be the same size and pulled the both out only to find two different size jets. What one goes where? I have the picture here showing the two in place. Any help would be greatly aprreciated.
 

Attachments

  • 2012-01-01 22_20_35.jpg
    2012-01-01 22_20_35.jpg
    54.4 KB · Views: 211
  • 2012-01-01 21_48_24.jpg
    2012-01-01 21_48_24.jpg
    47.8 KB · Views: 213
  • 2012-01-01 21_40_31.jpg
    2012-01-01 21_40_31.jpg
    47.3 KB · Views: 216
I used "The Works" toilet bowl cleaner. Just be careful because the tank will rust quickly because it will be bare metal on the inside when you are done. It is hard on paint too. The good part is that is is $1.79 at wal-mart.

mudchicken said:
Well just drained the vinegar for the first time. Drained it then added screws nuts and bolts again along with about 1/2 gallon of vinegar and shook it up some more. Drained it empty again removed nuts and bolts and refilled it to the top with more vinegar to sit overnight. The results so far are great, should come out really good till its all finished. The only thing im looking for is something to keep it from rusting until im ready to fill her with gas. I was thinking 2 stroke oil but not sure how long that will last. Any ideas??
 
This should answer your question about which jets go where:
http://www.armbell.com/forum/viewtopic.php?t=17218&mforum=kz400
 
MILLENNIUM FALCON said:
I used "The Works" toilet bowl cleaner. Just be careful because the tank will rust quickly because it will be bare metal on the inside when you are done. It is hard on paint too. The good part is that is is $1.79 at wal-mart.

Yeah thats what I used on my old 72 XS650 I built a while back. That stuff is crazy strong just a little less stable than vinegar.
 
I've resurrected carbs about that bad. Invest in a soda blaster and use it carefully. There's a thread on KZRider that shows you how to make one for cheap as long as you have an air source.
 
Not sure if anyone answered your question about sealing the tank but here is a great product that is pretty inexpensive and easy to apply.
http://www.caswellplating.com/aids/epoxygas.htm
 
Back
Top Bottom