78 Suzuki GS750 - cafe rebuild

sclark900

New Member
Picked her up on CL. Wouldn't start when I picked it up. After some troubleshooting, found it was the plugs. Fired right up upon replacement. Has 55k on the clock, and although it may/may have not of needed it, I'm doing a top end refresh. Mostly for the experience. Plans are for a pretty simple build since this is my first go at this: top end rebuild, carb rebuild, pods if it'll behave w/ them, chop rear frame and install hoop, cafe seat (Tuffside), new gauges, new signals, new harness, relocate battery, drag bars, then either paint or powder-coat the frame/wheels. Previous owner did the drab green paint job. Actually did a decent job of it. While I wouldn't chose the color, I may just stick w/ it out of simplicity. Ideas/thoughts/suggestions welcome!

Here's what she looked like on purchase day.

uc


The tear down process begins. Plan started simple: just remove the top bits, chop/weld hoop, reassemble and clean up elec.

uc


Found some funky wiring - gonna need to do more clean up than expected

uc


uc


Labeling the wiring harness prior to pulling it out

uc


Pre-frame chop

uc


Chop and grind

uc


The result

uc


The roughed out look w/ the Tuffside seat pre-hoop install

uc


Started w/ the idea of removing wheels to clean things up a bit. Forks were dirty so I figured it easiest just to remove them to clean up. Some whiskey and a cigar later, and this is what I ended up with.

uc


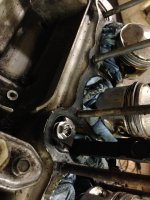
And some more whiskey and cigars + guys night in the garage, and we're on to a full top end rebuild!

uc


Now that I've opened that can of worms, I'm waiting for all the gaskets which have added up to more than the cost of the bike. Filling in the time w/ doing the frame modifications w/ the help of a good friend w/ welding experience

uc


Hoop on!

uc


Got the head mostly cleaned in anticipation of head gasket. What a PITA that was. Appreciate the forum tips for aiding in removal. Still have a bit more to go, but mostly done. Also doing some cleaning of the valves.

uc


uc


Next up is head reinstallation and full carb rebuild.
 
When you get into the battery relocation, if possible please take a few good pictures as I am working on a solution for my gs450 at the moment. Thanks
 
In the process of cleaning up the head to insure a clean surface for the head gasket. Problem - the old gasket is stuck on like glue. Anyone have any tricks to get old head gasket nastyness off? I know I shouldn't be using anything metal, but I have no idea what else might make this stuff budge. I've tried to soften w/ carb cleaner and mineral spirits w/ no luck. Also tried using a plastic scraper (the kind used to scrape wax from skis/snowboards). still nothing. Ideas?
 

Attachments

  • IMG_2214.JPG
    IMG_2214.JPG
    1.1 MB · Views: 324
They make a "gasket remover" spray but I have had limited success with it (its great for removing powder coat though) Don't be afraid to use a razor blade, just go slow and try to peel, not cut, the gasket off. Dull knives work good as well as they wont cut the aluminum as easily. I prefer to use scotch bright wheels or abrasive nylon wheels on a die grinder or drill. This makes a mess, so you need to be careful, you don't want that crap going into the cases.

Ps. i find that paper towels get oily and break down over time when you stuff them in engines, plus they leave fiber particles. Old plastic shopping bags are the way to go.
 
Great tips doc_rot. I'll replace the towels w/ plastic bags for sure. I'll go get myself a scotch bright drill wheel as well. Good idea. I also had someone suggest a straight razor (flat on one side, sharp on the other - similar to a straight shaving razor). May try that too. Appreciate the info.

doc_rot said:
They make a "gasket remover" spray but I have had limited success with it (its great for removing powder coat though) Don't be afraid to use a razor blade, just go slow and try to peel, not cut, the gasket off. Dull knives work good as well as they wont cut the aluminum as easily. I prefer to use scotch bright wheels or abrasive nylon wheels on a die grinder or drill. This makes a mess, so you need to be careful, you don't want that crap going into the cases.

Ps. i find that paper towels get oily and break down over time when you stuff them in engines, plus they leave fiber particles. Old plastic shopping bags are the way to go.
 
Between pauses on cleaning the head gasket, I decided to clean up some engine covers. Like the rest of this project so far, the scope of 'cleaning' escalated beyond original intentions of just getting it smoothed off a bit. A bunch of different grits of wet/dry sandpaper, some raw fingers, the purchase of a bench buffer, and several hours and a holy hell of a mess later, and I've gone from my original intent of a matte finish to full on mirror shine. One of these days I'll stick to the game plan.

uc


uc


I was going to replace the Suzuki emblem due to the scratches from what I assume was a parking lot drop, but after buffing it to a shine, I just may leave it and keep the character that goes w/ it.
 
That's a great question. I have no idea. I haven't really researched it much. I'm thinking a bit of steel wool and or Scotchbrite to clean it up? Or perhaps paint it a satin black or deep gunmetal grey. I'm wide open for suggestions.

Honestly though, before I go through too much more cosmetic work, I want to make sure this thing is actually going to start/run. I'm in over my head to be certain! The wiring harness is in sad shape and I'm in the process of rebuilding the carbs (another first for me). I think once I have that done and get the head back on the motor, I'm going to reinstall and test things out. If it's all good, I'll tear 'er back out and do the cosmetics. Glad I'm in no hurry!

mrmacioci said:
The covers came out great. What are you planning on doing to the block itself?
 
After a long delay, we're back in action! Got the head reinstalled and all nice new gaskets (OEM head gasket) a few months back and took a break to do some house projects. Finally got some time in the garage to put the swing arm, forks, and wheels on. Until I make sure she actually runs, I'm holding off on paint. W/ the help of some friends and some whiskey, we got the engine back in. Went in like butta! Upon further inspection of the carbs I found that the previous owner wasn't shining me on about having cleaned them recently. I cracked each open and they were all nice and shiny and varnish free. So for now, I'm holding off on replacing all the o-rings. Next up is finishing off installation of bits around the motor (stator, starter, engine covers), re-installing the carbs, and getting my controls worked out. W/ any luck, I'll be attempting to start her up by next month.

J1o9HdyMamxLb6gS8


uc
 
Back
Top Bottom