
We noticed you are blocking ads. DO THE TON only works with community supporters. Most are active members of the site with small businesses. Please consider disabling your ad blocking tool and checking out the businesses that help keep our site up and free.
You are using an out of date browser. It may not display this or other websites correctly.
You should upgrade or use an alternative browser.
You should upgrade or use an alternative browser.
'81 CB750C "Rock-It" (X-Basket Case)
- Thread starter Hoosier Daddy
- Start date
Hoosier Daddy
Earache my eye...

MotorbikeBruno
Over 1,000 Posts
Looking great so far!
Hoosier Daddy
Earache my eye...
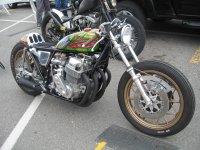
The rearsets comment was a lil tounge in cheek... (maybe). Now comes the point of a build I stand back and let it speak to me. I can think what style the bike wants to be. I can still progress with reassembling things like the harness and such while I let the juices flow. First comes the clean-up and install of the center stand... it will make things much easier. This engine installs from the side with a removable lower frame section and it would be a bitch with the side-stand only. And that alone will compress the forks a little. Right now both the front and rear suspension are at full extent of their travel. You can see in the pics I got it up on jackstands to raise it up for the wheel installation. So I am hoping it is skewing the profile.peteGS said:I think you'll need to seriously drop the front if you go rearsets... but of course that's just my opinion which is now worth nothing... 2 cent pieces removed from circulation so you need to round up/down to the nearest 5 cents... hahaha
Before anything final is decided I need to get the engine installed and down on her own weight. I can lower the triple trees on the front tubes with a little ingenuity to get the air forks hose to clear the top handlebar clamp / fuse box assembly.
I will probably be picking up a set of angled drag bars, not the straight broomsticks. They are cheap enough if you search, I found a set for about $20 shipped on evil-bay, knured, not drilled, no dimples. The straight ones hurt my wrists on long rides, that's why I want them off the 'oldWing Bomber. If I do pick up a new set for Bomber, I use these broomsticks for builds just to push rollers around the shop. I think I paid like $15 for them so it's no big loss.
Hoosier Daddy
Earache my eye...
Thanks Pal, it is appreciated. Was able to spend some time on her over the long new Years weekend. Epoxy coated the center and side stands and once cured mounted both. This allowed me to get her back on two wheels after who knows how long. Received the drag bars and was able to push her around the shop to get it loaded on the lift. NICE!
From there I worked on the rear brake linkage, polishing the chrome back to life. Not sure if using the stock lever or not but it sure cleaned up well.
Focus for a while will be on the engine, picked up all side cover gaskets last week and I stripped the PO's black paint off oil pan.
I will also be mounting assorted new bits I'v ordered when they start arriving.
Hoosier Daddy
Earache my eye...
Yep...this is the one. So far I am happy with my choice.
And yep again on MAD magazine...don't know what me remember Karbunkle the other day. 8) Sometime I want to go up in the attic and see if I saved them all these years. 'Twas funny stuff and pretty controversial at times.
And yep again on MAD magazine...don't know what me remember Karbunkle the other day. 8) Sometime I want to go up in the attic and see if I saved them all these years. 'Twas funny stuff and pretty controversial at times.
v-pilot
More Fun At The Ton!
Tifun said:HD, is your name Steve H by chance?
Keith
Prolly a question best asked in a PM ???
v-pilot
More Fun At The Ton!
Was checkin' it out back in Sept/Oct...not much happening then. Just thought I'd check back. Love those modular wheels. I know what it's like spending a month of Sundays polishing something, but it looks great in the end. Marvic/Akront made some for the Superlight 900ss for a couple of years in the early 90's...boy do I wish I could find a set. I'm polishing a lot of Aluminum for a Suzie LS650 cafe right now. Using most of the Ryca bits but goin' all bare Aluminum for the tins. Custom seat/tail and Manx style tank. Mostly ready for powder coat now. Tryin' to cut it to 280 lbs...we'll see how close I get.
Hoosier Daddy
Earache my eye...
Nope, not Steve H..... names Scott.
V-pilot: you got a build thread on that Zook?
Received the new carb insulators (boots), valve cover sealed washers, and air filter last night I ordered from vintagecb750.com, bar end mirrors and headlight retainer should be coming soon.
V-pilot: you got a build thread on that Zook?
Received the new carb insulators (boots), valve cover sealed washers, and air filter last night I ordered from vintagecb750.com, bar end mirrors and headlight retainer should be coming soon.
v-pilot
More Fun At The Ton!
Nope...wasn't sure anyone wanted to see another one of those "build by numbers" bikes. I don't have any tear down pics...only took 4 hrs to get to the bare frame. I can, if anyone's interested. I'll call it an AlumaRycaZuki. It'll be a while though as I'd like to have all the custom parts ready and engine work done first
Hoosier Daddy
Earache my eye...
I turned my attention back to the engine. Started out with the head that I already had cleaned and the valves lapped and installed a while back.

I cleaned, mic'ed, oiled and installed the shims and buckets. The PO had removed the cams when I got it so I have no idea what the valve clearances were. Plus, even though it didn't take much, after lapping the valves in I am sure I changed it a little. So I used my micrometer to get the shim sizes of the ones that were not marked to populate the DOHC Valve Shim Worksheet its base line measurements.
http://www.cb750c.com/publicdocs/DOHC_valve_worksheet.xls
I gave the mating surfaces a final wipe down, set the gasket in place and installed the head. Torqued in 3 stages to the final spec and then installed the front (exhaust) cam. Cleaning each piece to the point I was feeling a bit anal-retentive.

That's where I stopped for that night, went out the next morning rechecked all the timing marks and doubted myself on the front dot on the gear lining up to the top of the head, so I took it back apart and moved the chain one tooth down... WRONG, way too low. So I wound up putting it back where it was. Then finished it off installing the intake cam and the rest of the chain tensioners / guides.

I also got my new headlight retainer ring from speedmotoco.com. Seems the PO had some sort of issue and even though the stock bucket was in nice shape. He had a Vetter black trim ring with the reflector wood screwed in, Duct-taped to the factory bucket. :-\

Had my doubts when I saw it was an Emgo aftermarket piece but not to worry, assembled fine and fitment to the factory bucketwas spot on!

I cleaned, mic'ed, oiled and installed the shims and buckets. The PO had removed the cams when I got it so I have no idea what the valve clearances were. Plus, even though it didn't take much, after lapping the valves in I am sure I changed it a little. So I used my micrometer to get the shim sizes of the ones that were not marked to populate the DOHC Valve Shim Worksheet its base line measurements.
http://www.cb750c.com/publicdocs/DOHC_valve_worksheet.xls
I gave the mating surfaces a final wipe down, set the gasket in place and installed the head. Torqued in 3 stages to the final spec and then installed the front (exhaust) cam. Cleaning each piece to the point I was feeling a bit anal-retentive.
That's where I stopped for that night, went out the next morning rechecked all the timing marks and doubted myself on the front dot on the gear lining up to the top of the head, so I took it back apart and moved the chain one tooth down... WRONG, way too low. So I wound up putting it back where it was. Then finished it off installing the intake cam and the rest of the chain tensioners / guides.
I also got my new headlight retainer ring from speedmotoco.com. Seems the PO had some sort of issue and even though the stock bucket was in nice shape. He had a Vetter black trim ring with the reflector wood screwed in, Duct-taped to the factory bucket. :-\
Had my doubts when I saw it was an Emgo aftermarket piece but not to worry, assembled fine and fitment to the factory bucketwas spot on!
Hoosier Daddy
Earache my eye...
Yes, I have read that. Never hurts to verify though notlob, THANKS!! keep 'em coming.
MotorbikeBruno
Over 1,000 Posts
That head looks amazing! well done man.


