Follow along with the video below to see how to install our site as a web app on your home screen.
Note: This feature currently requires accessing the site using the built-in Safari browser.
We noticed you are blocking ads. DO THE TON only works with community supporters. Most are active members of the site with small businesses. Please consider disabling your ad blocking tool and checking out the businesses that help keep our site up and free.
oh man oh man have i had an ordinary day.
Im really hoping for some good news out of this haha
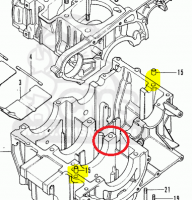
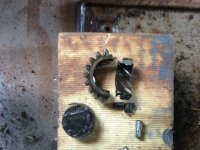
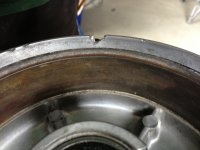
So i was applying plenty of heat to the area acm177 instructed, i then began to pry the cases with increasing sizes of screwdriver. I was doing really well until it didnt want to open up anymore, then crack. The top case cracks.
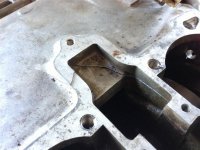
So i now have a cracked upper crank case, after looking at it for ages and many bad words i think that the bit circled in red is stuck or something because it does not seem to have opened up like the rest of the case.
Oh well another set back and lesson learned but not the end of the world.
Question is can it be welded? i wouldnt do it my self, id take it a welding shop. Or can i just JB weld it or something similar?
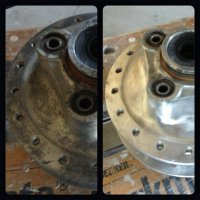
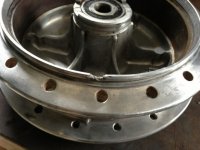
I also cleaned up the back wheel hub, after frustraion got the better of me on the engine haha.
pictures
Wow, thats nasty! I'd buy a new engine on ebay...You could try to weld it, but as its very close to gasket surface it would be hard to keep/get it flat again.. We (my gf and i) did a cb200 last year - here you go:
also, when a case cracks like that, it looks like you did forget a bolt somewhere? I'm going to split the cases on a spare cb200 engine very soon, as the kick spindle of the bike above is toast and i have to replace the complete kick axle. I'll make some pics and show you!
As did I bert, oh well. I didn't so much forget as didn't know it existed, the oil plug was seized in really well so I never removed it. The plan was to split the cases then work on it or drill it out. I got it out in the end with lots of heat and bashing it with the impact driver for about half an hour. Ridiculous.
Let it be a lesson to all those doing a 200 in the future, take note! haha. I'm in the process of getting a replacement case so all will work out in the end, although a less convenient and more expensive route.
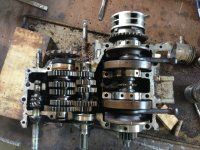
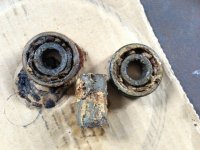
In the bottom of the case I found a small broken cog, I believe it's off the kick start mechanism? Please correct me if I'm wrong. Here are a couple of pictures:
Good luck with your build Desmobro!
All good deepwater I messaged you.
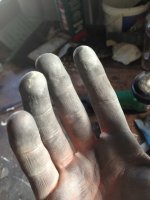
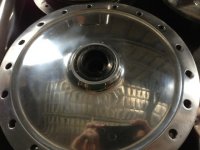
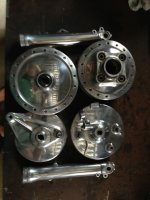
So after the engine debacle I've been working on cleaning and polishing the hubs and front forks, I will be polishing the engine side covers next. I brought a polishing kit from Bunnings warehouse. I stated out wire wheeling the hubs and forks to clean them up a bit, then sanded with progressive grits of sandpaper. Although I don't think I did this gradually enough, as there are still very fine scratches if you look closely. From a distance they look good which will do just fine for this build. After sanding I hit it with the course wheel and black compound, cleaned and hit it with the soft wheel and white compound. Worked well but took ages, also the black compound was tough to clean off properly the soft white wheel keeled turning black. Some degreaser and detergent sorted it out though.
Anyone know how to get out the fine marks from the buffing wheel? You can see it in the close up of the front hub.
Nar i didnt got to town with the wire wheel, i just cleaned all the grub off with it. It did leave a few marks which i noticed afterwoods and regreted a fair bit lol. But i sanded majority or them out. The marks left you can see on the left had side of the picture in the sort of sweeping motion across the light patch. They are really fine, like from one of the polishing wheels.
I didnt use any water for the sanding. What are the benifits of this? Also i sanded to 1200 grit
I would second the idea of using fine grits of paper when you're wet sanding. I take it up to 1000 grit, usually.
For aluminum I usually use a single pass of brown tripoli with a sisal wheel. Black emory has too much cutting action and the white rouge doesn't have enough. Also, if you're going to buff with more than one compound, it's good to make sure the part is nice and clean between switching between them. If you're looking for a mirror finish, use soap and water followed by a wipe down with acetone or denatured alcohol.
The last part I polished thoroughly looked like this when I started the sanding with 220 grit:
This after the 1200 grit:
And this after the brown tripoli:
A final pass with a fleece wheel (or maybe loose cotton?) and some red rouge would probably get the last of the scratches out.
Cool thanks Sonreir, that cover looks great! Im a noob when it comes to polishing, never done any. The kit i got came with the black and white compounds with a corse wheel (sisal wheel?) and a soft cotton kind of wheel so thats what i used. I might get some Brown compound if you recomend me too. When sanding with water do i just keep wetting the sand paper? How does it help the sanding process?
I was cleaning the parts with degreaser (seemed to remove most of it) then warm water and detergent, then rinse with clean water.
I think I'm probably up there with the slackest posters ever on DDT haha
Anyways some small updates.
I've painted my wheels satin black using calliper paint on them. I let them dry in the sun for about 3 weeks, so the paint is now getting nice and hard.
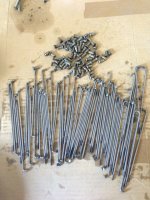
I cleaned, removed the rust with vinegar and polished my spokes. It took sooooo long and they aren't really extremely shiny. Which I kinda like, they just look cleaned up, not like new. Didn't want to fork out for new ones, and I think that they will fit in well with the polished hubs.
I also rebuilt my controls. Painted them the same satin black as the wheels and fixed the wiring.
I'm now in the process of cleaning all the old paint off the engine cases in anticipation of been able to paint them sometime soon. Before winter comes preferably, which will be soon in Australia!
More pics to come later today as I'm on my phone, but here are a couple of teasers.
Don't want to hijack this thread but if you are in Australia want not copy your work into the cafe racer Australia forum as well. Anything that gets more bums on racers has got to be good and it's a smaller market in oz for some reason good job with the 200. I recently built one up for a customer here in Brisbane and was pleasantly surprised at how well it went with basically very little engine work.
This site uses cookies to help personalise content, tailor your experience and to keep you logged in if you register.
By continuing to use this site, you are consenting to our use of cookies.


") good job with the 200. I recently built one up for a customer here in Brisbane and was pleasantly surprised at how well it went with basically very little engine work.
good job with the 200. I recently built one up for a customer here in Brisbane and was pleasantly surprised at how well it went with basically very little engine work.

