
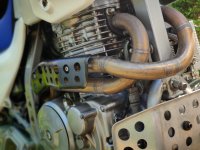
Doesn't look like your carbs will fit in frame like that. Is that just an illusion in the pic, or are those carbs pulled in really tight. they have to go outside the spine, especially with such long filters.
We noticed you are blocking ads. DO THE TON only works with community supporters. Most are active members of the site with small businesses. Please consider disabling your ad blocking tool and checking out the businesses that help keep our site up and free.
You are using an out of date browser. It may not display this or other websites correctly.
You should upgrade or use an alternative browser.
You should upgrade or use an alternative browser.
CBigBore 360 engine in the making
- Thread starter Nickel89
- Start date
cb250nproject
If you can make it better do so
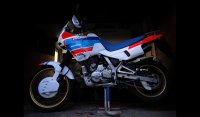
She looks pretty all buttoned up
Sent from my iPhone using DO THE TON
Sent from my iPhone using DO THE TON
All motorcycle frames have a spine, but I know what you mean. I got them mixed up.No spine on a 360. 350, yes, 360 gas outside frame loops and nothing down the middle.
Nickel89
N|E|R|D
Thanks, man!Yes, it looks really nice. Wish mine looked that good.
Vapor blasting, I tell you. If I could get on of those machines myself in the future, I effing will!
Nickel89
N|E|R|D
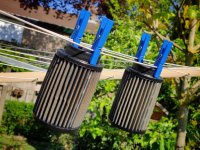
Filters need a good cleaning though!She looks pretty all buttoned up
Sent from my iPhone using DO THE TON
Going to have to start taking the old engine out, and figure out the simplest way to get this baby in.
Almost forgot I had these babies in the awnings ready to go on too Can't wait!
Nickel89
N|E|R|D
Forgot to post the picture with itFilters need a good cleaning though!
Going to have to start taking the old engine out, and figure out the simplest way to get this baby in.
Almost forgot I had these babies in the awnings ready to go on too Can't wait!
Attachments

Nickel89
N|E|R|D
Might get the 360'a old motor out this weekend. Been one hell of a busy week, so I might just lay low all weekend and regret it later
Few testbikes done, and in the off hours I've been getting the NX back to road worthiness. Needs a few more things done, but can't even get the tires up to pressure now.
Dropped the air compressor and sheered the head off
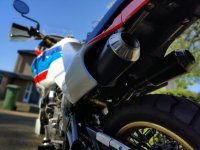
But she sure is pretty
Few testbikes done, and in the off hours I've been getting the NX back to road worthiness. Needs a few more things done, but can't even get the tires up to pressure now.
Dropped the air compressor and sheered the head off
But she sure is pretty
Attachments
Going to have to start taking the old engine out, and figure out the simplest way to get this baby in.
Engine in and out of one of these is relatively easy: Remove all but a couple of the motor mount bolts and leave those loose. The mount plates up at the top of the engine and the bolt up through the frame at the bottom front must be removed. Make sure all wires and hoses are disconnected. Put down some protection like cardboard or blankets on the floor and lay the frame and engine on the right side down onto it. Remove the remaining bolts and carefully lift the frame off the engine. Lay the new engine on its side, carefully put the frame down over it and put in a couple of the mount bolts. Tilt everything back up and put it all back together. If you are slow and thorough you can do it in just a few minutes by yourself and not scratch the paint on your frame or damage anything.
Nickel89
N|E|R|D
Yeah, that would definitely be the quickest way out and in, but I really don't feel like taking her back down to a bare frame againEngine in and out of one of these is relatively easy: Remove all but a couple of the motor mount bolts and leave those loose. The mount plates up at the top of the engine and the bolt up through the frame at the bottom front must be removed. Make sure all wires and hoses are disconnected. Put down some protection like cardboard or blankets on the floor and lay the frame and engine on the right side down onto it. Remove the remaining bolts and carefully lift the frame off the engine. Lay the new engine on its side, carefully put the frame down over it and put in a couple of the mount bolts. Tilt everything back up and put it all back together. If you are slow and thorough you can do it in just a few minutes by yourself and not scratch the paint on your frame or damage anything.
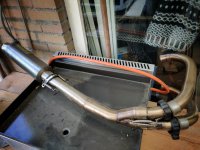
Took the headers and silencer off this evening. Quick scrub down, so it can go back on the new engine all shiny
Attachments
Yeah, that would definitely be the quickest way out and in, but I really don't feel like taking her back down to a bare frame again
Sure, you're welcome, glad to help.
Looking good, I'll be anxious to hear how it runs for you.
cb250nproject
If you can make it better do so
Looking good
Sent from my iPhone using DO THE TON
Sent from my iPhone using DO THE TON
Nickel89
N|E|R|D
Me too! Still need to bolt everything down to the frame right, but as a working from home lunch break activity, I hooked up my Dynatek coils. Charlie's Place brackets make fitting easy, but they're not spectacularly well finished. Might take the rough edges off.Sure, you're welcome, glad to help.
Looking good, I'll be anxious to hear how it runs for you.
Dyna Coils have been on the shelf for over a year. They should add a sweet bit of spark to it. Better still... The old coils' mounting bracket had snapped. The pressure from the bolts to the frame was the only thing keeping them together
Had a little bit of thinking on pressing a sinterbronze bush into the sprocket cover to support the shifter rod. Fun little experiment that makes no sense, but that's why I like it
Nickel89
N|E|R|D
Sure hope so, man!I like my Dyna coils. They're nice kit. They shoukd be a great upgrade for the big bore.
Small milestone moment; the sump plug is in!
Nickel89
N|E|R|D
What started out as a dumb idea, worked out perfectly. Pretty much useless and invisible, but also quite simple and mod.
Collared self lubricating bearing.

Had to open the case up to 16mm. Bit crude, but it worked just fine.

Speaking of crude... 

Bearing cost me 1,10 euro. Half an hour of fiddling and I'm way too happy with this. No play whatsoever and perfect action

Gonna get a few cans of oil and - obviously, why not?! ✌ - Iridium plugs tomorrow. Should be pretty much ready for a first start
Collared self lubricating bearing.
Had to open the case up to 16mm. Bit crude, but it worked just fine.
Speaking of crude...
Bearing cost me 1,10 euro. Half an hour of fiddling and I'm way too happy with this. No play whatsoever and perfect action
Gonna get a few cans of oil and - obviously, why not?! ✌ - Iridium plugs tomorrow. Should be pretty much ready for a first start
Sderbyshire
Into Sailing, classic Triumph cars and motorbikes.
First start, exciting..... we want video !


