
We noticed you are blocking ads. DO THE TON only works with community supporters. Most are active members of the site with small businesses. Please consider disabling your ad blocking tool and checking out the businesses that help keep our site up and free.
You are using an out of date browser. It may not display this or other websites correctly.
You should upgrade or use an alternative browser.
You should upgrade or use an alternative browser.
CL350 Brambler
- Thread starter Barnburner
- Start date
Barnburner
Coast to Coast
ericeldridge said:sorry if this is a dumb question, but how did that new tank work out? is it longer or shorter than the 71 tank?
New tank is definitely longer and somewhat differently shaped - both good things IMO. It fits in the rubber tank mounts up front perfectly, but the bars hit it so I have it set back about an inch. I haven't finalized the rear tank mount but it shouldn't be too hard to make work.
Barnburner
Coast to Coast
fuchs said:nice build to far, last mockup looks great imho.
What air filters do you use? do you have a close up shot?
Did you already ran with that setup?
Thanks, fuchs. The filters are K & N Part #RC-1280. They are 48 mm ID and have a 10 degree offset flange so they kick out a bit. I bought them as K & N Part #RC-1289, which includes a pair of RC-1280s and a pair of RC-1290s (same size but tapered). I ran the bike with them a bit and they seemed fine, but my jetting was a bit off because of them and because I cut off my stock mufflers.
Barnburner
Coast to Coast
Yeah, they're still stock - primary main jet is 70, secondary main jet is 105. I definitely will be swapping them out though once the bike is back up and running. A lot of people have dealt with jetting the 350s for pods, so I'm sure you can find the correct jet #s on here somewhere.
Barnburner
Coast to Coast
Sometimes I feel like I am taking too long to build this bike. Then I get a part I've been debating about buying for a while and it feels right and I'm glad I took the time to deliberate. This is one such part. I got this sweet Aris-style triangular headlight for the Brambler and fabbed up a quick mount for it using angled aluminum.

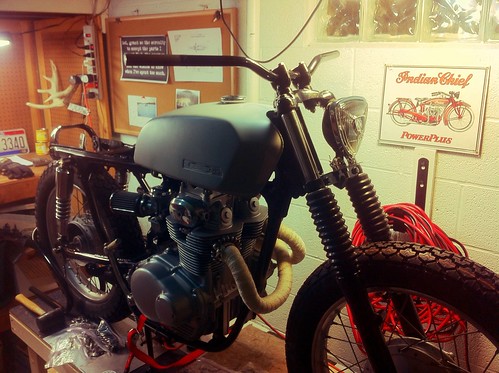

Figuring out where to stash the wiring will be a bit of a chore but, fuck it, I'm happy and one step closer ;D
Figuring out where to stash the wiring will be a bit of a chore but, fuck it, I'm happy and one step closer ;D
Barnburner
Coast to Coast
Rich Ard said:Does it take a 'real' headlight bulb?
I guess you could say that. It has a weird 55W mini-bulb.
Barnburner
Coast to Coast
Sure thing! I Picked it up from Lowbrow Customs (http://www.lowbrowcustoms.com)
Barnburner
Coast to Coast
Finally getting back at this one. I've been pretty busy with work this year so I haven"t had too much free time to finish getting everything back together. I also noticed that it takes about 1 x 10^100 times as long for me to make a decision with this bike (compared to my ratty CL175). I think since I decided to do things up right it just doesn't make sense to put any ol' part or half rusty bolt back on. So, with that said, let's dive in.
Thanks to some generous family members and a recent birthday, I got some nice bits to help me finish.

Pictured is a pair of universal EMGO coils, petcock, 530 chain, NOS footpeg rubbers, throttle tube, Dynatek plug wires and NGK resistor caps, jackhammer grips, horn and vacuum tuning adapters. They're sitting on a new parts washer I got as well. I plan on modding the parts washer to add an external oil filter and a better brush (like DTT member Swan did here http://www.dotheton.com/forum/index.php?topic=45077.0)
Since I last posted I haven't done much to the bike, except make a fiberglass seat. I wanted to keep the tracker look but I didn't think the typical flat tracker seat would do it for me. For one thing, I wanted to try and hide the CL's square frame rails and weird back end without chopping it all off. So, I made a cardboard mockup using some leftover Cinnamon Toast Crunch boxes and some foil tape and came up with this:

Glassing went pretty well. It was my first time using fiberglass so there was a bit of a learning curve. I doubt my part has the strength of a professional made one (and certainly not the finish but it fits the frame perfect so I'm happy with it.


For some rigidity, I molded in a small sheet of steel in between the layers of fiberglass that runs from the rear of the flat seat portion up the curve and along the top of the hump. After a but more bondo and some filler primer it turned out pretty well IMO:


In that last photo you can also see the aftermarket fork brace I picked up off eBay. With the larger Dunlop K70s I could no longer run the stock front fender, and even the fender's attached brace was a bit too small. After talking with the eBay seller who offers these, I learned that it was meant to be mounted offset to the front or back. I chose the front but am not settled on it yet. I still am debating making my own so that I can tuck it in between the forks. Something like this would be ideal for me:

I've gotten a bit more done since then so I'll probably do another update later today. Stay tuned.
Thanks to some generous family members and a recent birthday, I got some nice bits to help me finish.
Pictured is a pair of universal EMGO coils, petcock, 530 chain, NOS footpeg rubbers, throttle tube, Dynatek plug wires and NGK resistor caps, jackhammer grips, horn and vacuum tuning adapters. They're sitting on a new parts washer I got as well. I plan on modding the parts washer to add an external oil filter and a better brush (like DTT member Swan did here http://www.dotheton.com/forum/index.php?topic=45077.0)
Since I last posted I haven't done much to the bike, except make a fiberglass seat. I wanted to keep the tracker look but I didn't think the typical flat tracker seat would do it for me. For one thing, I wanted to try and hide the CL's square frame rails and weird back end without chopping it all off. So, I made a cardboard mockup using some leftover Cinnamon Toast Crunch boxes and some foil tape and came up with this:
Glassing went pretty well. It was my first time using fiberglass so there was a bit of a learning curve. I doubt my part has the strength of a professional made one (and certainly not the finish but it fits the frame perfect so I'm happy with it.
For some rigidity, I molded in a small sheet of steel in between the layers of fiberglass that runs from the rear of the flat seat portion up the curve and along the top of the hump. After a but more bondo and some filler primer it turned out pretty well IMO:
In that last photo you can also see the aftermarket fork brace I picked up off eBay. With the larger Dunlop K70s I could no longer run the stock front fender, and even the fender's attached brace was a bit too small. After talking with the eBay seller who offers these, I learned that it was meant to be mounted offset to the front or back. I chose the front but am not settled on it yet. I still am debating making my own so that I can tuck it in between the forks. Something like this would be ideal for me:

I've gotten a bit more done since then so I'll probably do another update later today. Stay tuned.
Scruffy
West Tennessee
My 63 CL72 had an aluminum offset fork brace when I got the bike. It was, shall we say, crap-tastic... It cracked at some point in the bike's history. Went from a stock Scrambler, to a CB header equipped TT racer, to a who knows what with crappy heavy cafe racer tailpan, to a fire road beater. I'm planning to make a brace like in your lower picture. And keep the TT style pipe set up.
I like where you've gone with your bike so far.
I like where you've gone with your bike so far.
Redliner
Over 1,000 Posts
Working on a CL as well.
I like the way this is coming out, every detail of it. That seat bump is more of a duck-tail which is normally reserved as a fender eliminator for larger bikes. Nice.
Good work with the fork brace, but it would be a shame to sand-blast the finish off of that motor with road dust
Any rusty bits you have left over that you plan to replace with new? To be honest, if I had the bike I have now back when you began, I would have swapped the nearly pristine pipes for your rusted ones. My build is an ugly one...
Barnburner
Coast to Coast
Thanks for the comments, gents. Scruffy, any build threads on the CL72? Sounds like a mean machine. The CL pipes are staying but if I get ambitious I may try and find someone to fab up a 2-1 manifold for me. From everything I read these twins can pick up some power with a 2-1 as opposed to 2-2. Good eye on the tail, Redliner. I definitely had a kz1000 duck tail in mind when I was making the buck for this seat. I actually wanted to do a little flip up in the back but found it hard to mock up. Also a good point about road dust ruining the engine paint. I'd like to run a front fender but I'm not sure if anything stock would fit between the tire and the forks b/c there's very little clearance there. If I notice a problem in the future I may glass up a small fender to mount to the fork brace and see if it helps out.
Redliner
Over 1,000 Posts
BarnBurner said:I definitely had a kz1000 duck tail in mind when I was making the buck for this seat.
That's what first came to mind. I always refer to the Big Kaws' tails when somebody wants me to build a "highway killer".
Why not mold something up now before you finish the brace so that you won't ruin any finish etc.? I've seen SL350 fenders that were plastic. They of course mount to the triple, but it shouldn't be hard to Dremel it to mount to the fork lower. Hell, might even use the existing holes and mount it to the brace you have.
Whatever, it looks good mate!
Scruffy
West Tennessee
Naw, no build thread, it's an eyesore. I got it for better than free, buddy gave me $20 for gas to get it from his garage. Had it running shortly there after, only to have something internal lock it up tight. Engine is out, working on the chassis and suspension overhaul right now. If I get it running, my Dad's best friend from when they were kids had a CL before they shipped off to 'Nam. Tim died over there, so kind of building it how his was. Tried to have it done for my Dad's 50 year high school reunion, but moved cross country a couple years ago and the bike got pushed to the side.
For all I know, it could have been the same bike. CB header pipes, fender delete, key delete, trim delete, brush painted flat black... from the Seattle area. With quilted vinyl kneepad covers.
For all I know, it could have been the same bike. CB header pipes, fender delete, key delete, trim delete, brush painted flat black... from the Seattle area. With quilted vinyl kneepad covers.


