Hey alzcbz, thanks for the help. The battery was actually fully charged every time I tried to start it, but at full charge it was only showing 12.6v on my multimeter. I had it load tested at autozone last night and they said the battery was fine. I thought 12.6v after full charge was normal, but is that low?
We noticed you are blocking ads. DO THE TON only works with community supporters. Most are active members of the site with small businesses. Please consider disabling your ad blocking tool and checking out the businesses that help keep our site up and free.
You are using an out of date browser. It may not display this or other websites correctly.
You should upgrade or use an alternative browser.
You should upgrade or use an alternative browser.
cl360 clicks but wont start
- Thread starter hillset
- Start date
alzcbz said:The charging systems on these bikes is marginal, at best. No charging below 2000 rpms.
+1, I meant to ask...its not a Lithium battery is it?
Nope its a Yussa lead battery. I got the starter back on tonight and the battery hooked back up, just need to get the right exhaust hooked back on (I took it off to drill out the stripped screw) and I'll be able to test it in the morning.
For what its worth, if anyone's reading this and thinking about taking their starter motor off, I realized it's alot easier to put back on if you put the two long screws on first and tighten them to the left case before adding the two short bolts to the front of the case. I realized I didn't get a good seal attaching the starter motor to the case until the two long screws were tightened in, and only then could I put the two shorter bolts in.
Also, I replaced the shorter two bolts with allen bolts from the hardware store and used locktite blue on them when I put the starter back on. Hopefully that holds, but I have some locktite red sitting around in case the blue fails.
Ok so I have an update that I'm almost embarrassed to post...
First things first, I got the exhaust back on and tried to start it again, same thing as always. Battery was fully charged, but just got a single click from the solenoid. Nothing else.
Then I realized that I thought I had tested the volts going to the starter motor but I actually hadn't. I was going to get a pair of alligator clips for my multimeter to test it to make it easier but I haven't been able to find them. So I tested the volts going to the starter, and I'm getting 0.01v with the multimeter set to 20v, so I'm guessing that means no volts are going to the starter - DOH!
So then I measured the volts at the solenoid again. The terminal getting power from the battery showed 12.5v so I'm assuming theres no interruption between the battery and the solenoid, and I know the battery is good. BUT when I measured the volts at the other terminal with the start button pressed, I get 0v.
So I tried the screwdriver across both posts trick again and still got no sparks, which confused me. But I realized the solenoid posts are pretty rusty, so I tried the screwdriver across both posts again BUT I ran the screwdriver between the connections to the posts instead of the posts themselves and boom - got a small orange spark. So at this point I'm thinking the solenoid is bad.
I took off all of the attachments from the solenoid and decided before I hop on eBay and buy a new solenoid I would just give them a quick clean and see if anything changes. I sanded down and oiled all of the metal connections and nuts / washers, and even opened up the solenoid to inspect the magnet (it looked good, no obvious corrosion or wear). Then I put the solenoid back on the bike, got everything hooked back up, and when I hit the start button I finally heard the starter motor!
The bad news is it wasn't a nice rev of the starter motor followed by the rev of the engine, it was like a winny from a dying horse followed by no spark at the engine. I tried the kickstarter and it was jammed, and I immediately got worried that I had put the starter motor on incorrectly and I was damaging the starter clutch gears. So I pulled the starter motor off and thankfully the gears look fine, BUT based on trek's comments about the sprocket and chain, I'm worried that I didn't put the starter motor on correctly.
If someone could give me some guidance on how to attach the starter motor properly I'd really appreciate it. OR if you think the issue could be something else I'm all ears. Thanks again for the help everybody, sorry for the novel of a post but I'm glad the stator is at least in better condition that it was this morning.
ha, good but ugh.
Is the chain still on both sprockets inside there?
Pgs 45-46 in the Honda workshop manual. (section 4) I sent the link to.
Dont loose any of the small parts that make up the clutch cable lever. It has a single small ball bearing that tends to get lost easily. It can simply fall out.
Follow the instructions...
Except as long as the starter clutch sprocket on the crank shaft spins free one way and locks up tight the other. You DONT need to remove the rotor, starter clutch or sprocket from the crank shaft.
If the eccentrics. (little pins, roller or springs inside the starter clutch) are jacked up. then you will need to remove all that stuff...and its kind of a bitch to get back together. Ok it can be a real bitch to get back together.
Ok great, thanks for showing me the pages that show the disassembly.
So basically, I'm removing the gear shift pedal and the exhaust, then removing the left crank case cover.
Then I'm removing the stator to get at the starter sprocket / chain / starter motor sprocket.
But since the starter clutch is currently turning one way freely and not turning the opposite way, I'm not removing the rotor, starter clutch, or starting sprocket (basically leaving everything on the crankshaft and pulling everything on the starter side?)
How do I get the starter motor sprocket off (number 1 on figure 4-44 on page 46) if I'm not removing the starting sprocket (number 3 on figure 4-44 on page 46) that its attached to? Should it just slide off even though its attached by the chain to the starting sprocket (number 3)?
Once I get the starter motor sprocket off, should I just tap the roller and starter clutch through (like in step 8) and then basically assemble the clutch onto the starter before I reassemble?
One last dumb question, do I need to drain the oil before I open the crank case? My oil plug is seized, so if I need to drain the oil, is my best bet just to slightly crack the crank case and let it drain out on its own?
Sorry for all of the questions, just want to make sure I know what I'm doing before I open it up so I don't make any more stupid mistakes. Thanks for all the help man I really appreciate it.
Attachments

hillset said:How do I get the starter motor sprocket off (number 1 on figure 4-44 on page 46) if I'm not removing the starting sprocket (number 3 on figure 4-44 on page 46) that its attached to? Should it just slide off even though its attached by the chain to the starting sprocket (number 3)?
Once I get the starter motor sprocket off, should I just tap the roller and starter clutch through (like in step 8) and then basically assemble the clutch onto the starter before I reassemble?
One last dumb question, do I need to drain the oil before I open the crank case? My oil plug is seized, so if I need to drain the oil, is my best bet just to slightly crack the crank case and let it drain out on its own?
Sorry for all of the questions, just want to make sure I know what I'm doing before I open it up so I don't make any more stupid mistakes. Thanks for all the help man I really appreciate it.
Ok, now Im a bit confused. you have already pulled the starter off the engine and reinstalled it correct?
If youve pulled the starter off the engine.
Did the small sprocket come off w the starter? It seems it would have slipped off the starter shaft and remained inside the case w the chain still on it. I would have thought theres even a possibility the small sprocket would have slipped down inside the case w the chain. Its been a while since I had that stuff apart.
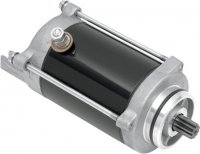
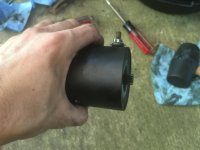
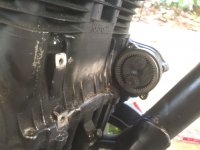
Yes I pulled of the starter and its currently off (I took it off today thinking I put it on incorrectly) - on the end of the starter is a small gear (the starter off of the bike currently looks like the picture I attached, i think this is called the rotor?), and on the crank case are two gears that only rotate one way (the starter clutch, right?)
The sprocket didn't come out with the starter (that's a bigger gear with wider teeth than the one in the attached picture, right?), so I'm guessing that's probably sitting in the crank case? Either way, you think the best bet is to open the crank case and just make sure everything on the starter clutch (like the sprocket and chain) is in properly?
From looking at the parts diagram, it looks like the sprocket attaches to the rotor on the inside of the crank case, right? So you're saying when I pulled the starter off, the sprocket probably fell off into the crank case and needs to get put back on?
Sorry for being so simple, just want to make sure I really understand what I'm doing before I get into the crankcase tomorrow.
Also, any thoughts on the oil draining from my previous question? Thanks again for the help Trek.
Attachments
Yes, Im sorry, the small sprocket has slipped off the end of the starter shaft inside the case. You will have to open the case. to slip it and the chain back on. And Im not sure exactly what your meaning when you say 2 gears. Theres really no gears in there at all. only the smaller starter motor shaft sprocket and larger crank shaft sprocket.
You will find on installation the starter chain is a bit loose...this is normal.
Also, Im not sure exactly how much oil will come out when you crack the cover off the case. I had mine drained. Just in case place a pan that can hold 2 quarts under it to catch any that comes out.
If you could post pics that may help.
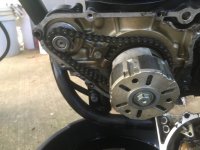
Ok - I got the crank case off and checked the sprocket. It was actually still on the rotor and chain so I think everything is good there. I slipped it off just to inspect it and put it back on, didn't see any damage. I've attached a picture of the left crank case open in case there's something I've missed.
So the starter is off (second picture), and the rotor sticking out of the starter has to fit into these two gears (third picture). The only problem is, every time I try to slide the starter motor into place, the rotor on the end of the starter motor doesn't slip in between the two gears and engage them. Since I have the crank case cover off, I'm able to test the rotor is engaging the two gears by slightly pulling the chain connected to the starter motor sprocket inside the left crank case. Every time I think I have the starter motor in place, the chain won't pull and I think the rotor is just sitting on top of the two gears, not actually engaging them.
So my question is, how do I properly attach the starter motor so that its engaging the two gears on the third picture?
Attachments
Yeahhhh just realized what I did. After not seeing those two gears on any of the parts diagrams, I started wondering if the whole assembly needed to come off. Those two gears are held in the cap for the starter motor. Turns out it was stuck on the case and I never pulled it off with the starter motor. When I pulled the whole thing off, the sprocket fell off so its a good thing I went ahead and opened the crank case anyway (plus its been a good learning experience).
I just got everything back on. I'm about to finish scraping off the rest of the gasket that came off when I opened the crank case and put a new one on (I'm pretty sure I have one sitting around). Then I should be able to put the cases back on and fire her up (hopefully).
One question before I test her again - how much oil should I add? I've read two quarts is good for an oil change, but since I didn't technically drain the oil (just let whatever was in the crank case come out), should I add a little less, like 1.5qt? Or should most of the oil be out now that the crank case has been opened (and I should go with 2qt)?
Ok, good news and bad news.
The good news is I got the 2 quarts of new oil in and got the starter to engage. Heard the engine chug and try to start, and after about 4 or 5 tries she finally fired up. Ran her in neutral for about 30 seconds and when I finally let off the throttle she died (the PO added Mikuni carbs with pod filters and the bike has always had idle problems since. I had her rejetted last summer and they said they tested it on the dyno, but I always have to keep a little bit of throttle on or else she dies).
When I tried to start her a second time, the bike kept chugging and sounding like it was going to start, but never got spark. At one point it sounded like it was about to start but backfired and died immediately. A couple of times I almost got it to start with the kickstarter but I could never get it back to spark.
Any ideas what could be causing the rough / no start? I was thinking about going to get two new sparkplugs tomorrow just to try those out, but I have a feeling the issue is in the carb. I'm definitely not an expert at tuning carbs, especially aftermarket carbs with individual pod filters (I've heard these are especially hard to tune). I'm definitely willing to put more work in, just want to know what I need to do to get the bike tuned up to the point that she'll start on the first push / kick.
Thanks for the help everyone.
Good news! 8)
You work too fast...seems I dont get the chance to help answer questions until after youve already done the work. LOL :")
did you check the oil level w dipstick...parked on center stand. Dipstick not threaded in. (just sitting on top of threads)? What kind of oil did you put in. Clutches are pretty dang sensitive. I only use Rotella T6 synthetic, 5w40, comes in the Blue bottle. Available just about anywhere. A lot of oils including those made for newer bikes are too slippery.
And I know nothing about mikuni carbs. Only Keihins that came factory on 360s. So, I would suggest finding some adjusting info on the models you got. But, it sounds like an Air/fuel mixture adjustment + idle adjustment. She was designed to idle at 1200rpm w factory carbs. Like I said I dont know what Mikuni designs them to idle at.
Plugs may be fouled.
But keep going...
You work too fast...seems I dont get the chance to help answer questions until after youve already done the work. LOL :
did you check the oil level w dipstick...parked on center stand. Dipstick not threaded in. (just sitting on top of threads)? What kind of oil did you put in. Clutches are pretty dang sensitive. I only use Rotella T6 synthetic, 5w40, comes in the Blue bottle. Available just about anywhere. A lot of oils including those made for newer bikes are too slippery.
And I know nothing about mikuni carbs. Only Keihins that came factory on 360s. So, I would suggest finding some adjusting info on the models you got. But, it sounds like an Air/fuel mixture adjustment + idle adjustment. She was designed to idle at 1200rpm w factory carbs. Like I said I dont know what Mikuni designs them to idle at.
Plugs may be fouled.
But keep going...
Haha...i have a few days off (which I haven't had in a long time) so I'm trying to be efficient and get alot of work done on the bike.
I checked the dipstick and it looks like I overfilled it a little too much. The oil fills the whole flat part of the dipstick (above the top line) with the motorcycle centered and the dipstick sitting on the threads but not screwed in.
Since the oil drain plug is seized, I'm going to open the bottom of the crankcase cover tomorrow and just let some of the oil drain out. I'll recheck the dipstick and add a little bit of oil, recheck, etc. until its good. I've read that overfilling the oil can cause the bike to not start so maybe that's it?
I used 10w-40 (that's what the oil cap said), non-synthetic motorcycle specific oil:
http://www.ebay.com/itm/like/151951540483?lpid=82&chn=ps&ul_noapp=true
It's JASO certified which I figured was a good sign for an older Japanese bike. I've seen other threads where oil type preference can start wars so I'm not trying to open pandora's box, but is this oil alright for the bike?
Is the best / only way to drain the oil without being able to open the plug to open the crank case cover and let some drain out, or is there a better way I'm not thinking of?
Ive only run the Rotella so no experience w anything else. but I would get it out if you notice clutch starting to slip.
Or open the smaller round rotor cover on the left side w 3 bolts...and simply tip the bike a bit. It will run out.
http://www.amazon.com/Lincoln-Lubrication-615-oz-Suction/dp/B0002SRJCM/ref=sr_1_4?ie=UTF8&qid=1464918334&sr=8-4&keywords=oil+sucker
Or simply get a length of the largest diameter hose that will fit in the dipstick hole and use the ole thumb over the end trick to dip it out.
Trek - Sorry its taken me so long to update the post, I've been pretty busy working on the bike. After the last update, I decided I had enough of that oil drain plug, went to harbor freight and bought a 25" breaker bar + a 17mm impact socket, and busted it off that night ;D
I drained all the oil and decided to clean the filters, so I took off the right crank case cover, cleaned the screen and centrifuge filters, put a new gasket on, and sealed her back up.
Today, I took the alternator cover off and set the points (first time setting points on a bike so I wanted to take my time and learn to do it right, my previous bike had an electronic ignition).
I also went out and got new plugs (NGK B8ES) + new oil (the rotella T6 5w40 you suggested). The bike took ALOT of oil (about half of the big bottle that I got), but I added it slowly and made sure the oil level came up to pretty much exactly on the halfway line on the flat part of the dipstick, so I think shes good. If not, at least my oil plug isn't seized any more.
Then the moment of truth, hopped on, said a quick hail mary, and fired her up! After a few cranks, I got her to fire up and ran her for about 30 seconds. Then at idle, the engine revved and died :-\ BUT, I realized I had the petcock off...haha. Once I turned the petcock on, she started two more times on the first push! Knock on wood I think she's good to go!
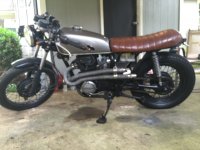
Thanks again for all of the help man, I couldn't have done it without you and the other people who helped me on the board. Seriously appreciate it. I attached a pic of the whole bike.
One last question: one of the big projects I want to do this summer is rebuild the forks. Right now, they have pretty much no give, and it makes riding a pretty bone crushing experience. I feel like I can follow the instructions in the service manual you gave me, but I'm not sure whats the best way to prop the bike up to get the forks off. I've read about some people using a car jack under the engine to lift the bike, but I'm not sure that's going to be stable enough for me to work from? Especially if one of the bolts is hard to get off and I really have to give it some force. I've also read about some people attaching straps from a hook in their roof, but my bike sits in a carport and I'm not sure the roof would hold the weight. Any ideas?
Thanks again for all of the help man.
I drained all the oil and decided to clean the filters, so I took off the right crank case cover, cleaned the screen and centrifuge filters, put a new gasket on, and sealed her back up.
Today, I took the alternator cover off and set the points (first time setting points on a bike so I wanted to take my time and learn to do it right, my previous bike had an electronic ignition).
I also went out and got new plugs (NGK B8ES) + new oil (the rotella T6 5w40 you suggested). The bike took ALOT of oil (about half of the big bottle that I got), but I added it slowly and made sure the oil level came up to pretty much exactly on the halfway line on the flat part of the dipstick, so I think shes good. If not, at least my oil plug isn't seized any more.
Then the moment of truth, hopped on, said a quick hail mary, and fired her up! After a few cranks, I got her to fire up and ran her for about 30 seconds. Then at idle, the engine revved and died :-\ BUT, I realized I had the petcock off...haha. Once I turned the petcock on, she started two more times on the first push! Knock on wood I think she's good to go!
Thanks again for all of the help man, I couldn't have done it without you and the other people who helped me on the board. Seriously appreciate it. I attached a pic of the whole bike.
One last question: one of the big projects I want to do this summer is rebuild the forks. Right now, they have pretty much no give, and it makes riding a pretty bone crushing experience. I feel like I can follow the instructions in the service manual you gave me, but I'm not sure whats the best way to prop the bike up to get the forks off. I've read about some people using a car jack under the engine to lift the bike, but I'm not sure that's going to be stable enough for me to work from? Especially if one of the bolts is hard to get off and I really have to give it some force. I've also read about some people attaching straps from a hook in their roof, but my bike sits in a carport and I'm not sure the roof would hold the weight. Any ideas?
Thanks again for all of the help man.