Come See My Woody! (1979 CB400Ti) ***FINISHED*** (for now ;))

Re: Come See My Woody! (1979 CB400Ti)

...and you can create something truly custom for your bike. Like layering more fiberglass on the lower/center/side and molding it to better fit with your side frame rails/side panels. Otherwise you will have a tapered gap between the seat/rear frame and a funny, rounded gap that will look poor or you will need to fill with some other panel(s).
 
Re: Come See My Woody! (1979 CB400Ti)

zap2504 said:
...and you can create something truly custom for your bike. Like layering more fiberglass on the lower/center/side and molding it to better fit with your side frame rails/side panels. Otherwise you will have a tapered gap between the seat/rear frame and a funny, rounded gap that will look poor or you will need to fill with some other panel(s).

I wanted to create as straight a line as I could with the gas tank, it's kind of hard to see in the mockup, but I plan on cutting come aluminum side panels to bolt onto the side that will address the issue you speak of, they will be covered with Di-Noc Carbon Fibre Vinyl to tie in with the signals and also kind of disappear in black visually.
 
Re: Come See My Woody! (1979 CB400Ti)

The seat is 95% complete! I finally got it to the primed stage, I just have to wet sand it and fix any small issues like drips or small ticks. It took a looooooot of man hours to get it to this point, and it's ain't perfect, but luckily the part that is a bit lacking will be covered by the seat pad. Sanding that inner butt bump radius was a real pain in my butt bump radius.

My advice to others doing this for the first time... don't add the small hose line to create a pocket for the seat like in the Dime City video... it really is more trouble then it's worth. If I did do it again I'd do it without it, and I don't think I'd loose any style points either.

I think I'm going to create an aluminum sub plate that will bolt to the bottom of the seat. It will slip in the front bracket by the gas tank and have the latches bolted to it. That I think will be my best bet.

As for the pad, I'm thinking I'm going to cover the seat in tin foil, lay a couple layers of fibreglass on top of that, and create my pan for upholstering. Probably just go industrial strength Velcro to keep it on... anybody see any potential problems with my plan?

Here's what it looks like primed... OH! And I got the muffler put together and wrapped!
 

Attachments

  • photo 4-6.JPG
    photo 4-6.JPG
    172.3 KB · Views: 565
  • photo 2-6.JPG
    photo 2-6.JPG
    123.8 KB · Views: 561
  • photo 1-6.JPG
    photo 1-6.JPG
    65.3 KB · Views: 545
  • photo 3-6.JPG
    photo 3-6.JPG
    75.7 KB · Views: 480
  • photo 5-5.JPG
    photo 5-5.JPG
    72.5 KB · Views: 493
Re: Come See My Woody! (1979 CB400Ti)

That looks great, an off the shelf seat would never fit like that. As for the velcro, that's what I used and the pad never budged.
 
Re: Come See My Woody! (1979 CB400Ti)

I've used industrial velcro on two of my seats and the only issue I have with it is it can be very hard to remove the seat :), that stuff is serious stuff.

Seat looks great BTW, nice work.
 
Re: Come See My Woody! (1979 CB400Ti)

Rigged up the seat today so it'll use the stock clasps. Used some aluminum just shy of 1'8", cut and bent it, fit the hardware, then bolted on the fibreglass seat to it, hopefully give it a bit more strength. I also added two makeshift rubber bushings in the middle to help support the weight. All that and it's still lighter than stock, so that's a relief...

It's cool that I got it finished and that it comes off and what not, but it's kind of rendered useless since my tail light will be mounted to the back, so I couldn't really take it off without disturbing the wiring. Oh well, maybe I can adapt some sort of plug if I really feel like I need to.

Oh and a side note... I know I was saying before I would have just bought one if I could do it over, but after having it turn out well and rig up exactly as I envisioned... pretty darn good feelin!

I don't know why these are uploading upside down... sorry about that!
 

Attachments

  • photo 3-7.JPG
    photo 3-7.JPG
    87.9 KB · Views: 523
  • photo 2-7.JPG
    photo 2-7.JPG
    100 KB · Views: 448
  • photo 4-7.JPG
    photo 4-7.JPG
    39.9 KB · Views: 508
  • photo 5-6.JPG
    photo 5-6.JPG
    63.6 KB · Views: 444
  • image-2.jpeg
    image-2.jpeg
    57.6 KB · Views: 465
  • photo 1-7.JPG
    photo 1-7.JPG
    87.2 KB · Views: 465
Re: Come See My Woody! (1979 CB400Ti)

So this weekend in between get togethers I was able to add the bar end mirrors, figure out the placement of the speedo (gotta do up a bracket still), chopped down the fender and was able to salvage enough of the front to use as a small back fender, and strip the gas tank. I gotta fill a couple dents as well as the emblem brackets then everything will be ready to go to my paint guy. I had a question though, there's spotty rust all over it, should I do something to address that or is it fine to paint over as is? Also now that's its bare metal is there a chance of flash rusting? Should I coat the bare metal in anything to prevent this?
 

Attachments

  • photo 4-8.JPG
    photo 4-8.JPG
    50.7 KB · Views: 435
  • photo 3-8.JPG
    photo 3-8.JPG
    55.6 KB · Views: 427
  • photo 2-8.JPG
    photo 2-8.JPG
    182.3 KB · Views: 447
Re: Come See My Woody! (1979 CB400Ti)

spmc said:
I had a question though, there's spotty rust all over it, should I do something to address that or is it fine to paint over as is? Also now that's its bare metal is there a chance of flash rusting? Should I coat the bare metal in anything to prevent this?
Quick answers: yes, yes, yes.
Longer answers: http://www.dotheton.com/forum/index.php?topic=10993.0.
You cannot paint over any rust (or dirt, or grease) and get good results. You will need to neutralize the rust, fill in any spots (in addition to dents) and spray on a good (not necessarily thick) coat of primer. Then you can take it to a paint guy.
 
Re: Come See My Woody! (1979 CB400Ti)

Hey, just going back to the seat - what kind of foam is the green stuff and where did you get it from? I'm having a hard time finding something that will sculpt so well.
 
Re: Come See My Woody! (1979 CB400Ti)

Ribo said:
Hey, just going back to the seat - what kind of foam is the green stuff and where did you get it from? I'm having a hard time finding something that will sculpt so well.

Just ordinary florist foam... any craft store should have it, I got mine from Walmart. I bet if you went to an actual florist and asked to buy 9 or 10 blocks you'd get a better price!
 
Re: Come See My Woody! (1979 CB400Ti)

Thanks! - I will check it out.
 
Re: Come See My Woody! (1979 CB400Ti)

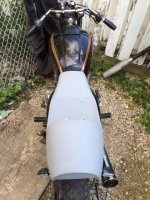
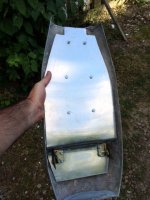
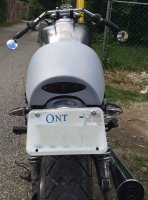
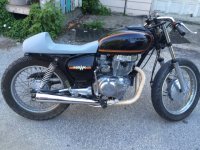
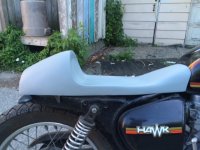
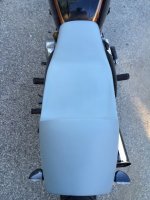
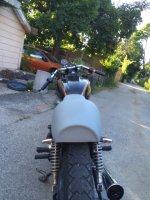
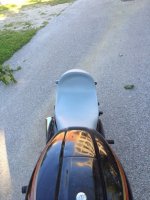
So more progress to report... I was able to finally finish the seat. I had some trouble with a couple spot sinking in once I put the primer coat on, I don't know if it was a reaction between the glazing spot putty and the primer or if the glazing putty is just crap, but once I dug it out and did it the right way with some actual body filler it seems to be good. I also cut the back radius for the small fender and tail light, which are bracketed up to cross supports. I also created a small angled tab through the back fender and bolted on a cross piece to mount the license plate. Using regular bolts right now, but LED lighting bolts should arrive tomorrow or so.

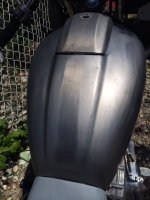
Sanded down and primed the side covers. Sanding the rattle can job I did was proving to be a no go as the paint would instantly gum up the sand paper. I have read using paint stripped on the side panels was a big no no but I plan on losing them this winter so I figured what the hell, worth a shot. So what I did was just dip some fine steel wool in the stripper, rub off about a 2-3" circle, and immediately chase that with another piece of steel wool waiting in a bucket of water. Seemed to do the trick, with little to no noticeable damage to the plastics. If I was keeping them and they weren't already cracked, I would have sanded the plastic some and they would have been perfect. So... It can be done! Just be patient, and careful. Don't put too much on at a time or eventually it will eat into the plastic itself.

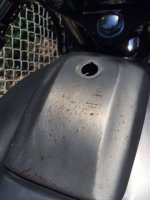
Also filled in a couple dents and the emblem mounts with body filler. First time doing that kind of work too, and man is that an art. Takes a lot of work to get it just right and smooth. Really wish I had a garage with a nice big workbench to lay out all my materials. I also strongly suggest Acetone to clean up your tools for reuse, otherwise you'll be buying three sets of spreaders and multiple mixing boards like I did. (dumb I know!) Think I got it to a smooth finish now though so it should be good for paint. I didn't prime it yet, I want my paint guy to do it just to make sure the paints play nice together.

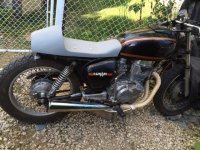
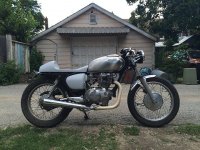
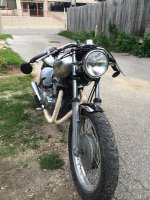
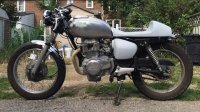
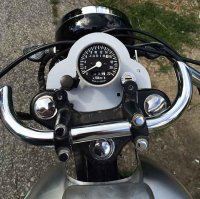
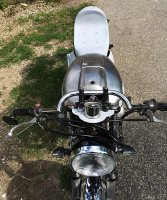
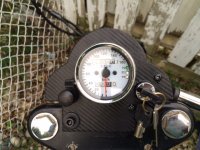
In these pics I just sort of loosely mocked everything up to see how it would look. I created a gauge/ignition/choke bracket out of aluminum as well. That's going to be secured to the triple tree, however with the current handlebar clamps I'd have to cut off the OEM gauge mounts, and I've decided that I think clip ons are the way to go, I like when the bike looks hunched over! (like I will after riding this for an hour). So when I change out the bars the bracket with sit nicely and the choke and ignition won't be interfered with.

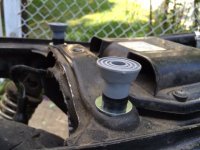
Oh and the left side of my new headlight bucket wouldn't sit flush with the new bracket for some reason (the other side was fine), so that'll take some sorting out eventually.
 

Attachments

  • DrymockRightside.jpg
    DrymockRightside.jpg
    94.7 KB · Views: 429
  • DryMockFront.jpg
    DryMockFront.jpg
    191.2 KB · Views: 420
  • drymockleftside.jpg
    drymockleftside.jpg
    66.3 KB · Views: 421
  • drymockguagebracket.jpg
    drymockguagebracket.jpg
    78.8 KB · Views: 423
  • DryMockBehind.jpg
    DryMockBehind.jpg
    80.8 KB · Views: 428
  • DryMockOverhead.jpg
    DryMockOverhead.jpg
    88.6 KB · Views: 420
Re: Come See My Woody! (1979 CB400Ti)

Looking pretty nice dude... great work...
 
Re: Come See My Woody! (1979 CB400Ti)

Still plugging away, my seat, side covers and tank are now out for painting and I pulled off the front tire for changing the tire and truing it up. Today I also finished off my gauge bracket. Cut out of just shy of 1/8" aluminum, painted black and then covered the face in Carbon Fiber Di-Noc Vinyl. Looks aight... was designed when I was keeping the original bar mounts, but since loosing them I might change it up a little down the road, but for know, it'll work!

Also had a question about tires... would there be any big issue with going from the recommended 3.60-19 and 4.10-18 tires to 3.50-19 and 4.00-18 tires?
 

Attachments

  • gaugevracket.JPG
    gaugevracket.JPG
    135.3 KB · Views: 386
Re: Come See My Woody! (1979 CB400Ti)

I think I like the idea of bringing up the rear an inch or two, however I'm having a hard time finding a Clevis to Clevis style shock. I've found one pair that match the stock length, but nothing in the 14, 14.5" range at all. Anybody have any links for something like that?

What I have found is eye to clevis like the ones pictures below... what would be involved in making these fit to the frame?
 

Attachments

  • $_57.JPG
    $_57.JPG
    373.7 KB · Views: 202
Re: Come See My Woody! (1979 CB400Ti)

an inch is about max and then you would want to raise the front as well(longer forks)
2 inches brings huge issues with massive chain slack at full droop,and the chain will be contacting the top front of the swinger a whole bunch,and no you can't just tighten up the chain
that said adapting the clevis tops would be an easy do for a handy fabricator
 
Re: Come See My Woody! (1979 CB400Ti)

xb33bsa said:
an inch is about max and then you would want to raise the front as well(longer forks)
2 inches brings huge issues with massive chain slack at full droop,and the chain will be contacting the top front of the swinger a whole bunch
that said adapting the clevis tops would be an easy do for a handy fabricator

Okay, so there's no adjusting one without the other than huh? I just want to try to level the bike off a bit, take some of that backward lean out of it, but everything I seem to think of is like pulling a jenga piece in terms of the ripple effect it can have on everything else on the bike. I don't have the knowledge (though I hope to gain it as I continue researching/playing) of how tweaks like shock length, tire size, fork length, etc affect riding. One day!
 
Re: Come See My Woody! (1979 CB400Ti)

the problem is most of the cheap shocks are so oversprung that adding an inch of shock length is effectively more because they dont sag properly to rider weight
your bike looks fine i would suggest you ride it enjoy it for what it is and when you can afford buy some hagen shocks
 
Back
Top Bottom