Follow along with the video below to see how to install our site as a web app on your home screen.
Note: This feature currently requires accessing the site using the built-in Safari browser.
We noticed you are blocking ads. DO THE TON only works with community supporters. Most are active members of the site with small businesses. Please consider disabling your ad blocking tool and checking out the businesses that help keep our site up and free.
I did that on my Suzuki X6 Roadracer with a T500 front brake. I also drilled big holes in the thing and it cracked during "hard" use on the race track. I think you have to be careful how much strength you take from the hub, they get hot and distort a bit with consistent hard breaking especially if you use green linings. The 650 brake has holes already but they are not overdone so you can grind a bit and save a few ounces and still be safe
Yea, I agree.. I mean even if it was just round them off some so they aren't as shape and protruding like they are would be great. I may have my machinist look into it. He worked for NASA in NOLA on the fuel tanks so he knows a thing or two about structural strength.
Kemp said:
I did that on my Suzuki X6 Roadracer with a T500 front brake. I also drilled big holes in the thing and it cracked during "hard" use on the race track. I think you have to be careful how much strength you take from the hub, they get hot and distort a bit with consistent hard breaking especially if you use green linings. The 650 brake has holes already but they are not overdone so you can grind a bit and save a few ounces and still be safe
Thanks, yea I just want to get rid of the big fin looking things. I'm noy looking for shaving weight but if it comes out of looks in this application that's cool as well.
If we are talking the small "fins" they are there to increase surface area to shed heat and they probably add some stiffness (both marginally effective I would guess). If we're talking about casting lump from one side to another, I guess they add some stiffness but it wouldn't hurt much to remove them.
When the wheel is on the bike though I don't think any of us would notice if they were there or not. I wouldn't spend a lot of time and though on it. It's not like you are stuck on a boat for weeks on end with nothing else to think about.... ;-)
Haha yea, I know right Teazer! Well I just figured it would be easier to brush/polish up if they were removed or smoothed out some.. I think they are for some stiffness. I am just thinking on the lines of if i stuck the whole hub in a drill press and turned it so I could make easy of sanding and polishing, those lumps would make it a pain in the ass. I'm thinking I will lightly polish the hubs on both front and rear clear them and PC the rims some color yet TBD.. But I think the hubs would look better not painted.. So it was more of something that popped into my mind earlier today, apparently I'm "stuck on a boat for weeks on end with nothing else to think about...." haha!
So I started making my order list for this time on the boat.. I delved in tires and bearings today. I know the sizes, brands, and prices of the tires that will fit so it comes down to what you guys think of them and reviews(this info will be gathered when I get to that point).
I looked at bearings for my front XS hub and MikeXS has the whole kit for $46 which includes 2 bearings and 2 seals. Then AllBalls has a kit for $23 that includes the same thing. Are the Allballs just as good? I am leaning towards the cheaper because I have to get more bearings for my steering stem and my rear 350F axle bearings. I know Allballs are well known for their stem bearings and such so I can't imagine them putting out cheaply made axle bearings.. It would be nice to have all my bearings ship out at once to save shipping costs.
Heading to NOLA to bring my head in to get the new bronze guides installed and reamed. Decided to forgo the new valves and just do a good lap job when I get the guides finished. I go offshore for 2 weeks tomorrow so hopefully the had will e finished and I can button everything up and have a more complete engine minus electrical systems.
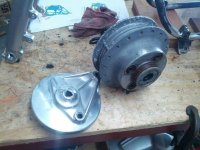
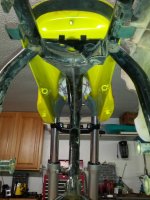
Well I'm home from offshore and I had some time to work on the bike. Got the rear rim off the hub, took the brake parts off and cleaned the hub with alumibright to get the crude and whatnot off. After that it came out very nice and clean. Going to go to HF and buy a 1hp buffing wheel to polish parts. This morning I woke up earlier than I wanted and decided to get out of bed and mess with it again. I decided to start messing with the frame and tank issues. I will be making a loop for the rear of the tank to rest on and will secure it with a hook and bolt. The front will get the old tanks grommet holders. I'll be going to NOLA to get my head so I can paint it and put it on the engine finally.
Other news, my dad and I ate going to go half and half with a new Miller Tig/Mig welder soon. I have some 3/4" 316 stainless tubing that I'm going to be using for my frame and swinger bracing. I'm pretty excited to knock some of this big stuff out of the way.
Still waiting on my front hub from my machinist (he's been busy getting his oyster boat running so he doesn't lose his oyster lease) so I can polish that and put the rest of the front end together. I do however need to get him to cut down my stem since the cbr1000 one is too long. I can use the katana one for mocking for now.
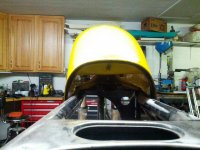
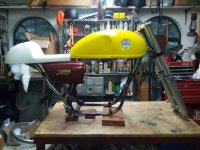
And here's your pictures. And a picture of a rough mock up!
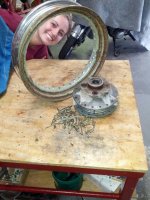
Haha! Yea, that one was a bit crusty.. I actually got it from the motorcycles that went down on the Titanic.. Ha! No, I'm getting an Excel rim since that one is a couple inches too small and its too wide as well.
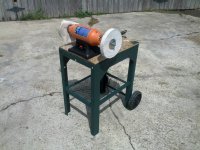
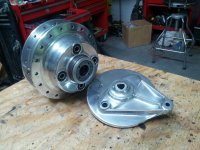
Dad had an old table at the marina I snagged and cleaned up to put the buffer on. Started buffing the rear hub and I think it's coming out great.. I'm not looking for a show quality finish so the imperfections are there to stay and will be covered by clear powder.
Heading to the marina now yo use the big compressor to clean the other side of the hub with the die grinder. More updates to follow.
Finished polishing the rear hub tonight... I think it came out great! Super happy with it.
So I attempted to break down the hub and get the old seals and bearings out and replaced with the new ones I ordered but they pinged the edges of the lock nut 4 times. Does anyone know how to get that nut loose with a spanner wrench the easiest? I tried heating the hub near the but and it won't budge. Then tried getting a punch and hitting the hole on an angle and still a no go. Any tricks of the trade would be great..
Oh quick update.. I didn't get my head last week because the shop said after he got the guides installed, he broke his reamer on the new guides.. said it was some hard stuff, but also his tool wasn't the newest either. So thumbs up to Kevin at TTr400 for some snazzy mega-hard bronze valve guides! And thumbs down to me cause I don't have my head haha, but I have other things I can work on.. Like rebuilding this rear hub and putting my pistons and jugs on the engine, frame work, more polishing, etc.
Making progress there. What is holding the back of the tank up so high and can it be adjusted? If the back end came down it would line up much better with that seat and would look more integrated.
This site uses cookies to help personalise content, tailor your experience and to keep you logged in if you register.
By continuing to use this site, you are consenting to our use of cookies.

")