Designs for building a motorbike stand (adjustable)

neevo

Over 1,000 Posts
I have a wooden stand for my bike at the moment that works ok, but getting the bike up onto it is a bitch and its low.

I have a welded, a bunch of square stock and a desire to build an adjustable stand but I can't figure out how the hydraulic ones are constructed. Anyone care to enlighten me?

Happy to buy some bits to make it work like a hydraulic ram and rollers etc.

Who can help me?

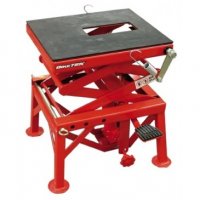
Essentially I am looking to build something that functions something like these do:
 

Attachments

  • ImageUploadedByTapatalk1378422075.052691.jpg
    ImageUploadedByTapatalk1378422075.052691.jpg
    84 KB · Views: 2,108
This ones pretty simple.
http://www.youtube.com/watch?v=65Z1OzC48Qw
Essentially the idea is to use the jack to lift one part of the table and have the "scissors" roll with the lift to add support if that makes any sense.

And this one is much nicer and gives a better idea of how its properly done
http://www.youtube.com/watch?v=chOxu4Aw1So

And heres another simpler one
http://www.youtube.com/watch?feature=player_embedded&v=NzAGKDiQiYE
 
Thanks SONIC. Need to see if I can shrink it down a little as I plan on making a lift stand rather than a table but that's given me some ideas. Also been checking google images for pics to see how I can get it working too.
 
If you're not dead set on making one, you could much more easily modify an existing ATV jack. Harbor Freight runs specials on them every now and then.

-Deek
 
So I found a design I thought I could adapt and make work:

A578ECB6-4931-4918-94B4-007BAAFD01B8-3764-0000027D6530C3D0_zps4dca1d8a.jpg


Drew something up to see if I could make it work and also see what bits I would need:

DD94DB88-FCC9-49F6-AB10-ADD3AF26C6BC-3764-0000027D6CED414F_zps448748d0.jpg


Once I had the drawing I went to the local hardware store and bought a bottle jack and some bolts:

68694C8B-9DCF-45E1-AF2C-C7FA07097238-3764-0000027D9D0632E6_zpsb17ea801.jpg


I have a load of square section tube here I will use up for the stand so it might be a bit over the top on the base as I would prefer to use what I have rather than buying a load more (eg c section would be ideal but I don't have any). Once I had the parts I redid the drawing to try and get some rough dimensions too and to see how I think the stand could work:

B1026571-7B9A-4295-90FE-698A97063FF2-3764-000002808E7FC63F_zpsdbdf7696.jpg


Next step is to start chopping some steel and fire up the TIG. Wish me luck.
 
Did you consider a side mount stand?

6jdfjzgq-600x443.png


kv6x01p1.bmp


I like the design.

For the version you are designing, I would add some rubber on the top to protect the frame. You'll need to use tiedown straps to keep it stable before you lift your bike. So, add some big eyelets for the hooks.
 
Started by cutting up some square stock for the base and test fitting it up:

6BDC1DB5-226C-4E59-A4AA-B06275EBD9E7-3764-0000028BEE858C10_zpsba1abfba.jpg


Next I welded it up and cracked out the drill for the bolts. It was a tough job as my 10mm drill bit is losing its edge and the first try was a little bit wonky but I decided to drill them out to 11mm instead and use a bit of force to straighten the holes up:

B33DAE3D-D52A-4E13-BB7F-8DE59F0B8BE8-3764-0000028BF45DD5B4_zps9ffd8ce9.jpg


I then found some big square stock I had forgotten about. I cut 1 side off to make some c channel so that I could use it as the top. I completely buggered it up by cutting it too short so had to weld an extra bit on each piece, pretty annoyed with myself on that one.

Here it is in its current state. Still need to sort the pivot bolts by fitting washers to remove the slack and I need longer bolts for the c section. But I think it will work!

Here is a test of the mechanism:

F83366A4-BC95-40A9-911E-988FAE22617E-3764-0000028C01731968_zps27fef182.jpg


3C19BA6E-D1C9-4AD2-83C9-8579AD79F3B5-3764-0000028C06C189B7_zps10747163.jpg


Tomorrow I will sort all the bolts, will put the mounts in for the bottle jack and make the jack lift arm too.
 
eyhonda said:
For the version you are designing, I would add some rubber on the top to protect the frame. You'll need to use tiedown straps to keep it stable before you lift your bike. So, add some big eyelets for the hooks.

Good ideas! Will grab some rubber for the top and some eyelets.
 
Looks good! It's cool building your own stuff!

What is the width? This is the shorter dimension. When your bike is on it, this width has to be wide enough to be stable. When I had this type of lift, it was a bit wobbly due to the short distance front to back. If it isn't wide enough, you can add some length of tubing before installing your casters.

Also, is this stand for working on your bike or just to put it on your work table? Or is it only to work on it with the wheels off? On a normal lift, you just roll it up a ramp. Either you have no space to roll it up or the bike has now wheels at the moment. I thought it's a roller already?
 
Hey ehonda, I don't have any room for a full bike lift and the bike (whilst being a roller) doesn't have a side or centre stand so it won't stand on its own. I originally made a wooden stand with wheels so I could push the bike to 1 side which gave me enough room to get my trailer out of my garage.

The idea was to make a stand that I could get under the bike and jack up, so I didn't break my back trying to lift the bloody thing onto the wooden stand I made. Ideally it would hack up a bit higher to I could work on it a little easier.
 
Spent another day in the shed, finishing the bike lift (my missus is a saint), first up was welding caster mounts on the outside. This wasn't the original plan but I was worried about how stable my original idea was, so decided to go further out with the wheel mounts:

FFEA1E97-F8AA-4061-8FF4-EA1ABDA6B19A-4470-00000304F4845636_zps1d37f05b.jpg


Popped the wheels on to mark up for the bolt holes:

C7AC3C09-5DA1-4885-852B-0145575E2911-4470-00000304FA98EC9D_zpsc0138fb6.jpg


Drilled and tapped:

C3B92051-93A4-4395-892B-68E4329A6380-4470-00000305005D31DC_zps8325d932.jpg


2 done, 2 to go:

BD162436-DE0C-460B-A9DF-92BA7F967830-4470-00000305061E9D05_zps82095bf2.jpg


All done:

6F46D16E-65CF-4A0B-BC4C-739D05490276-4470-0000030512FCFEF5_zps3e2c2606.jpg


We have a rolling chassis ;)

4DD11343-615A-490E-BD97-91D2B54BC935-4470-00000305184C7519_zpsd0d1e2b4.jpg


Next up I put it all back together with washers for spacers in between the moving parts to remove the slack. It was coming together and as it currently stood still had a bit of wobble in it:

2D6C7684-9020-47F3-8C80-86BB51837AF0-4470-000003051D93665D_zpsba3c1d04.jpg


Next up I made the arm for the lifting mechanism out of 5mm steel:

EAF7157F-F3A6-4F88-A624-19F25E9B8838-4470-000003052463D2D5_zpsec638745.jpg


It was also at this point that I welded on a cross brace between each lifting arm, this was a good move as it really brought the whole setup together and removed all the slop. I also welded the lifting mechanism to the front of the lifting arms:

A83A7487-D07A-4721-9EB7-23FA04D22F87-4470-000003052AB393F0_zpsc54981dd.jpg


Next I took a brand new bottle jack and took a grinder to it to clean up the top and weld a mount:

D182784E-BA79-437C-9B19-9E1D08C2E8D7-4470-000003052FEF09E3_zps61245899.jpg


I originally was going to put a mount with a pin between the jack and the lifting mechanism however realized I didn't have enough room, so instead I cut up a bolt and welded that on top instead:

0E016F9E-A8E0-4375-98BE-386A48EA46CA-4470-00000305368919EC_zps44df1a94.jpg


All done! Here is a little vid of it in motion:

http://youtu.be/fMjH3vn5DRI

Next weekend I will strip it all down and paint the parts and reassemble. I will also buy some tube end caps for the exposed tube, I used it on my engine stand and it finishes it off perfectly:

72A72709-3886-41D8-8041-4D4BF5AB7C0F-2135-0000020D3F2201FC_zpse911c7c0.jpg


Here it is in its unfinished glory:

D6A01F78-CA1B-4B91-9E4C-6BA6A88C6BE0-4608-000003194C01FCA2_zps76f4b5c8.jpg


F587A9E6-E862-47E9-A112-AC99BC97E8A6-4608-000003195509CC31_zps571a668f.jpg
 
Nice work on the stand mate. Makes me wish I had got more done with my weekend.
 
I'm pretty pleased with it. I think I'm going to add some timber runners to the top as it will give me a little more height and it will give me a surface to glue some rubber to also.

It will look great once its painted too. Going for the same finish as the engine stand.

I also need to get some eyelets so that I can strap the bike down and I need to build a ratchet system so that you can jack the bike up, the ratchet system locks, then you can undo the jack.
 
Nice work! You've been a busy boy in one day! And, yes, your wife is a saint to put up with all that time away.
 
So I went into the shed this afternoon to find a load of oil over the bench! Turns out the release screw on the bottle jack is so loose that if its not horizontal then it leaks. Not great as the stand has it on a angle permanently! I looked at swapping it around but then the mechanism would point the other way, so I cracked out the plumbers tape and wrapped the threads. Worked a treat:

BB722862-FB68-4125-9147-3F052DA3B8AD-1646-0000014FC32D21F3_zpsed932bce.jpg


With a jack no longer leaking I next put my attention to the lift lock, this was designed to take the pressure off the jack so I could lock it in the top position. This is the extra sections welded onto the frame, I will need to post a pic of it in action when it's back together as I had already started to dismantle the stand for painting:

914E9BDD-E1A0-455A-B434-E248EE8C597C-1646-0000014FCB2812E2_zpsd5d2aa50.jpg


Next up was to look at options to raise the max height of the stand and add some protection to the top of the stand so I don't scratch the bike frame. I have some hardwood boards left over from my deck which would work a treat:

3A07848B-4C27-4D11-8AEB-37CE2D0149F5-1646-0000014FD1CECF2A_zps92fe8dbf.jpg


I had to cut them in half which left the cut uneven so I grabbed the power plane and made a tonne of mess getting them straight again:

6347556C-830F-4FF2-92AD-6A3E976D83DD-1646-0000014FD91A9F8D_zpsedddda44.jpg


Drilled and screwed in from underneath to keep the top clean:

8D982EBA-E56D-474F-86EF-962404074EA7-1646-0000014FDF0E2941_zpsc5d42937.jpg


Then the whole lot was broken down and the paint booth was knocked up:

7795DF13-85B5-45D9-AF9E-0FEE541553FD-1646-0000014FE4221358_zps00d5f207.jpg


I still need to paint the bits under the wood but they are galvanised so I need some etch primer first. I will post up the final stand once its back together.
 
Here is the locking mechanism, seems to work ok however it's right at the very top of the lift so I may need to trim some off this piece to make it a bit easier to lock the stand without having to jack it up to an extreme amount:

1E065D05-5793-492F-84FC-977263C68C22-343-00000036AA57E958_zps528d05e0.jpg


Testing it out I buggered up my new paint! Turns out it scrapes the base a bit hard and has stripped the fresh paint... Bugger:

6E26FCA2-0F52-4C03-9575-AB92E45BEDF2-343-00000036B173ECCE_zpsffd19674.jpg


So I cut some 3mm Alu and made a paint saver section that the tube can scrape along all it likes:

F0866E33-416F-42D0-9E61-DC6BE04A942D-343-00000036B769C7E1_zps1ed5b3ed.jpg


CA682B90-5751-403C-9C38-8ACAB6E01237-343-00000036BCD8960E_zpsa9b0bed0.jpg


The tops are also etch primered and painted too and the timer is attached so I can now call it reasonably finished:

07414DFA-73C9-4266-9527-B87D0AAFACC8-558-000000808B2B1D5F_zpsdb5ff80b.jpg


Lifting the bike up on it tonight it looks like I need to trim down the locking mechanism as its tough jacking the bike up as far as I need to to lock it, I think it will damage the lift jacking it up so hard to lock it, plus I don't need all the height:

8C6EA4FA-AC8A-43A9-8E8D-2A8ACAF28DDF-558-00000080918C87E3_zps8c580665.jpg


Fingers crossed it is all structurely sound and I don't find the bike on the floor tomorrow morning.
 
Very cool! Have you tried moving it around on those casters yet? They seem small but if your garage floor is flat maybe it's not a big deal.

-Deek
 
Yeah it scoots around without a problem. Floor isn't even that flat!

I do however need to put some rubber on top and also some eyelets, it moves around but isn't exactly stable as the bikes slides around a bit on top of the runners.
 
Back
Top Bottom