
This has been a long time coming but I finally got it completed! I've been wanting to add this button to my Honda CB360 build since I started as I also have a Honda S2000 and wanted to tie the two together somehow. No one had ever done this before so I figured what the heck and gave it a shot.
To see it work, click YouTube link below:
http://www.youtube.com/watch?v=XOmZjmARvq0
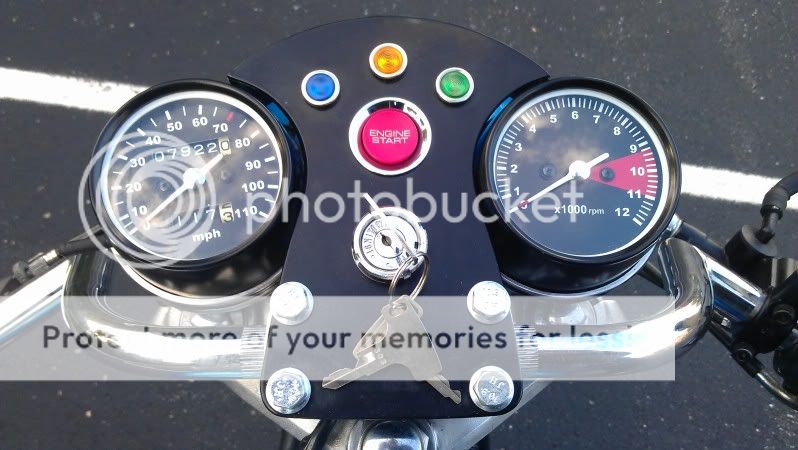
Picture of my dash:
MATERIAL LIST
1ea Honda S2000 Start Button Switch Assembly - Part Number 35881-S2A-911
1ea 3.5 Internal Computer Harness http://www.cablestogo.com/product/03165
Multiple Male/Female connectors for 18-22ga wires
1ea SPDT 5-prong relay http://www.parts-express.com/pe/showdetl.cfm?Partnumber=330-070
Basic wiring tools
PROCESS
1.) Open up your right hand controls and remove wiring for your OEM Electronic Start Switch. If you DO NOT have a Honda please familiarize yourself with your wiring diagram because the colors I mention in this post WILL NOT correspond with your bike.
2.) Once you identify the wires, cut them loose and pull them back through your handlebars so they come out the middle by your headlight. For a Honda CB360 these wires are BLACK, BLACK/RED, and YELLOW RED.
3.) Install female prong socket ends on these wires.
4.) Plug in your S2000 Start Button harness into the button itself.
5.) Wire up your button to the relay as follows:
(credit to preludeonline for the below picture)

RELAY WIRING
Im showing this by the RELAY NUMBERS and as they correspond to the PRONG NUMBER on the S2000 button and the colors in the OEM CB360 HARNESS. If you are using a different bike, PLEASE reference your wiring diagram.
30: BLACK wire from OEM CB Harness
87A: BLACK/RED wire from OEM CB Harness
87: YELLOW/RED wire from OEM CB Harness
85: INPUT from PRONG 1 on S2000 Harness
86: GROUND
That will take care of the relay wiring, now we need to finish the wiring from the S2000 button. For this, reference the above picture.
PRONG 1: Output to relay
PRONG 2: 12v Power Wire - Tap into BLACK/WIRE white (power wire) from OEM Kill switch
PRONG 3: GROUND
NOTES
- Secure ALL connections and make sure you have good GROUND connections where they are needed. If not, the button won't work. Trust me.
- Wiring the button per the above directions retains function of KILL SWITCH, NEUTRAL SAFETY, AND CLUTCH SAFETY
- The relay and all wiring SHOULD fit inside your headlight bucket (it does for sure on the CB360)
- The S2000 button w/ pigtail is approximately 6" deep. You need to have a custom dash or a place with ample room in the back to work with.
Congrats! You did it! Enjoy something that will be a great conversation starter and likely something people have never seen before!
Ask any questions and Ill be happy to help!
-Matt
To see it work, click YouTube link below:
http://www.youtube.com/watch?v=XOmZjmARvq0
Picture of my dash:
MATERIAL LIST
1ea Honda S2000 Start Button Switch Assembly - Part Number 35881-S2A-911
1ea 3.5 Internal Computer Harness http://www.cablestogo.com/product/03165
Multiple Male/Female connectors for 18-22ga wires
1ea SPDT 5-prong relay http://www.parts-express.com/pe/showdetl.cfm?Partnumber=330-070
Basic wiring tools
PROCESS
1.) Open up your right hand controls and remove wiring for your OEM Electronic Start Switch. If you DO NOT have a Honda please familiarize yourself with your wiring diagram because the colors I mention in this post WILL NOT correspond with your bike.
2.) Once you identify the wires, cut them loose and pull them back through your handlebars so they come out the middle by your headlight. For a Honda CB360 these wires are BLACK, BLACK/RED, and YELLOW RED.
3.) Install female prong socket ends on these wires.
4.) Plug in your S2000 Start Button harness into the button itself.
5.) Wire up your button to the relay as follows:
(credit to preludeonline for the below picture)
RELAY WIRING
Im showing this by the RELAY NUMBERS and as they correspond to the PRONG NUMBER on the S2000 button and the colors in the OEM CB360 HARNESS. If you are using a different bike, PLEASE reference your wiring diagram.
30: BLACK wire from OEM CB Harness
87A: BLACK/RED wire from OEM CB Harness
87: YELLOW/RED wire from OEM CB Harness
85: INPUT from PRONG 1 on S2000 Harness
86: GROUND
That will take care of the relay wiring, now we need to finish the wiring from the S2000 button. For this, reference the above picture.
PRONG 1: Output to relay
PRONG 2: 12v Power Wire - Tap into BLACK/WIRE white (power wire) from OEM Kill switch
PRONG 3: GROUND
NOTES
- Secure ALL connections and make sure you have good GROUND connections where they are needed. If not, the button won't work. Trust me.
- Wiring the button per the above directions retains function of KILL SWITCH, NEUTRAL SAFETY, AND CLUTCH SAFETY
- The relay and all wiring SHOULD fit inside your headlight bucket (it does for sure on the CB360)
- The S2000 button w/ pigtail is approximately 6" deep. You need to have a custom dash or a place with ample room in the back to work with.
Congrats! You did it! Enjoy something that will be a great conversation starter and likely something people have never seen before!
Ask any questions and Ill be happy to help!
-Matt
")


