Fiberglass problems

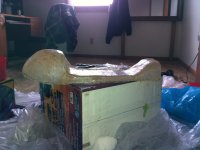
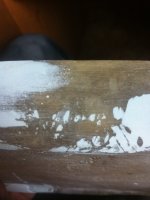
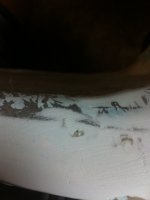
I have a procedure for fixing seams in fiberglass gas tanks.

I use a thin cutting disk on an air tool to groove the joint where the leak is. Then I apply vacuum to the tank. With a cotton swab, I clean the joint with acetone. The idea being that the vacuum will pull the acetone through the joint and clean it. Then, while maintaining vacuum, I apply liquid epoxy resin to the joint. The vacuum will pull the epoxy into the joint.
 
It's still a glass tank and is by definition on its way out, not much point trying to repair it if you're going to fill it with pump gas
 
Just happened to see this thread and thought I'd add something about resin curing in low temps....there are 3 components in a polyester resin mix, the resin itself, the accelerator and the catalyst....its the accelerator that actually governs the speed of the reaction (and the temperature it will work at) Nowadays pretty much all polyester resin has the accelerator already added...mainly for safety reasons...accelerator and catalyst mixed on their own are explosive....but the thing is if you have low temp curing problems you need resin with more accelerator in it...in the Uk that would be called winter resin....works at 2 or 3 degree C no problem.
 
So I laid my glass over the mold and got that part done. Now comes the prepping... I need some serious tips on this. I put some icing over it and I'm sanding to try an fill the beginners fiberglass sh!t job and even it all out. I keep getting pinholes and I think I'm sanding to far. Is there any videos on how to prep for paint with the sanding and laying filler and all that jazz?
 

Attachments

  • image.jpg
    image.jpg
    1.5 MB · Views: 155
  • image.jpg
    image.jpg
    799.5 KB · Views: 152
  • image.jpg
    image.jpg
    642 KB · Views: 149
You are just doing basic body work at this point. Yes, there will be pinholes, so you get some spot putty, and it's time to start going to finer sandpaper.
 
When mixing the body filler, try picking it up and flipping it with the plastic spatula rather than using a stirring motion. I found that this helps eliminate the small air bubbles that cause pin holes. Also, be sure to push it into any voids in a few directions to make sure you fill them completely.

Looks good so far. The rest is not hard, but it is work.
 
Thanks for the tips and encouragement. I was about ready to throw it away I guess it just takes patience. Sanding, laying filler, sanding, laying filler, sanding more, laying more filler. It's making me go insane haha I guess I just needed some confidence to keep going ill have to try the spatula trick when I go to lay more filler and the spot putty to get those pinholes that have me wasting a tub of filler! Thanks guys
 
Yeah its a bitch to finish shitty/beginner fiberglass work. Ask me how i know ;D

But just keep at it it will come out nice in the end, its just annoying because you watched that DCC video and theu do the whole damn thing in about 5 minutes and it takes you 4 full days of work (again, ask me how i know ;D)
 
Alpha thanks for the help. I've done some research of my own and found helpful information.

http://www.accessnorton.com/fixing-fiberglass-tank-t6227.html

I hope to have the time this weekend to split my tank and begin repair.

Of course i'll have to seal it with this product or similar http://www.hirschauto.com/prodinfo.asp?number=GTS&variation=QUART to be able to run pump gas.

In my opinion everything is worth trying to repair hence the 200$ 39 year old motorcyle in the garage that hasnt run in over 20 years :)
 
Back
Top Bottom