First Cafe Build - CB350

That IS indeed the worst carb I have ever seen...and I've seen 30+ sets just in the last year....hope your pine sol trick works. I use my soda blaster, works like a charm!
 
I just cleaned a set like that for a guy in my ultrasonic cleaner. They had corroded so badly that by the time they were clean we realized the posts for the float were corroded off clear down to where the pin goes through. Its a parts carb now. Good luck
 
Shanedalion said:
I just cleaned a set like that for a guy in my ultrasonic cleaner. They had corroded so badly that by the time they were clean we realized the posts for the float were corroded off clear down to where the pin goes through. Its a parts carb now. Good luck

That was my thought exactly. There's not going to be much left under there :(
 
Re: First Cafe Build - CB350 (Pine-Sol Soak Results)

Well, here are the results of the Pine-Sol soak. I have to say, I'm impressed.

So, to recap, I put 2 gallons of Pine-Sol in a five gallon pail along with my nasty carbs. I have found very little about pine-sol soaking around, a few posts on some other forums, and I was curious. Some others dilute the mixture with water, but I used full strength original formula Pine-Sol.

The pictures below are with NO scrubbing/carb cleaner or anything. Just disassembled them as much as I could in their condition, put them in a pail, waited two days. I didn't have any agitation or anything. Just had them in my house in a sealed container (caution: without a sealed pail, you will have an angry wife). There was no concern about the pail being sealed, no pressure build-up or anything strange. Just be careful when you open it up, the fumes are pretty nasty and made my throat a little raw for a bit.

Before & After:
 

Attachments

  • 2013-03-19 20.12.19.jpg
    2013-03-19 20.12.19.jpg
    1.4 MB · Views: 223
  • 2013-03-19 20.36.48.jpg
    2013-03-19 20.36.48.jpg
    1.6 MB · Views: 213
  • 2013-03-22 12.15.18.jpg
    2013-03-22 12.15.18.jpg
    1.4 MB · Views: 197
  • 2013-03-22 12.15.11.jpg
    2013-03-22 12.15.11.jpg
    1.5 MB · Views: 204
Re: First Cafe Build - CB350 (Pine-Sol Soak Results)

It's hard to see with my crappy camera phone pictures, but the bowls are spotless. It will take very little cleaning and carb spray to get it to look better. I had problems with disassembly since these babies were so crusty. So, I'm thinking now that I can get in there, I may take them fully apart and soak overnight to get all the jets/passages freed up before I tear into it tomorrow with carb cleaner.

I'm going to save my pine-sol bucket and keep reusing it, can't see why it wouldn't work. There's some sludge in the bottom I might clean out, but I think it should be a good poor-man's parts cleaner.

One word of caution, I heard this didn't mess up plastic or rubber. The rubber seems fine and isn't even expanded like it does with carb cleaner, but I had some of the small parts in plastic cups and they did melt a bit. Not sure if that's because of my full strength mix or not, plus they were the thinnest, cheapest cups on the market. But I would not soak plastic parts in it after this experience. My ATC 110 has a plastic float, so if you're doing one like that, I'd just clean that separately.

Also, I didn't put the chrome caps in there, so I'm not sure if it would affect chrome at all. I'm thinking it would be fine, but who knows.
 

Attachments

  • 2013-03-22 12.17.17.jpg
    2013-03-22 12.17.17.jpg
    1.5 MB · Views: 206
First off, I changed my forum name, so I apologize for any confusion through PMs, etc.

Spent some time on the bike this weekend and had my brother in law over one night to help. It's amazing how much more you can get done with another hand to help.

Got the top end pulled off, disassembled the front forks, made a diy soda blaster and used up all 4 lbs of baking soda I had in the house (these things are great). You can see the before and after a bit where the cylinder is sitting next to the head.

Disassembling the points casing and the tach gear side casing was awful. Took my large size impact driver and a lot of hopeful thoughts to not strip out those pan screws.

Where are you guys finding replacement fasteners? I know there are tons of sites, but any of them have kits for these bikes, or a recommendation?

My points are trashed, basically all rusted together. So, dime city got an order.

Also onto the advancer mechanism. Mine was rusted in badly, had to crank on it a bit to get it out. Decided to just order a replacement from ebay.

Did some clean up on the combustion chamber. Then wrestled with the valves but gave up because it was too late and I was getting frustrated.

My cam chain roller is chewed up, as expected, but I do have a question:

I see the big cam roller (toward center of engine) is readily available online, but the smaller one on the 'lever' has a little chewed up portion on mine too. Is this necessary to replace, or is this really not as crucial as the big one? I found the whole lever assembly with the roller, but it was $100!! I know in a perfect world it would all get replaced, but is this something I can just leave and only replace the bigger roller??

One good bit of news, when I pulled the cylinder, it really looks like it's in good shape. I'm bringing it to the speed shop tomorrow to have them measure it and see if I can just get away with rings and a hone. I'm hoping I can.

Oh, and we can do a photo scavenger hunt. 10 pts to anyone who finds the tinkerbell toothbrush.....don't tell my daughter I stole it, but it fits into all those little nooks and crannies real well.
 

Attachments

  • 2013-03-24 13.22.27.jpg
    2013-03-24 13.22.27.jpg
    1.4 MB · Views: 192
  • 2013-03-24 13.21.54.jpg
    2013-03-24 13.21.54.jpg
    1.5 MB · Views: 192
  • 2013-03-24 13.18.09.jpg
    2013-03-24 13.18.09.jpg
    1.4 MB · Views: 190
  • 2013-03-24 13.17.30.jpg
    2013-03-24 13.17.30.jpg
    471.8 KB · Views: 195
One other question about valve springs. I've seen all the DIY tips, but I have a compressor like this one below and I can't really get it to work well. I'm guessing it's pointless and I should just get/make another one. Just curious if anyone has ever had any success with this type before?
 

Attachments

  • images.jpg
    images.jpg
    5 KB · Views: 353
Usually you are going to need a VERY large C-clamp to make it work, I personally haven't seen anyone use those. I paid $40 for an actual valve compressor tool and I am pretty pleased with it. Plus, you know you'll use it in the future right?!
 
Spent some time on the build this week, the weather is making me anxious to get this thing rolling. Didn't wrestle the valves yet, decided I'd save those for another day. I may just do an acetone test on them and see if they're solid, and if so run them as they are.

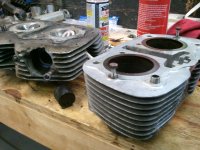
Last week I brought the cylinder in for a hone/bore, but realized I forgot the pistons at home, so that's delayed another week since they need to measure them for wear to see if I can get away with just a hone and rings.

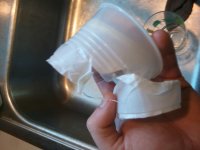
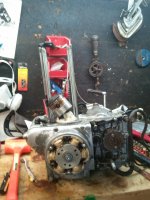
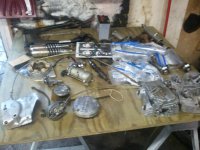
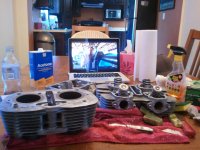
So, I took to getting the lower case ready for soda blasting and paint. It was pretty scuzzy with 40 years of road grime and grease so I decided to do some serious scrubbing to save me on the baking soda stash. I used this degreasing spray which worked really well. Half a can of that and a couple toothbrushes ate up my day, but it looks decent after that. Also cleaned up the shop, It's amazing what a sheet of plywood, some sawhorses, and some ziploc bags can do for your sanity and organization

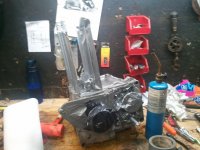
Then I got to taping, the typical blue tape wasn't working well in the cold shop, so I went with duct tape. Just a little tip I accidentally learned is that if you gently apply heat with a propane torch to the duct tape it has a kind of 'shrink-wrap' effect and it sticks it on very well.

So, the case is ready for blasting and then paint. I am going to pick up some engine paint this week and hopefully get the cylinder bored/honed so next week I can get the painting over with, then the following week hopefully have the whole engine back together and ready to test.

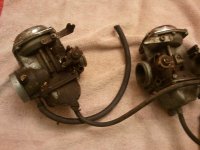
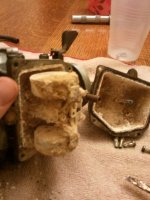
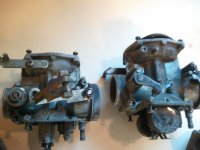
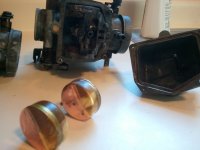
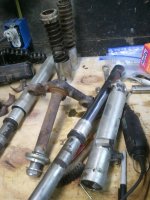
The carbs I was looking at fell through, so I either have to wrestle with the ones I have or look for another set. I might ask at the bike scrapyard this week, but I don't know if I'll find anything better than what I already have. Any tips on getting the threaded-in jet out if it's all chewed up beyond screwdriver world? I don't have an ez-out that small, not sure if they even make them.

Any general tips from anyone I should pay attention to at this point would be much appreciated.

By the way, wanted to give a shout out to Dime City Cycles. Just got my first order in from them, it was fast, complete, and even had a couple freebie decals in there. Gotta love getting packages in the mail every day, it's like christmas, but you have to pay for it.
 

Attachments

  • 2013-03-30 18.50.26.jpg
    2013-03-30 18.50.26.jpg
    1.4 MB · Views: 246
  • 2013-03-30 18.51.14.jpg
    2013-03-30 18.51.14.jpg
    1.5 MB · Views: 190
  • 2013-03-30 18.49.59.jpg
    2013-03-30 18.49.59.jpg
    1.4 MB · Views: 190
Oh yeah, also spent about 6 hours scraping gaskets. The worst part about this build by far. This was my view for two full evenings of scraping. But when it's done it's pretty satisfying.
 

Attachments

  • 2013-03-29 11.36.09.jpg
    2013-03-29 11.36.09.jpg
    1.4 MB · Views: 187
Bob Loblaw said:
Oh yeah, also spent about 6 hours scraping gaskets. The worst part about this build by far. This was my view for two full evenings of scraping. But when it's done it's pretty satisfying.
yep been there but momma wouldn't let me in the house with aircraft stripper lol
 
Back
Top Bottom