First Cafe project (CB450)

Doc.

Been Around the Block
Hey guys,

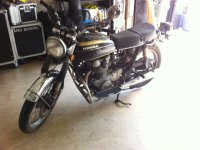
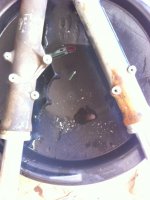
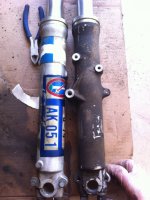
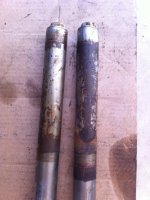
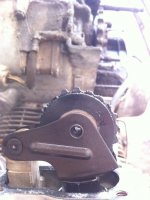
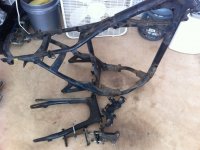
Recently I purchased a non-running '73 CB450 with the plans of building a Cafe Racer. I used to have a CB350 Cafe which I loved, but had to get rid of. It was bought as a Cafe anyway. Ever since, I had been looking for a CB that I could build myself, and I finally got my hands on one. Even though the engine is ceased, the bike was there about 98%, so I couldn't pass it on with the good price tag it had on it.

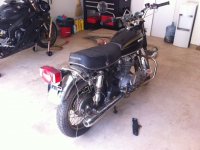
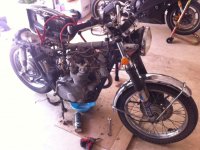
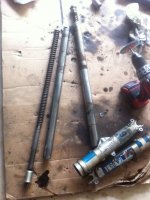
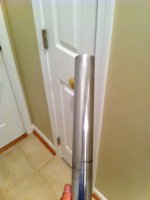
Attached are some pics of when I first picked it up. This is my first build, so my knowledge of a Cafe bike is very limited. I'm aware that it will require alot of repolishing, renewing, and customizing, so I'm hoping that you guys can help me out through the build. I will post question that I have if I can't figure them out myself.

Thanks.
 

Attachments

  • photo-126.jpg
    photo-126.jpg
    110.2 KB · Views: 250
  • photo-127.jpg
    photo-127.jpg
    120.3 KB · Views: 233
Since the engine was ceased, and I knew I would have to tear it down and more than likely rebuild, I couldn't wait to get to work with it, so I started to strip the bike out.
 

Attachments

  • photo-136.jpg
    photo-136.jpg
    130.5 KB · Views: 227
  • photo-168.jpg
    photo-168.jpg
    131.5 KB · Views: 233
  • photo-170.jpg
    photo-170.jpg
    145.3 KB · Views: 234
The title of the bike has a date of 2002 last, so I wonder how old this oil is. Also, it smelled very much like gas. ???
 

Attachments

  • photo-169.jpg
    photo-169.jpg
    69.1 KB · Views: 218
It's currently sitting in this state, bare frame. I'm still trying to figure out a plan for it. Color scheme, etc. etc., but at this moment I'm kind of thinking everything black, with a satin green tank/tail. That's just a thought though. Hell I might even do some wild bright highlighter colors, we'll see :p

Also the actual build up plan is to get the frame done, and then add on piece from the ground up. I want to get the wheels and shocks and forks done next. Then I will draw out the next plans (maybe engine)

But the frame and some small parts will be powder coated black.
 

Attachments

  • photo-94-1.jpg
    photo-94-1.jpg
    118 KB · Views: 208
And that is it for now. I will update this thread as I get things done. Any questions or comments (or of course advice :p ) feel free to share! 8)
 
I started my build just like you and with a CB450 too. Learned A LOT by just jumping into it. All the rest came from drawing on the knowledge from the board(s). Good luck, I'm curious how yours turns out!
 
Thanks Clutch. Yeah I've always been the kinesthetic type, so getting down and my hands dirty, I learned a good amount. I tore that whole bike down in 3 days, probably about 8 hours total time.
That might be a different story though come engine tear down time. Haha.
 
looking nice doc, cant wait to see what you can do with her!
oh and more pics please!
all the best Mark.
 
This looks great! Can't wait to see what you do with her. Keep the pics coming as the build moves along.
-chris


---
I am here: http://maps.google.com/maps?ll=41.588600,-88.147593
 
Thank you guys. I will definitely post more pics. I can't wait to get some free time to work on it again (hopefully tomorrow).
 
I decided to do some light stuff (very light :p ) before breakfast, so I drained the forks. MAN that fork oil stinks!!!! :eek:

And I'm planning on taking the forks apart. What's the easiest way I could do that? Would unscrewing the top nut blow my head off? Or should I point it down low (or better yet AT somebody else ;D ).

Thanks.
 

Attachments

  • photo-127.jpg
    photo-127.jpg
    150.3 KB · Views: 206
These things will need alot of elbow grease :(
 

Attachments

  • photo-63.jpg
    photo-63.jpg
    183.8 KB · Views: 228
  • photo-93.jpg
    photo-93.jpg
    193.2 KB · Views: 216
Oh and I got nosy with the cam chain tensioner. I just wanted to see what it looked like. I didn't like the looks of it.
 

Attachments

  • photo-94.jpg
    photo-94.jpg
    160.9 KB · Views: 232
Also, these are the parts I have decided to powder coat. If there is anything I missed, or you guys recommend I also do while I'm at it, please feel free to share. I want to make sure I get all the right parts powder coated now, than kick myself in the behind later.
 

Attachments

  • photo-128.jpg
    photo-128.jpg
    180.1 KB · Views: 234
block all the threads on the frame with old bolts , that way you wont have to re-tap them once it comes back from powder as the threads fill up with powder.
if your renewing your swingarm bearings take the old ones out before you send the arm away as you dont wanna scratch it getting them out if they are a pig.


cam chain tensioner looks well past its best lol
Keep up the good work.
Mark
 
Doc. said:
I decided to do some light stuff (very light :p ) before breakfast, so I drained the forks. MAN that fork oil stinks!!!! :eek:

And I'm planning on taking the forks apart. What's the easiest way I could do that? Would unscrewing the top nut blow my head off? Or should I point it down low (or better yet AT somebody else ;D ).

Thanks.

Not a terrible amount of pressure behind the nut, I just chuck them up in some soft jaws and thread it out nice and easy keeping some pressure on it at I get towards the end.
 
Looks like a great start. On the fork lowers, I used some brake clean and a red scotchbrite pad to knock the crap and crud off and then began the long but rewarding process of polishing. Good luck!
 
pugeyed said:
block all the threads on the frame with old bolts , that way you wont have to re-tap them once it comes back from powder as the threads fill up with powder.
if your renewing your swingarm bearings take the old ones out before you send the arm away as you dont wanna scratch it getting them out if they are a pig.


cam chain tensioner looks well past its best lol
Keep up the good work.
Mark
Thanks Mark. I'm not sure if there is any threaded holes in the frame, but I'll double check before I send it out.
Is the swing arm bearing that metal pipe inside the swing arm? When I took it apart, all I saw was that, and the two rubber pieces and metal washers at the end.

shocwav3 said:
Not a terrible amount of pressure behind the nut, I just chuck them up in some soft jaws and thread it out nice and easy keeping some pressure on it at I get towards the end.
I actually tested my luck, and there was no pressure at all. Very easy to take apart. I cleaned the guts all out to get rid of any old stinking oil. I'm working cleaning up the tubes, not an easy job though.

jayfromjay said:
Looks like a great start. On the fork lowers, I used some brake clean and a red scotchbrite pad to knock the crap and crud off and then began the long but rewarding process of polishing. Good luck!
I actually used a degreaser and a wire brush, worked great! It's clean enough to be sent out to powder coat (which I'm also thinking about doing). Thank you!
 
Here's a couple of pictures of the forks. Took them apart. Some nasty little boogers. Then I used a wire wheel, 400 grit, and 800 grit to clean out the tube. I need to get some good polisher. I have a feeling I can make it look better than this. Still a very big improvement from before.

I'll post pictures of the lower fork tomorrow. I forgot to take one tonight :p
 

Attachments

  • photo-64.jpg
    photo-64.jpg
    198.4 KB · Views: 221
  • photo-95.jpg
    photo-95.jpg
    172.5 KB · Views: 220
Back
Top Bottom