
We noticed you are blocking ads. DO THE TON only works with community supporters. Most are active members of the site with small businesses. Please consider disabling your ad blocking tool and checking out the businesses that help keep our site up and free.
You are using an out of date browser. It may not display this or other websites correctly.
You should upgrade or use an alternative browser.
You should upgrade or use an alternative browser.
First Cafe project (CB450)
- Thread starter Doc.
- Start date
Doc.
Been Around the Block
Honestly I'm afraid of chipping too, but I'm just hoping for none. But I'm sure it'll happen due to road debris.Tim said:Every time I see painted engine cases I'm tempted to do mine (which are apart and have been freshly soda-blasted) but I know I lack the patience or skill to do it up right and I'll have paint flaking off in 3 months from now. Looks awesome.
The bike will be ridden every once in a while, so hopefully that'll lower my chances.
I don't know what size your valve stems are but in the past I've used an automotive seal that the id was correct and trimmed the od if necessary. If your valve guides are in spec on the intakes, this won't be a problem if you can't find anything. They are not needed on the exhaust.
Jordan918
Been Around the Block
Do you mind sharing how you did this? Painstaking process.Doc. said:Removed the old cush drive. What a pain in the ass.
---
I am here: http://maps.google.com/maps?ll=36.072121,-95.919025
Doc.
Been Around the Block
Man, if I would've known, I would've kept the exhaust ones on. I'm not sure exactly what their size is. I think I can find the seals, they're just way too expensive. I missed out on a great deal on ebay.wfo guy said:I don't know what size your valve stems are but in the past I've used an automotive seal that the id was correct and trimmed the od if necessary. If your valve guides are in spec on the intakes, this won't be a problem if you can't find anything. They are not needed on the exhaust.
Doc.
Been Around the Block
Pretty much drove the inner metal out with a screw driver, pounding it, then drove the screw driver between the outer metal and the hole in the hub and crumbled it. It was a BITCH!DashGordan said:Do you mind sharing how you did this? Painstaking process.
Hoosier Daddy
Earache my eye...
Doc.
Been Around the Block
Haha yeah it's a bit pain and takes time, but really that's the only way I could think of doing it.DashGordan said:Thats not what i wanted to hear.
I'm liking this project. Not sure how I've missed it. I'll be that creepy guy looking over your shoulder from now on.
Keep up the tenacity.
Yea I was aware of bike bandit, but wasn't thinking of DCC until late last night. I hate the fact that both places charge almost a third of the price for shipping. I never really understood DCC's ridiculous shipping charges. Oh well, part of the fun I guess.Hoosier Daddy said:
Thanks btw!
Jordan918
Been Around the Block
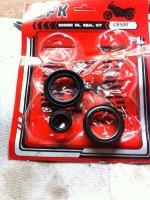
The top right seal looks like a steering bearing seal.Doc. said:Does anybody know what these seals are for? Maybe I haven't ran into that yet, but I can't figure it out. Also, the damn seal kit I bought shorted me out a seal for the shifter. Bastards.
Doc.
Been Around the Block
Yeah I was thinking that too, but it came with the engine seal kit. I'll just wait to see what I will need it for, haha.DashGordan said:The top right seal looks like a steering bearing seal.

Doc.
Been Around the Block
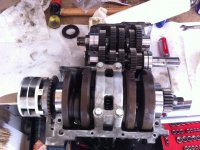
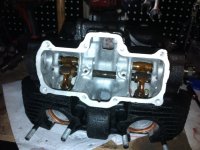
A couple of updates...
Got the valve train back in, but it failed the acetone test. Just ordered a lapping tool and paste.
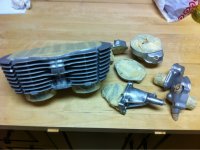
Also taped up the parts to be cleared. I'm not sure what I want to do with the cylinder jug though, whether to keep it original or paint it black to match the lower and the head. I might just paint it and sand the fin edges.
Got the valve train back in, but it failed the acetone test. Just ordered a lapping tool and paste.
Also taped up the parts to be cleared. I'm not sure what I want to do with the cylinder jug though, whether to keep it original or paint it black to match the lower and the head. I might just paint it and sand the fin edges.
Attachments
jelloelstone
Been Around the Block
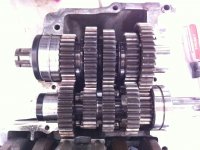
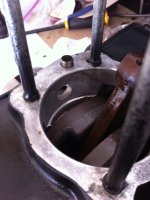
That is likely just a hole to allow oil to pass through but dont listen to me  , anyone that knows these engines more should chime in!
, anyone that knows these engines more should chime in!

