carbon moto
manufacturer of quality cafe racer parts
not done a lot of work on my gs550 project lately as the frame is still at my mates having the welding done & we have been too busy to go & see him
, we have just brought out a range of cafe seats
& just made a seat for this bike, modded the frame to suit & done a full paint job
(paint not my choice for the colour scheme but its what the customer wanted & he is happy with it)
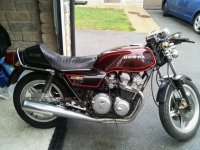
this is how it came in

then we made a plug for the seat, then a mould & then a seat unit for it

the frame was cut back to the brace that holds the inner mudguard (which we kept in)
& the open ends of the tubes had covers welded on them.The number plate & light brackets were bolted to the mudguard mount.
A brace across the frame was welded in place & 2 mounts just in front of the tan, these had anchor bolts fitted so the seat could be bolted to the bike

the cut out was made for the rear light & the paint work began
the tank side panels & seat were all repaired flatted & given a few coats of 2 pack high build primer,
flatted back again & the first base coat colour applied red


, we have just brought out a range of cafe seats
& just made a seat for this bike, modded the frame to suit & done a full paint job
(paint not my choice for the colour scheme but its what the customer wanted & he is happy with it)
this is how it came in
then we made a plug for the seat, then a mould & then a seat unit for it
the frame was cut back to the brace that holds the inner mudguard (which we kept in)
& the open ends of the tubes had covers welded on them.The number plate & light brackets were bolted to the mudguard mount.
A brace across the frame was welded in place & 2 mounts just in front of the tan, these had anchor bolts fitted so the seat could be bolted to the bike
the cut out was made for the rear light & the paint work began
the tank side panels & seat were all repaired flatted & given a few coats of 2 pack high build primer,
flatted back again & the first base coat colour applied red