Honda CJ250 Twin '78 - Brat/Cafe Build

bforshaw

CJ250t (1978)
Scoured the site for the last few years, constantly reading project builds hoping to do my own at some point.

Previous bikes include a good old CG125 and a Beemer 650...had to sell her a couple of years back to buy a cage though. New job, more driving not really the kind of job where you can dash up in your gear helmet in hand.

Gutted.

You can imagine how chuffed I was to find that almost everyone at my new employer are bikers.

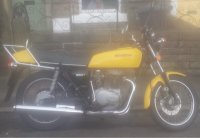
One in particular kept me sane whilst I was doing my 6 month induction/training feeding me with Bike Magazines. He is a classic Italian bike person, but had a '78 Yellow Honda CJ250T for a runabout. 2 owners since new, he was the second! Only done 12k and about as original as is possible. I snapped it up for £800.

This was my trusty little ride around at weekends whilst I was in London during the week. Always wanted to do a Cafe/Brat rebuild but couldn't face tearing a part such an original bike. It even had its original number plates!

I rode, serviced and enjoyed the bike for around 6 months. I live in the Peak District so the stone cottages rarely have garages. The bike lived under a cover out front. It was perfectly covered and it got ridden most weekends. The weekend before it happened I had fitted the newly chromed forks and the brand new exhaust muffler I had sourced from Germany.

Normal Tuesday morning, got up about 5:30 as I had a drive to Nottingham for an Audit. Got changed, had breakfast, grabbed my gear and walked out front.

My front garden is a small cottage type garden with stone walls and a brick herringbone patio. The bike usually stood in the centre, locked with a disk lock and beast of a chain. After all it's a 70s bike, not really attractive to thieves I thought.

When I walked out the first thing that struck me was the pedal bike sat in its place. I thought that's strange, where's the bike. It took a few seconds for me to realise.

As soon as I did I booted the mountain bike over my wall in a rage, ran back inside dropped my bag, grabbed a kitchen knife (daft I know) and went for a drive to some wasteland just down the road thinking they will have taken it there.

It wasn't there. It wasn't anywhere, it was lost. My little, slightly frumpy and very rare Honda was lost. I could only see red, was massively angry and probably did more than my fair share of swearing on the phone to the rozzers.

They were their usual helpful selves...Ie Useless.

The usual mix of sorry, we will look...etc.

About 3 days later it was found...

I was a mixture of sad/happy/angry, the anger was made much worse when the lady from the recovery company informed me of the £150 charge for the privilege of having it stolen.

After much complaining I paid and picked her up.

She was in a sorry state....quite badly bashed up. The seat had been pried open and the electrics savaged, the seat pan was torn and bent, the headlight ignition bracket was smashed and bent and it was full of mud, grass and s*#t.
 
I started the strip down last November, a month after it was stolen.

Its given me the opportunity to breathe new life into the CJ...as much as it annoyed me.

I will upload my progress over the coming weeks as I think I have enough to put on here, slightly delayed...but it will catch up to my current state fairly quickly. I always intended to put it on here but never got round to it at the time. Looking back at all the projects I followed, they were really good reading and they helped to inspire me. So I thought it best to give something back!

Here's a picture to start, it's how it looked the weekend before the theft....
 

Attachments

  • ImageUploadedByTapatalk1415740769.457541.jpg
    ImageUploadedByTapatalk1415740769.457541.jpg
    247.9 KB · Views: 1,312
Subscribed, there's always been something good looking in this model of CJ. I know they were never RD league but the proportions are all right.
 
So that didn’t quite work out… 1 year on and I haven’t posted once! :-[

I started the build thread with great intentions, I wanted to document the build, the wins, the problems etc etc etc….

I was really pleased when Sonreir and Erskine started following the thread, probably got a little bit of stage fright, kinda self conscious about the writing style too…more importantly though my life took over.

In the year that has passed since first posting and creating the thread several important milestones have passed…I got married, my younger brother has had his first son, promotion at work, all the usual busy but don’t realise it stuff. I have made progress on the bike though, although not as much as I had hoped in November.

Originally when starting the bike after it was stolen in October 2013, I didn’t have a garage. I had literally nowhere to work on the bike properly and the work was started outside…Luckily in the December my future Sister in Law and Brother In Law moved nearby, they had a garage and kindly let me use it to start the rebuild.

Being only 5 minutes away, the garage was really handy. I moved the bike over there, all my tools, parts etc and got to work.

So theres a bit of the back story, and some explanation of how I have not posted for over a year!

Heres hoping I can maintain my motivation and get the bike finished whilst at the same time maintaining some sense of dedication to documenting the process on here.

::)
 
As I said, the work started in 2013, so will take a few posts to get up to speed with how the bike currently stands progress wise.

Last post was text heavy so going to try and make this one a little more visually stimulating!


Stripping the bike was fairly easy, for a 1978 bike nearly all of the bolts came off without too much trouble. Nothing seized, no threads stripped. All very easy, much easier than a certain BMW F650 I previously owned!

64916-211215033826-1754104.jpeg


Decided from the start to have a rear hoop and ‘brat style’ seat on the bike, so decided to start marking up where to cut the frame, smoothed out the old seat lock area and removed that tab, also ground out the gouges that thieves had made in the frame forcing the seat.Frame was pretty solid really, very little corrosion other than some light surface corrosion. Strong little bike!

After a few hours cleaning the frame up a little, I took the plunge and fired up the angle grinder…

64916-211215033832-17551261.jpeg


Gone! But I wasn’t finished yet…I wanted flat seat so that hump, well it had to go!

64916-211215033839-1756520.jpeg


Thats better, still lots of tidying up to do now, trying to remove the weld seam from that hump. Looking better already though!
 
Next job was to strip the frame, swing arm, shocks and front forks. Found it pretty easy going really, couple of beers later and it was ready to be welded!

64916-211215040832-1757878.jpeg


My dad helped me to weld the hoop on the frame, it was sourced from a custom roll cage maker on eBay, we salvaged some steel bar to form a centre bung and then temporarily pop riveted the hoop in place whilst we welded it to the frame.

64916-211215040838-17581277.jpeg


The frame and the rest of the bigger components were now almost ready for powder coat, contacted a few of the usual places in the UK, all were pretty extortionate! Then I stumbled across a local powder coating shop, gave em a call on my lunch at work and was pleasantly surprised….not only would they powder coat my frame but they would do nearly the whole bike for a one of price of £85! (about $120). They said it might take 2 weeks as they would fit it in around their usual work, (staircases and fencing mainly) so I snapped their hands off!

Started to prep the frame for powder coat, removed any bushings, put old bolts in any threaded holes and built an elaborate protector for the steering head! Two pieces of wood and some threaded bar!

64916-211215040839-17592446.jpeg
 
So whilst the frame was away at powder coating I got to work ordering some new bits, first thing was to replace the bushings I removed beforehand. Found some good Bronze Swingarm Bushings from the USA they are really nice, should help to firm up the back end too.

64916-211215051756-17602003.jpeg


Got the call from the Powder Coaters! Managed to finish the bike in less than a week!

Picked it up, and wow. What a difference!

64916-211215051803-1761916.jpeg


It looks really smart, took a box of parts with the frame and swing arm, they look good too!

64916-211215051809-17621436.jpeg


Ahead of schedule, I started looking at how to install the bushings without damaging the frame….easy! Put the in the freezer for a few days! Literally shrinks them enough to just slip in nicely. Very much easier than taking the original ones out!

64916-211215051815-1763266.jpeg
 
So you must be thinking great, making progress here… :-\

But no, the scourge of motivation stopped me in my tracks again. Other things took over… :-[

I figured that it was becoming a chore having to walk round to my bro in laws garage plus I was using up the entire space, it was also irritating my SO (she was training to be a teacher at the time). So I decided to get to work on a solution, you may remember I said that houses in our area don’t really have garages, well some of the newer ones do but our 1800s ones don’t!

We had a small, glass conservatory/lean to type structure on the back of our house. Drafts, cold, damp and not enough room to sing a squirrel let alone a cat!

I drew up some plans, did a spreadsheet, explained the benefits to my SO and decided to build a workshop!

64916-211215053741-17642466.jpeg


This is the horrible original lean to!

And this is the new improved, insulated, double glazed WORKSHOP!!

64916-211215053747-1765458.jpeg


64916-211215053754-176659.jpeg


It took about 2 weeks to build, with the massive help of my Dad and my brothers and made me learn that wood is a horrible material to work with! But once it was finished gave me a really good space, that was warmish and waterproof to work in!

I haven’t seen many projects on here that have required the builder to build himself a workshop too!

Once the motivation hits me, I make progress quick, its just finding that motivation that I stumble on!

Man Caves, you have got to love them!

;D
 
My job requires quite bit of travelling, so every once in a while I will take a small piece of the bike with me, some sanding/polishing gear and get to work in the Hotel in the evenings:

I took my breather cover on one of these overnighters and it came back looking pretty good!

64916-211215073557-1767494.jpeg


Eventually I moved everything across into my new Workshop, took a few weeks! In that time I managed to find someone to cut me a custom seat pan, then went through the process of welding some studs on it to fix it to the frame and shaved a few bits here and there. Starting to look like a bike(ish) again!

64916-211215073604-1768758.jpeg


Next job…get the wheels back on, and start the reassembly of the frame!

64916-211215074633-17691150.jpeg


Lights anyone?

64916-211215074639-17702418.jpeg
 
That is going to be nice :) Shame it's taken so long but you're on your way now by the looks of it.

Carry on....
 
Thanks for the encouragement NoRiders!!

With the frame in a good state, time to start a bit of engine work! I know the engine was running very well before the build…I rode it pretty often! So I think the main purpose of this phase would be a top end strip to check the little beggars that stole her didn’t strip the top end white metal bearings. To establish if the bottom end needed looking at I decided to pull the oil strainer and centrifugal filter. Pleased to find no metallic pieces, just the usual gunge and thick oil.

The tool to remove the centrifugal filter is amazing, literally just screw an engine case bolt into the centre threaded hole and it just pops off! Small things…

Based on that I decided to only pull the top end, re-lap the valves, de-coke the pistons, re-seal the valve stems, gasket it up and inspect for any wear. All simple stuff, :p

Opened the engine up to find the top end to be in good nick! Phew! No obvious damage! No big chunks of white metal, in fact it looks pretty much new! It should do really, it might be of 78 vintage but its only done 12000 Miles.

64916-211215124553-1772699.jpeg


64916-211215124559-17731700.jpeg


The pistons were pretty coked up, as were the valve faces/ports. Did a quick isopropyl test on the valves and left it overnight, none seeped through! Had a feeling the valves would still need to be lapped once the carbonisation had been removed.

64916-211215124600-1774117.jpeg


64916-211215124600-17751848.jpeg
 
For now nothing but trust my measurements. In reality I have not dropped the height of the seatpan. The factory standard mudguard would be in exactly the same position....should I be wrong (it's more than likely) then it will be time for some stiffer rear shocks, they are on the list anyway tbh.


Sent from my iPhone using Tapatalk
 
why do you want a bike with shitty suspension and an uncomfortable seating position that gives you less control and less fun ?
 
Great job so far!

Xb33bsa, shitty suspension? Less control and less fun? What makes you think this bike wont handle any differently or be any fun? All he's done so far is weld a hoop in and powder coated the frame.

Sent from my SCH-I535 using Tapatalk
 
I don't care about the collectors. There taste has no impact on me. Im not into motorcycles to make money or collect bikes. Im in it to ride and wrench and hopefully meet some cool people along the way. You my friend make it difficult for newbies to get involved.

Sent from my SCH-I535 using Tapatalk
 
Thanks Stack! Kind words, you are spot on about collectors! Let's be brutal, no one is collecting the CJ250! In the uk most people reminisce about how they had one as a learner, they quickly remember that the superdream was nicer, or how they quickly jumped to the 400F or 550. Sure some folks will call me a heathen, but that's what makes our society free. We are all entitled to opinions, afterall like arseholes everyone has one!

The bike owes me nothing, the fun of rebuilding it, learning new stuff and chatting to people along the way makes it worthwhile.


Sent from my iPhone using Tapatalk
 
Back
Top Bottom