Hondacati GSX-R CL350

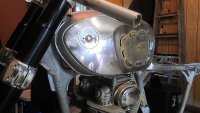
I'm giving it one more shot in the garage today, to get the tank down into the frame where I need it.
You guys have reinforced my persistence to make it work. The tank makes the bike!!!
I've channeled the frame near the wish bone, and it needs another 1/8" per side,
which is a pain in the ass, yet very doable in an hour or two.

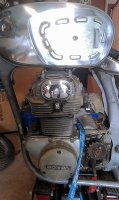
Last night I took some time with a piece of brass round as a punch, and hammered the 'ridge' out of the bottom of the tank.
It had a shoulder on each side of the deepest part of the tunnel...well, it used too. LOL
By concaving this should I gained almost an inch in depth. I also splayed open the seam on the very back on the tank,
taking the very square and rigid shape, into a wedge of goodness. ;)

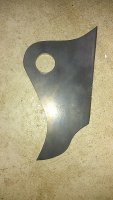
The tank is a VERY nice NOS tank from a local salvage yard, so welding if needed will be perfect.
It's blasted and clean. I'll let you all know how it turns out.
 
Awesome! Looking forward to seeing the results! I had to pound the tunnel of the cb77 tank as well to try and get it to sit lower using a round piece that fit in the tunnel, know what your going through but it is so worth it
 
Well, the tank is on...

Wheeeew. Way deeper of a project than what I expected. The modern GSRX forks were WAY easier to bolt on!!!
One would think that the same brand of tank, only a few years earlier, would be a breeze to adapt. NOPE.
Different animals.
How to do it:
Narrow your CB frame at the wishbone by almost an inch each side. Swoop in the sides and flatten the last 10 inches or so of the top tube sides.
Grind the top of the seam toward the rear just a bit...(not past the tack welds)
Beat out the bottom of the tank to remove the ridge. Remove the rear mounting tabs from the tank.
Move the front locating pins on the frame, down and back 1/2" each way.
Slightly bend the crossover spigot to clear the rear bolt on the head.
Build block off for rear of the tank (to follow) to hide the openness of the tank rear.
Fabricate new rear mounting tabs...
and it drops right on. LOL
 

Attachments

  • IMAG2463.jpg
    IMAG2463.jpg
    178.3 KB · Views: 267
  • IMAG2464.jpg
    IMAG2464.jpg
    171.8 KB · Views: 235
I just adapted a CB160 tank to my CB360 and I ran into similar issues. I kept the stock damper locations on the front, just narrowed them, but the crossovers and the petcock had to be relocated. Also had to switch to a cb400 petcock the stocker was too big and didn't clear the valve cover.

Nice work!
 
plagrone said:
I just adapted a CB160 tank to my CB360 and I ran into similar issues. I kept the stock damper locations on the front, just narrowed them, but the crossovers and the petcock had to be relocated. Also had to switch to a cb400 petcock the stocker was too big and didn't clear the valve cover.

Nice work!

THANKS!! You made me make a mad dash out to the garage to grab the petcock. LOL
It barely clears. LOL the move backwards helped that issue slightly. I hadn't even picked up the petcock to check it.
The crossover tube is very close to the rockerbox bolt, just like the left side.
 
BSA Nut said:
Well, the tank is on...

Wheeeew. Way deeper of a project than what I expected. The modern GSRX forks were WAY easier to bolt on!!!
One would think that the same brand of tank, only a few years earlier, would be a breeze to adapt. NOPE.
Different animals.
How to do it:
Narrow your CB frame at the wishbone by almost an inch each side. Swoop in the sides and flatten the last 10 inches or so of the top tube sides.
Grind the top of the seam toward the rear just a bit...(not past the tack welds)
Beat out the bottom of the tank to remove the ridge. Remove the rear mounting tabs from the tank.
Move the front locating pins on the frame, down and back 1/2" each way.
Slightly bend the crossover spigot to clear the rear bolt on the head.
Build block off for rear of the tank (to follow) to hide the openness of the tank rear.
Fabricate new rear mounting tabs...
and it drops right on. LOL
Just as I thought, piece of cake ;)
 
Yes, john...a piece of cake! LOL

I did manage to get one outer-swingarm plate made yesterday, despite a killer headache for two days. Grrrr.
The right side is nearly cut out and drilled, still needs final shaping.
I also noticed that the right side of the swing arm around the pivot point is too close to the engine,
I need to shave a bit to make some room. Maybe an 1/8" off the inner corner lip of the swinging arm.
Not a big deal, but this is the first time that the engine has been installed with the rear suspension.
 

Attachments

  • pivot plate.jpg
    pivot plate.jpg
    152.5 KB · Views: 415
Finally got the wheels back from powdercoating...
Transparent copper really pops.
;)
 

Attachments

  • IMAG2504.jpg
    IMAG2504.jpg
    185.5 KB · Views: 227
Very happy with these wheels...
It's an odd color to photograph. In the sun they take on so much metallic flavor, they turn orange.
In the shade, they appear more copper. Super sexy bitch-o neat-o.
 
Nice color! It's hard to get a good powder color since you have to go with what's available. Did my thruxton swap rims in gold and there were like 2 choices. Is there a color code or manufacture name for that color?
 
actionabe said:
Nice color! It's hard to get a good powder color since you have to go with what's available. Did my thruxton swap rims in gold and there were like 2 choices. Is there a color code or manufacture name for that color?

Transparent Copper...its a two part powder. Chrome powder first, then the tranny copper.
 
BSA Nut said:
Transparent Copper...its a two part powder. Chrome powder first, then the tranny copper.

Word to the wise:
Do not google tranny copper :eek:
 
namelesspenguin said:
Any more updates?

I've been stuck, waiting for the wheels and such. I want to double-triple check all of my suspension geometry with it sitting on rubber.
I couldn't see mounting up the rubber, then later pulling it all apart again to ship out for powder. I wanted to save a step.
Work schedule has been busy also...tomorrow Im going to pop the bearings back in the front wheel and mount them both on the bike.
I should have a rolling chassis by late afternoon. Pics to follow, of course.
Once everything is acceptable...the wheels will come off, and be returned to my bedroom...where they currently sleep between my wife and I. ;)
-L
 
Back
Top Bottom