MXSeatPro.com
New Member
I see this is a common topic on DTT so I thought I'd throw in my two cents...
I've been an upholsterer for the past 15yrs and run a site where I specialize Motorcycle seats...I'll even leave my site out of this to keep from this sounding like an info-mercial, but here are some tips from an experienced individual on how to make these seats reliable and durable.
I see some individuals suggesting inserting a wood strip to the bottom of a pan as a staple point... First off, The wood idea is ok at best but it doesn't have any integrity and is born to fail. Resin and Wood don't expand and contract the same and will eventually separate. This will work if you want to do this to your own seat on the bike you rarely ride, but I'd never be able to sell that design and keep customers coming back. If you plan on riding your bike in any fashion that requires energy this will not hold. Now I know we aren't racing these bikes but you should be able to drag a knee when you want to and not worry about your seat falling apart.
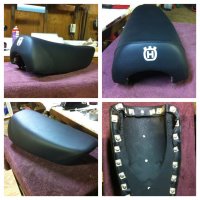
With that being said, A much more durable approach is to sew a hem in the bottom of the seat cover where you would staple it to the pan, if you could, and run a wire through it for reinforcement. Personally I use a small gauge wire doubled over and twisted like safety wire. Make it so the wire enters and exits the hem fairly close to the same point, usually toward the front of the seat. Pull it taunt and rivet one end of the wire to the base of the pan. Grab your pliers and pull the other end taunt while adjusting the cover making the wire pull consistently around the entire seat pan, or a majority of it. Once its pretty even, rivet the other end of the wire to the pan. You'll then go around the cover and place a rivet every 3" or so pinching the wire to the pan.
Make sure You leave enough material at the bottom of your cover for the hem, and to reach the bottom of the seat so the rivet will be vertical when the seat is mounted.
Just for safe measure:
Make sure you us the proper drill bit for the rivet you have. You'll like these holes as tight as the girl that took your virginity, especially with glass. Any wiggle room between a glass pan and the rivet will only get worse.
Use large headed rivets close to the size of a dime , and pre-drill the holes in the pan before putting the cover on. Use an awl to poke holes in the cover, not your drill bit.
Good Luck Tonners!
I've been an upholsterer for the past 15yrs and run a site where I specialize Motorcycle seats...I'll even leave my site out of this to keep from this sounding like an info-mercial, but here are some tips from an experienced individual on how to make these seats reliable and durable.
I see some individuals suggesting inserting a wood strip to the bottom of a pan as a staple point... First off, The wood idea is ok at best but it doesn't have any integrity and is born to fail. Resin and Wood don't expand and contract the same and will eventually separate. This will work if you want to do this to your own seat on the bike you rarely ride, but I'd never be able to sell that design and keep customers coming back. If you plan on riding your bike in any fashion that requires energy this will not hold. Now I know we aren't racing these bikes but you should be able to drag a knee when you want to and not worry about your seat falling apart.
With that being said, A much more durable approach is to sew a hem in the bottom of the seat cover where you would staple it to the pan, if you could, and run a wire through it for reinforcement. Personally I use a small gauge wire doubled over and twisted like safety wire. Make it so the wire enters and exits the hem fairly close to the same point, usually toward the front of the seat. Pull it taunt and rivet one end of the wire to the base of the pan. Grab your pliers and pull the other end taunt while adjusting the cover making the wire pull consistently around the entire seat pan, or a majority of it. Once its pretty even, rivet the other end of the wire to the pan. You'll then go around the cover and place a rivet every 3" or so pinching the wire to the pan.
Make sure You leave enough material at the bottom of your cover for the hem, and to reach the bottom of the seat so the rivet will be vertical when the seat is mounted.
Just for safe measure:
Make sure you us the proper drill bit for the rivet you have. You'll like these holes as tight as the girl that took your virginity, especially with glass. Any wiggle room between a glass pan and the rivet will only get worse.
Use large headed rivets close to the size of a dime , and pre-drill the holes in the pan before putting the cover on. Use an awl to poke holes in the cover, not your drill bit.
Good Luck Tonners!