
We noticed you are blocking ads. DO THE TON only works with community supporters. Most are active members of the site with small businesses. Please consider disabling your ad blocking tool and checking out the businesses that help keep our site up and free.
You are using an out of date browser. It may not display this or other websites correctly.
You should upgrade or use an alternative browser.
You should upgrade or use an alternative browser.
How to widen a tank tunnel
- Thread starter nixon
- Start date
nixon said:frederick said:I spread mine with a scissor jack. Not really sure it was the best way to do it, but it worked. So its an option.
[/
Cool, did it impact on outside shape, or crushed the tunnel metal only?
I think it just kind of spread the whole things a little. It didn't crush the inside, and it didn't really change the way the outside looks.
PLAZACYCLEJOSH
Honda make Josh, happy Josh
There is another option that has not been proposed on this highly entertaining thread, though it may be somewhat cost prohibitive. It also doesn't technically involve mechanically widening the tunnel.
I am not going to say that this is going to be popular to the die hard do it yourself crowd, but I grew up in an auto shop that contracted out work regularly so I have no problem with going to a welding shop. The other thing is that it requires a bit of a humility pill to hand work over to a professional sometimes vs using something from a supplier from like dime city.
So here is what I would recommend based on the assumption that you have the original tank or that you can get a destroyed version of the original tank that just has the tunnel and mounting in tact. Basically you will be making one tank out of two.
The original tunnel can be removed and bronze welded onto the new tank. This gives you the original mounting and clearance and allows you to decide what angle you want the tank to set at.
The bronze welding aspect is important because it is welding at a much lower temperature, which helps the tank not be brittle and it also plays well with most alloys. A high nickel alloy weld could also be used but runs hotter.
for anyone wanting to do something like this I would recommend cleaning and stripping both tanks inside and out. Also finding a local applied technology center that has a welding program can save some $$$
nixon
Active Member
well found some time and beat the top 1/3 of tunnel both sides..great, fits fine.
but i totally missed the bottom section ..the frame has a support on the k7 the k4 didnt have.
will need to cut/weld the bottom 1/3
will talk to some local welders tomorrow.
kinda bumped this for others to lol at previous posts. hilarious.
but i totally missed the bottom section ..the frame has a support on the k7 the k4 didnt have.
will need to cut/weld the bottom 1/3
will talk to some local welders tomorrow.
kinda bumped this for others to lol at previous posts. hilarious.
Ribo
Twist the "go-go" side and hold on!
Got the bump and a lot of laughs from this thread too - I did this recently to get an XJ550 Seca tank to fit on an XJ650 - only needed widening about 1/2 of an inch but I found a way to do it that was fairly neanderthal but also very cheap and quick and easy...
http://www.xjbikes.com/Forums/viewtopic/p=415252.html#415252
http://www.xjbikes.com/Forums/viewtopic/p=415252.html#415252
Doogie said:I learned nothing from this thread and I don't even care.
+1
nixon
Active Member
Ribo said:Got the bump and a lot of laughs from this thread too - I did this recently to get an XJ550 Seca tank to fit on an XJ650 - only needed widening about 1/2 of an inch but I found a way to do it that was fairly neanderthal but also very cheap and quick and easy...
http://www.xjbikes.com/Forums/viewtopic/p=415252.html#415252
nice work...good idea. there is 100 ways to skin a ..rabbit. ( why do cats get skinned??)
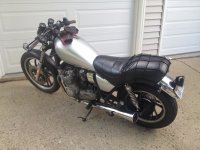
nice bike.. do you have plans changing the seat on it?IMHO reckon it would look mean with the tank ( seat end) raised slightly and a flatter seat
Ribo
Twist the "go-go" side and hold on!
nixon said:nice work...good idea. there is 100 ways to skin a ..rabbit. ( why do cats get skinned??)
nice bike.. do you have plans changing the seat on it?IMHO reckon it would look mean with the tank ( seat end) raised slightly and a flatter seat
Thanks, yeah I'm planning on a full teardown build over the winter with a seat hoop and brat seat that may or may not be swept - not sure yet.. it actually looks better now, I still don't have the new tank on but - did a bit more work since those photo's with all new cables and new MC that allowed me to lower the tach and speedo and I swapped out the front fender and rear light. Rear fender is going to be changed to match soon too..
Attachments
I learned that Junior is no professional. Damn.
Sent from my iPhone using Tapatalk
Sent from my iPhone using Tapatalk


