Follow along with the video below to see how to install our site as a web app on your home screen.
Note: This feature currently requires accessing the site using the built-in Safari browser.
We noticed you are blocking ads. DO THE TON only works with community supporters. Most are active members of the site with small businesses. Please consider disabling your ad blocking tool and checking out the businesses that help keep our site up and free.
I've been working on a "do the ton inspired" ke 125 tracker for quite some time now and after seeing how helpful your guys' inputs can be I finally decided to start my own build page so that i could share it with the rest of you guys. I was able to score a 79 roller along with a 76, 79, and most of a 81 bottom end for next to nothing so I saw some potential. I also got two cylinder barrels (one bored and sleeved), three heads, two stators and rotors (76 and 79), a carb, tank, and gauges and controls and what not. This is my first complete overhaul and first build thread so we'll see how it goes...
My plan is to split the cases and see what i'm dealing with in order to cannibalize a solid bottom end then do some stripping and painting to clean every thing up.
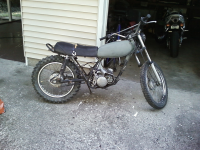
This is what the roller looked like when I brought it home. Thats a 79 frame with the 79 bottem end, mag and carb on it.
so like i said this build has been going on for awhile so I have some catching up to do with the page. Thats not all bad because it should go quickly but the downside is that i dont have very many "before pictures" but I have plenty of afters.
The picture above of the 81 is after I split the case and remmoved the transmission and crankshaft. The motor had only the internals with it.
The 76 on the other hand is a pretty complete bottom end even though the crankshaft is completely siezed. It came with stator and rotor, valve assembly, gear change mech, oil pump, ect and internal parts.
This is most everything I pulled off the 79 and the internals from the 81
Here is the frame after everything has been taken off BEFORE paint...
So moving right along here... After I split the case on the 79 I decided that it was going to be the one i would use for the build. The bearings and seals were in good shape and all the threads were decent. Also I decided to use the head which is from I think the 81 or a completely different year altogether. But as it turns out I dont have any pictures of the stuff before but I have some after claening and painting.
Thats the cylinder I decided to use in the background its the one that is bored 1mm over and sleaved but I dont know if they had sleeved pistons from the factory or not I was hoping you guys could tell me. The reason being only one of my cylinders is sleeved and I'd like to get an idea of what year it is.
For the cylinder and head I had to paint black and polish the fins not original but I just like that look pluss with all the fins going the way they do especially on the head I thought it looked pretty cool. Theese pictures were taken befor clearcoat too so the finished surface comes out a little more glossy.
Next I cleaned stripped and painted the frame and swing arm I wanted something different and something that would make the black and silver on the engine stand out so I went with white. Also I started working on cleaning and painting the froks and triple clamp.
The bars are a little bit bent but thats okay for now too
I'm not really crazy about the brown seat but I had the material laying around so I took out some of the foam and made a cover. Its no where near professional work but for $0 its waht I'm going with for now
The next order of business was to paint the tank. I cleaned it up and rinsed out as much rust as I could it was actually in pretty nice shape not a lot of rust and no dents or cracks. originally I wanted to do a two tone black and white ( black with white sides) but at the last minute I decided to do something a little less original. I didn;t at any point plan to do this as an original rebuild so I went with some wwII fighter influence.
I didnt really mark the tank at all doing the stencil work but a lot of careful taping retaping and looking at both sides turned out pretty nice in my opinion. Both sides match up pretty well.
Yea I'v been going through phases where I like the tank then I dont but I think it might just be the brown seat throwing everything off so I'll put up some pictures without it. Also I want to raise the front end up back to where it needs to be I thought it might look nice a little lower but i'm having second thoughts about that too. Also my piston rings should be here tomorrow so I can finally get the top end put together and get the engine in the frame so I can really tie everything together.
Thats the original chrome on the bars too there wasn't hardly any rust on them so I didn't paint them but I'm thinking about painting them black. Any opinions?
I'm actually a fan of the brown seat. If you went black on it or something, it'd look a little too boring. The tan seat and white frame go well together. But its your bike and not mine . I think the chrome bars are throwing it off though, as you don't have much bare metal on the bike itself. But I'd wait until the motor gets in the frame since that will definitely change how the overall bike looks.
Finally! piston rings came today even though i've been busy with school but class isn;t until noon tomorrow so I guess that means I should pull an all nighter and get the top end put together. I guess i'm just excited because i've been at a stand still for quite awhile now. This is the FOURTH time i've received piston rings in the mail but this time they are the right size and not broken.
By the way does any one know what kawasaki is talking about when they refer to the "ELECTRO FUSE" cylinder I have a theory but i'm not completely sure....
Okay I think I may have answered my own question but some extra input would help. I have two service manuals for the ke 125 (both of which i downloaded free somewhere, if anyone needs them let me know) one is "Revised 5 Dec 26, 1979" and the other is "Fourth edition Dec 10, 1981" the 81 refers to the ELECTRO FUSE cylinder which is the one I thought was just bored and sleeved. It turns out they say you cant hone or bore an electro fuse cylinder but mine is 57mm which is 1 over, any ideas?
Alright guys i'm back, its 3 am its time to drink some beers, play some lucero, and catch you all up. I was ahead of the game when I started this thread so I guess I'll post some pictures I have of the bottem end assembly.
Here's getting the crankshaft in, It was a sunday so I couldn't go to campus to use the arbor press so the case went in the oven and the crank in the freezer, half hour later it dropped right in.
Next was the trans it took a lot of refering to the manuals because i didn't label anything when I took it apart but I kept as much attached as I could so it went together pretty easily. I also checked out the condition of the 81 vs. the 79 parts and tried to use everything that was in the best shape. (I also straightened out that shift drum plate.) eventually...
And here's the case halves before they went together (the first time)
This site uses cookies to help personalise content, tailor your experience and to keep you logged in if you register.
By continuing to use this site, you are consenting to our use of cookies.


") . I think the chrome bars are throwing it off though, as you don't have much bare metal on the bike itself. But I'd wait until the motor gets in the frame since that will definitely change how the overall bike looks.
. I think the chrome bars are throwing it off though, as you don't have much bare metal on the bike itself. But I'd wait until the motor gets in the frame since that will definitely change how the overall bike looks.


