Follow along with the video below to see how to install our site as a web app on your home screen.
Note: This feature currently requires accessing the site using the built-in Safari browser.
We noticed you are blocking ads. DO THE TON only works with community supporters. Most are active members of the site with small businesses. Please consider disabling your ad blocking tool and checking out the businesses that help keep our site up and free.
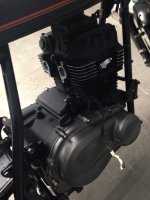
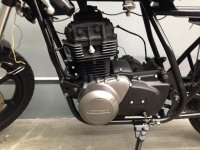
It will definitely suit your bike. You could hit the bigger fins on the upper part with some sand paper and polish. That always looks mint to me. Otherwise just chuck it in as is. Is that the same grey as your forks? Back yourself mate. It's gonna look awesome!
I would remove the paint off some of the bolt heads, grind down the finds and polish, and polish the valve adjustment covers to have some contrast and details. Just my thoughts.
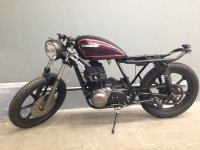
I've got to pull my engine out so a new rebuild and fresh shinny paint will be added........again.
I would remove the paint off some of the bolt heads, grind down the finds and polish, and polish the valve adjustment covers to have some contrast and details. Just my thoughts.
I've got to pull my engine out so a new rebuild and fresh shinny paint will be added........again.
Will put some stainless ellenhead screws in the side covers, the exhaust collor will be the same as the side covers, and yeah maybe the valve covers all so the same as side covers.
It will definitely suit your bike. You could hit the bigger fins on the upper part with some sand paper and polish. That always looks mint to me. Otherwise just chuck it in as is. Is that the same grey as your forks? Back yourself mate. It's gonna look awesome!
that's a shame. i always thought that took a motor from looking like "i just bombed this thing in my driveway in 5 minutes!" to "i actually put some thought, time, and effort into making this look nice." to each his own, though! either way, it's a nice bike.
Put the motor back in today, before hand gave the top 5 finns a polishing, i like it more now. Was before hand a little too much matt black, still need to get the side cover ellen bolts in stainless
that is coming along nicely 8)
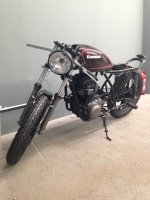
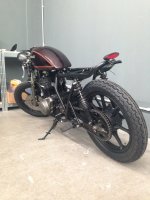
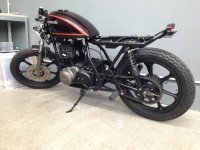
but you have a serious safety issue the rear tire needs a lot more clearance
the way it is now about halfway into the wheel travel it hits the frame could cause a lockup and control issue
that is coming along nicely 8)
but you have a serious safety issue the rear tire needs a lot more clearance
the way it is now about halfway into the wheel travel it hits the frame could cause a lockup and control issue
Do you really think I've come this far along and not A. messured out the bottom out distance of the spring and B. bottomed out the shocks to make sure it doesnt catch ?
Check the first pictures of the bike, i have more clearance now than it did before The bottom out distance on those springs is around 11.5cm all clearance distances i have are around 14cm
I was looking at the pictures on this page the way the pan low across the frame between the shocks it must be the angle of the picture that is really fooling me
I was looking at the pictures on this page the way the pan low across the frame between the shocks it must be the angle of the picture that is really fooling me
just checked my manuel, the travel on the rear shocks is 95mm
i should have more than enough clearance, the picture you are refuring to does fool the eye a bit i think
I was looking at the pictures on this page the way the pan low across the frame between the shocks it must be the angle of the picture that is really fooling me
This site uses cookies to help personalise content, tailor your experience and to keep you logged in if you register.
By continuing to use this site, you are consenting to our use of cookies.

")