Follow along with the video below to see how to install our site as a web app on your home screen.
Note: This feature currently requires accessing the site using the built-in Safari browser.
We noticed you are blocking ads. DO THE TON only works with community supporters. Most are active members of the site with small businesses. Please consider disabling your ad blocking tool and checking out the businesses that help keep our site up and free.
I did have the spring on backwards! What a relief. That's what happens when you take too long to put something back together. Thanks.
Looks like I'll have to take the rear wheel apart because that part is not going back on easy
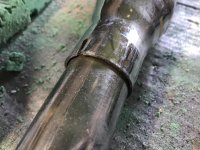
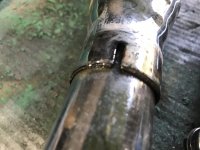
So I was able to get the exhaust extension off of one pipe but the other seems to be stuck. It kind of looks like it's welded or something. Any advice on getting this apart?
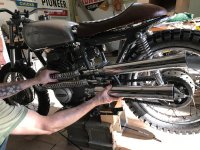
What if I kept the upper pipe the way it is and shorten the lower one? What does everyone think of this look? I don't know about the way the tips flare out.
The pipes are different lengths to make up for the bends at the front
I have the same exact bike
Those mufflers look a lil long to me
I'm going to run wrapped stock pipes all the way down no mufflers
Just read through your thread Miles and it is good to see someone jumping in and giving it a go, glad you are apart of our family mate.
Changing the pipe length will not effect compression. It will have an effect on exhaust pulse reverb but that is only really a problem if you drastically reduce the size or are seeking every last HP out of the engine.
Compression is affected by the valves, spark plugs and pistons. Once the combustion chamber is sealed up nothing external will affect it.
As for my thoughts on the pipes. I think the muffler look good, could be a little shorter. I would try to keep the headers an equal length to help with even power from each cylinder. As for personal preference, I would make the top pipe the shorter one, keeps with the flow of the bike and should keep the headers equal length.
Keep up the good work, I will be watching with interest.
Thanks for all the info, Brodie. Unfortunately I can't shorten the top pipe because it's welded or somehow attached to the muffler, I can't get them apart.
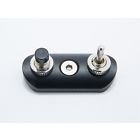
i bought this switch-block on ebay and i really like the concept and minimalist approach, but i cannot figure out how to get the nut on the screw. the nut goes on the inside of the handlebar tube. even if i were lucky enough to get it started, how would i get it tightened? there's no way to hold the nut, not only because of the length of the tube but the wires from the switch is in the way. has anyone else been successful installing this?
Drill and tap a hole in the bar for the screw and eliminate the nut. Or, make an aluminum slug that you can slide into the bar and thread a hole in that.
If youve already drilled the hole and its too big to tap. A nut-sert would work good. If you can get ahold of the tool.
We use them at work for situations like this. I installed them on my aluminum beer rack.
Amazon has metric
https://www.amazon.com/Muzata-Riveter-Thread-Riveting-Included/dp/B01M59GTH8/ref=sr_1_1?ie=UTF8&qid=1500169584&sr=8-1&keywords=nutsert+tool+metric
Thank you for all the suggestions. I looked at the price of that nutsert tool, which starts at $35 and goes up and up, and the handlebars are only $23 so I just ordered a new set and I'll tap the screw hole correctly this time. Thanks again.
Hey guys! Quick question about the throttle grip. I'm not using the original switch block that holds the throttle grip onto the handlebars. So I'm wondering what is going to hold it on now? What have you guys done or purchased to make this work?
Follow up question to this - Is there a front brake light switch? I tore this bike apart almost a year ago. I don't see anything that goes to the front brake handle that will send a signal to the brake light.
Wiring - Yikes. I've eliminated a lot of options on this bike and I'm going for minimal wires. I found these two diagrams online and put them together. I'm confused. Can someone please help?
1. where does the black wire from my starter solenoid go?
2. I bought a 2Fast Moto Rectifier that has 4 wires coming out, Red, Yellow, Orange and Pink. This diagram shows 5 wires going into the rectifier. It shows 3 coming off of the stator when there are actually 4 wires. And the 2Fast box site says that I still have to use the old regulator. where is that in this diagram?
i think i've got the cleaning part taken care of. I've been scrubbing on this engine for weeks trying to get a uniform look. Thanks for all the input. I'm going to buy some high heat paint tonight and get started.
Almost impossible to get a uniform finish on the crankcase, wheel hubs and brake plates on any Japanese alloy from the 60's onwards, that's why factory painted them. You'll find early Honda's only had top case painted, lower case was left 'bare'. Anyone who has polished engine cases knows you find all sorts of variations in the alloy colour due to various impurities and poor mixing. Don't know it's due to majority of parts being high pressure die cast and 'flow' requirements?
Best thing to do is have stuff vapour blasted but cheaper is ordinary 'sand' blasted which leaves a rough surface for painting
Stock shock is 9.5 inches long fully compressed if I remember right. If yours don't move they may be seized or your trying to compress a shock by hand off the bike? On softest setting they will easily 'bottom out' when riding over rough (ordinary?) roads
You've discovered it isn't faster or easier removing the operating arm from brake cam. Always remove adjuster from rod, you have to adjust brake after wheel fitting or chain adjustment anyway.
Pretty sure you won't have enough clearance and may need to 'modify' rear frame. If you look up 'Willow' you can see what happens when lack of clearance and modification get out of hand
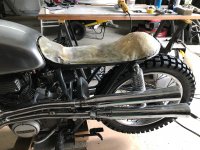
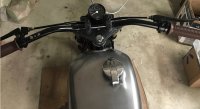
Here's a couple pics of how far I am. I got the seat upholstered for $200 with leather scraps that only cost me $21. I have the switch block installed (what a pain in the ass drilling a square hole in the handlebars) and just an analog speedometer. everything is LED.
I'm not sure how the throttle cable is going to work since I'm not using the original plastic switch block. does anyone have experience with a setup like this? basically i just have the brake lever and the turn signal on the end of the bar holding the grip in place.
now that the winter is over i'm back to working on the bike. I'm trying to hook up the throttle cable but the clamps don't fit over the grip. I bought these grips: https://www.ebay.com/itm/112162551582?ul_noapp=true
and a couple different clamps. the first clamp's channel was too narrow so I bought this one: https://www.amazon.com/gp/product/B019HA2F24/ref=oh_aui_detailpage_o02_s00?ie=UTF8&psc=1
but it seems too small in diameter. what am I missing?
I appreciate the response but now that I have it all wired up I would really like to find a throttle clamp that works with the grip i currently have installed if possible.
This site uses cookies to help personalise content, tailor your experience and to keep you logged in if you register.
By continuing to use this site, you are consenting to our use of cookies.